|
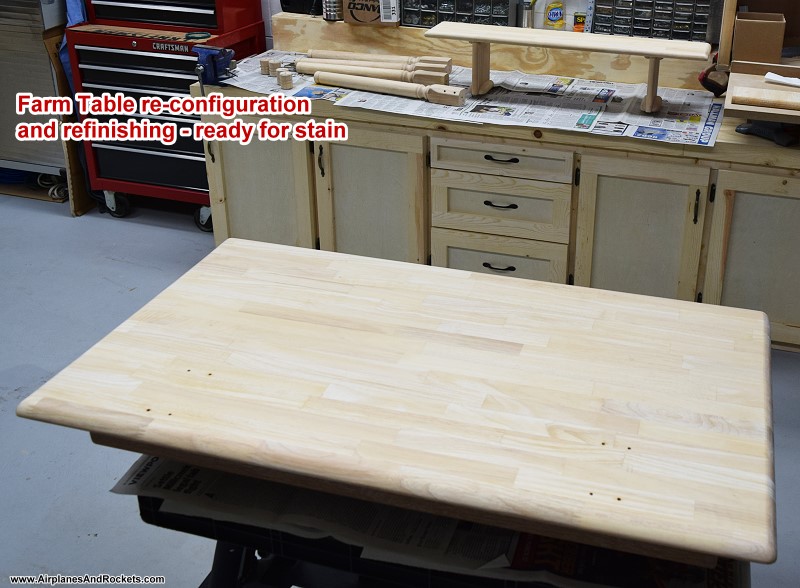
 While reconfiguring and refinishing an old farm table, I decided
to remove the paint from the round legs and stain them instead. A belt sander made quick work of removing
most of the paint (very dry and dusty). Some minor flat areas were created in the process, but I was
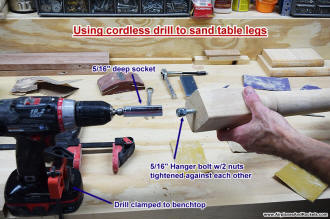
able to retain most of the roundness. I owned a Craftsman lathe many moons ago that would have been
nice to use to sand the legs, but the lathe was sold prior to one of many household moves. In place
of a lathe, I clamped my cordless drill to the workbench and used a used a socket to drive a couple
nuts on a hanger bolt that had been screwed into one end of the table leg. The free end was supported
by my hand. Since the clutch on the drill was set to easily disengage and the turning speed was very
low, there really was not much danger. You could wear a glove on the supporting hand, but I had no problem
with my bare hand. While reconfiguring and refinishing an old farm table, I decided
to remove the paint from the round legs and stain them instead. A belt sander made quick work of removing
most of the paint (very dry and dusty). Some minor flat areas were created in the process, but I was
able to retain most of the roundness. I owned a Craftsman lathe many moons ago that would have been
nice to use to sand the legs, but the lathe was sold prior to one of many household moves. In place
of a lathe, I clamped my cordless drill to the workbench and used a used a socket to drive a couple
nuts on a hanger bolt that had been screwed into one end of the table leg. The free end was supported
by my hand. Since the clutch on the drill was set to easily disengage and the turning speed was very
low, there really was not much danger. You could wear a glove on the supporting hand, but I had no problem
with my bare hand.
Legal disclaimer for lawyers: I assume no responsibility for your
stupid client if he/she/it gets hurt while misusing this method.
 It worked out very well and saved a lot of time. In fact, prior
to sanding I used a round file to clean out a couple of the turned grooves in the legs, and also to
create a new one at the point where a removable section of the lower leg was made. I wanted to be able
to adjust the table to a lower height for use with a computer if necessary, so I cut off the bottom
2" of each leg and reattached the piece from the bottom with a long screw. Where the two pieces meet,
a groove was cut so that the joint would appear as just another groove. The photos tell the story. BTW,
I am left-handed, so you might be more comfortable setting up the drill from the other direction. It worked out very well and saved a lot of time. In fact, prior
to sanding I used a round file to clean out a couple of the turned grooves in the legs, and also to
create a new one at the point where a removable section of the lower leg was made. I wanted to be able
to adjust the table to a lower height for use with a computer if necessary, so I cut off the bottom
2" of each leg and reattached the piece from the bottom with a long screw. Where the two pieces meet,
a groove was cut so that the joint would appear as just another groove. The photos tell the story. BTW,
I am left-handed, so you might be more comfortable setting up the drill from the other direction.
Other Woodworking Tips & Projects:
Posted October 3, 2011
|