|

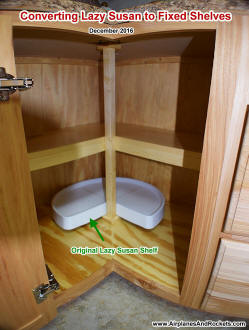
Completed Lazy Susan to Fixed Shelf Base Cabinet Conversion - Shelf Area ≈ 1,820 sq. in.
Our kitchen is pretty small by 2016 standards. For that matter, our entire 920 sq. ft. rancher house is pretty small by 2016 standards. Immediately
after moving in in 2008, we set about performing a complete renovation that
included replacing all the kitchen cabinets (and just about everything else). Melanie does a lot of baking and needed to store a lot of
supplies in the basement because they would not fit in our cabinets. We considered trying to shoehorn another cabinet into the kitchen area
somehow, but there was no reasonable location. So, she came up with the idea of converting the base corner cabinet from its original Lazy
Susan configuration to fixed shelves (see photo above for completed conversion).
Lazy Susan units are convenient in terms of not having to dig deep into a corner for access to items, but there is a lot of wasted space
even in the most well-designed configurations. This particular base unit is an el cheapo off-the-shelf unit from Lowe's, and to save money
the size of the 3/4-round shelves only occupied about 2/3 of the available area. In fact, the back walls stopped about 19" from the front,
rather than extend the full 24" back to the kitchen wall (see photo below). The total shelf area of the two Lazy Susan shelves works out to
about 615 sq. in. By comparison, the total fixed shelf area is about 1,820 sq. in., so the multiplication factor is about 3x.
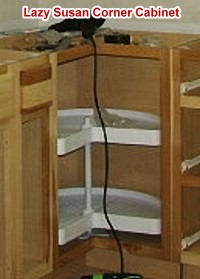
Original Lazy Susan Base Cabinet - Shelf Area ≈ 615 sq. in.
Conversion began by removing the two back false walls and the floor. Support pieces were installed for the new floor and then 1/2"
plywood was fitted and glued and nailed in place. 1/4" plywood was used for the new back walls that are nailed directly to the kitchen wall
in order to get the maximum usable space. A 1-1/2" square vertical post was needed to support the countertop since there is a 45° joint in
the countertop in that corner. Finally, shelf supports were glued and nailed in place and the 3/4" thick solid pine top shelf was glued and nailed in place as
well.
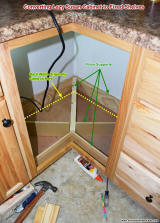
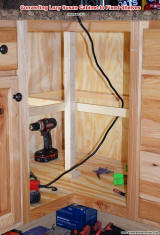
Construction Process
All the wood was sanded smooth prior to installation in order to avoid having to do the hard work in a cramped space (my aging body
protests in positions other than straight). Some additional sanding was needed to make all the edges flush. After vacuuming the entire
assembly and using a tack rag to remove dust, three coats of Minwax semi-gloss polyurethane was brushed on, with light sanding and cleaning
between coats. No stain was used on the bare wood, although in retrospect I probably should have added a bit of brown tint to offset the
yellowish pine color. It's not worth the trouble at this point; the next owner of the house can do that ;-)
The picture below illustrates how much wasted space there was with the original plastic Lazy Susan shelves. The storage space gained is
approximately the equivalent of having added an 18-inch-wide base unit (including the drawer space).
Size Comparison of Lazy Susan and Fixed Shelf
Other Woodworking Tips & Projects:
Posted January 13, 2016
|


