|
Indoor airplane models covered
with microfilm seem to have always been for a very particular, dedicated group of
modelers who possess the patience, steady hands, and eyesight (aided or not) to
build and maintain very delicate structures. A directed sneeze can literally blow
them to pieces. It is an aspect of aeromodeling into which I have never ventured.
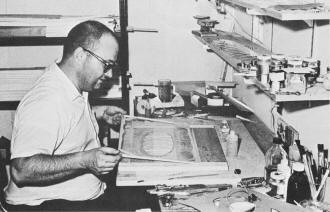
Mr. Joseph Bilgri, AMA #4393, was a contest-winning pioneer of the craft. The
AMA History Project has a biography of Joe that is worth reading
if you have an interest in indoor modeling. Of course today, with the advent
of nano-size radio controlled and free flight models, the realm of indoor flying
has increased considerably beyond wire-framed surfaces covered with bubble-thin
sheets of microfilm. This 3-part series on indoor models begins with a construction
article and ends with proven methods for successfully repairing damage. It
appeared in the March 1971 issue of American Aircraft Modeler magazine.
See Part 1: Bandersnap, Part 2:
Pouring and Covering with Microfilm, and Part III:
Bilgri Patching and Covering Methods.
Bilgri Patching and Covering Methods for Microfilm
 Tom Vallee Tom Vallee
By the grapevine, author learned these two elements for serious microfilm modeling.
The Bilgri System of microfilm covering is more suitable for lighter, more advanced
models, such as FAI (world championship) class indoor models. This system was first
described in print by Joe Bilgri in a famous series of indoor articles in 1960 and
now deserves repetition. Patching techniques will also be covered because it is
virtually impossible to keep an indoor model flying very long without them.
As the first step in the Bilgri method, take the building template for the wing
or stab to be covered and trace its outline in pencil on a building board or workbench
top.

Patching starts by wetting the film around the hole lightly with
water.

The patch is put over the hole and attached by touching it between
two fingers.

Lift off paper gently. Smooth out the wrinkles with water. Remove
excess film.

Removing microfilm from backing paper.

First step in Bilgri method is wetting board one inch beyond
the wing structure.

Lay film over wing, then blow on it so it adheres completely
to structure.

After partial drying, cut excess film away with hot wire or acetone-dipped
brush.
Place the wing (or stab) on the penciled outline. Then wet the surface of the
building board for the width of an inch just outside the outline. Also wet the top
of the wing spars and compression ribs; using a soft brush dipped in tap water.
Be careful to get as little water as possible inside the wing spars.
Next take a frame of slack microfilm (several inches longer and wider than the
part to be covered) and lay it film side down over the wet wing (or stab, etc.)
. Blow gently on the film as it settles down over the wet framework, so that the
covering adheres nicely to the wing outline. Use a finger to pat down the film on
the one or two spots where it has not adhered.
A few minutes later, when the wet wing has partly dried, cut the film along the
outside of the wing spars with a hot wire or a brush dipped in acetone. If using
the latter, the brush must be "dry," with just enough acetone on it to cut the film
on the outside of the still wet wing spar, but not enough to dissolve the wing covering.
Most modelers will find a hot wire easier to use.
At this point, the wing tends to stick to the board or bench top. To free it,
carefully and slowly slide a razor blade between the bottom of the wing spars and
the building board.
Indoor wings are covered flat and dihedral added after covering. Hold the wing
down with small weights, crack the wing spars with a sharp blade at the dihedral
break and carefully block up the wing tips. Apply small drops of glue at the dihedral
joints and the wing is ready for mounting and bracing.
Microfilm is fragile and few indoor builders finish construction without poking
at least one or two holes in the covering. Does this ruin the model? Certainly not!
Holes are quickly mended with squares of microfilm patching material and the plane
is ready to fly!
Making patching material is easy. Lay a frame of microfilm, film side down, on
a sheet of Japanese tissue. Lay a second sheet of tissue over the film. Cut around
the inside of the frame with a sharp, blade and carefully lift the frame and excess
tissue free. The result is a sheet of microfilm patching material, a sandwich of
microfilm between two sheets of paper. From this, patches of any reasonable shape
and size easily can be cut with a pair of scissors.
Microfilm patching material is an easily prepared sandwich of microfilm between
two sheets of paper (Japanese tissue is best). Use a pair of scissors to cut individual
patches to proper size. Open the 'sandwich'. The microfilm will stick to one of
the pieces of paper. The patch is now ready to be applied to your model. See photos.
To repair a hole in the wing, simply cut a patch of the right size and remove
one piece of tissue. The microfilm will stick to the other piece of tissue. This
is the patch proper - a piece of film backed by paper.
Using a soft brush, apply a few droplets of water to the film around the edges
of the hole. Carefully place the patch, film side down, over the hole. Then press
the patch between two fingers, not from one side only, against the wing. Remove
the backing tissue with the aid of a moistened finger tip. Smooth down any loose
edges with a water brush and the model is ready to fly. In case of a jagged irregular
hole, the procedure is same, except droplets of water are applied to film side of
the patch to avoid spreading the tear in the wing film.
This business of being able to patch indoor models is most important because,
quite often, an indoor beginner will come to a contest with his first serious indoor
model, damage the film and give up, assuming his model is ruined. Yet, after some
simple field repairs, the models could be back in the air in a few minutes! Witness
my own experience as a beginner.
About five years ago, when I first began serious indoor modeling, I showed Bill
Bigge a picture of Joe Bilgri holding what looked to be a completely demolished
indoor model with a folded-up wing whose spars were broken in several places.
Imagine my amazement when Bill said Joe Bilgri's "demolished" model probably
was flying good as new within an hour after the photo was taken. Bill's reasoning
was a follows: Since Joe covered his models with dry (non-sticky) microfilm, it
would be a simple task to unfold the wing, which would be held in place by the brace
wires. Then a few drops of glue applied to the broken spars would leave the wing
strong as ever.
Bill went on to say that it would be a simple task to mend any torn spots with
microfilm patches. At that point, the model would be ready to fly and perhaps even
win the contest!
I was elated at having this information! After considerable effort, I had just
finished my first serious indoor model, only to poke a big hole in the microfilm
near the middle of the wing. I thought the model was ruined and that the wing would
need to be dismantled, recovered, and braced again, a considerable project for a
beginner.
After a little instruction from Bill, the wing was soon mended. Shortly after
this, proudly wearing its patch, that model was flown to a win in my first indoor
meet, thanks to Bill's help. Now, when going to a contest or flying session, I always
take along a sheet of microfilm patch material for field repairs.
Any minor damage to my models can be remedied as it occurs.
My favorite model, at present, is the Snark FAI. It is two years old and still
covered with the original film. It has participated in over sixty full-bore contest
flights at seven different meets and has set several low-ceiling national records.
The wing may be full of patches, but the model still flies fine.
Many outdoor modelers certainly don't get this much use out of their ships so,
if it's possible to get this many flights out of a lightweight indoor model, perhaps
these flyweight ships are much easier to build and handle than most people realize.
Certainly building good indoor models is within the ability of any serious free
flight modeler. Two previous parts in this series (Jan., Feb. 1971 AAM) have covered
other necessary techniques. The first article included full-size plans and building
information for a small indoor model, the Bandersnap, suitable for the smaller flying
sites where most indoor modelers do their first serious indoor flying.
The second article covered techniques for making frames of microfilm and a simplified
system for covering indoor models with microfilm. Dubbed "The Quick and Easy System,"
this method is easy to master and particularly suited for covering heavy beginners'
models.
|


