|
Website visitor Kenneth E. wrote
to say that he is working to build a complete collection of the Tenderfoot models
that were published in American Aircraft Modeler magazine. The Tenderfoot
series was an attempt to provide motivation to young newcomers to the hobby. They
were a mix of freeflight rubber, gliders, control line designs that built simply
and cheaply. Power could be muscle (hand launch), CO2, rubber band (wind-up or catapult
launch), and and internal combustion engine 1/4A (.010 and .020) & 1/2A (.049 and .051)
using glow fuel or diesel fuel. Kenneth requested reprints of the following three models:
The Saucerer, a unique
control line model by Ray Malmström (January 1970), the
Bonanza and Mustang,
free flight hand-launched glider by David Thornburg (January 1971), and the
Clodhopper free flight
rubber powered model by Paul Denson (February 1973).
SAUCERERA simple-to-build and fly model that IS different.

Saucerer is lively sport ship for learning to fly upside down,
loops, and wingovers. Being almost unbreakable, it is a fine confidence builder.
It uses 049 engine.
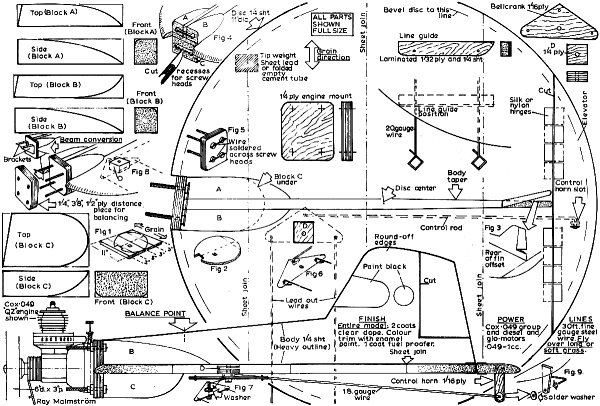
Full-size plans on next two pages include many helpful building
sketches. Plane is mostly 1/4" sheet balsa. No airfoil, as such, is carved, but
bevel wing edges.
Before painting, sand model all over with fine sandpaper. Blow
off dust and brush on several coats clear dope. Use extra fine sandpaper between
coats, then trim with color.
 By Ray Malstrom By Ray Malstrom
FLYING fun comes in all shapes and sizes, and it certainly will be yours, if you
circulate with this circular-shaped space-age flavored flying saucer.
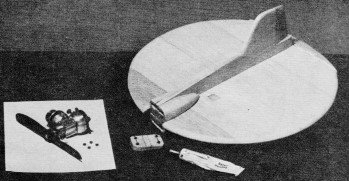
Construction: Cement together 1/4" balsa sheet cut to the dimensions
in Fig. 1. Draw a center line across the sheets, and with a pair of compasses draw
an 11" diameter circle. From the plan, trace and transfer to the circle the angled
cutout for the motor mount, the elevator line and the small square that will accommodate
the bell crank mount D. Using a fretsaw, cut out the disc (Fig. 2). Bevel the edges
with fine sandpaper. Cut the elevator apart and rejoin using nylon or silk hinges.
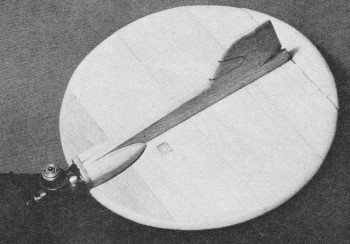
Cut a small slot in the elevator where shown for the control horn. Cut the body
from 1/4" sheet. Note that it is tapered (use sandpaper on a block for this) towards
the rear. The rear of the fin is cut away and re-cemented back at an angle (Fig.
3).
Now cement body piece along top center-line of disc. Cut hose blocks A, Band
C from block balsa. Shape with knife and sandpaper and cement in position. Gouge
out recesses for bolt heads (Fig. 4). Cut engine mount from 1/4" plywood, and drill
holes to suit the engine you intend to use. Insert mounting bolts from the back,
and solder pieces of wire across the heads to prevent them from turning (Fig. 5).
Firmly cement the engine mount into the cutout on the disc and against the face
of blocks A, Band C. Make a really firm job of this, and see the engine mount points
the correct amount to the right.
Cut a bellcrank from 1/16" ply (or use a metal or plastic commercial bellcrank
of similar size), and bellcrank mount D from 1/4" ply. Drill D to accept to bolt,
and make sure it is a tight fit. This is important. Cut control rod, and leadout
wires over-length at this stage and assemble to bellcrank, bending as shown (Fig.
6). Pass the bolt through the central hole in the bell crank, slip on a washer or
two (Fig. 7), and screw firmly into part D. The bellcrank mount (complete with bellcrank
and wires) is firmly cemented into the square recess already cut in the disc (Fig.
8). Make the line guide, drill holes, and slip it onto the leadout wires and cement
to the undersurface of the disc in the position shown. Do not yet form the hooks
on the leadout wires.
Cement the 1/16 ply horn into the elevator slot firmly. Use plenty of cement.
Connect rod by bending the end and slipping through the hole in the control horn
and locking with a soldered washer (Fig. 9). Be sure the bellcrank is in the position
shown on the plan and the elevator is neutral (flat) when you connect up. Now cut
off the excess from the leadout wires and bend the hooks. The hooks should be level
(as shown on the plan) when the elevator is in the neutral (flat) position. Take
care over this connecting up, as accurately lined-up controls make for really sweet
and easy flying. Add a small weight to the starboard edge of the disc as shown.
Hold in place with several layers of tissue doped on. Finally dope and finish your
Saucerer as detailed on the plan, and bolt the engine in position.
Flying: Before that eagerly anticipated first flight, balance
your flying saucer carefully. Tie a length of thread to a pin, and push the pin
into the body at the balance point shown on the plan. Your model must balance level.
Slight nose-heaviness does not matter, but tail heaviness must be avoided. It is
unlikely that you will need any weight at the rear, but with varying engine weights
you will most likely need a little additional weight in the nose. This can be achieved
in two ways: Simply by adding some sheet lead (only a little will be needed) under
the engine mount and block C, or by cutting a false firewall from plywood (around
1/4" to 1/2" thick) and positioning it between the engine and its mount. This way
you move the engine further forward and achieve correct balance without the necessity
of adding extra weight. Fig. 8 explains this simple and very neat method of balancing.
Take your choice, but either way, do make sure your Saucerer balances on the balance
point. You'll be glad when you take off on that test-flight!
Wing-overs and loops are possible with Saucerer after you are acquainted, so
good luck and happy circulating. And choose soft grass to fly over.
MATERIALS LIST
Three 1/4 x 3 x 36 balsa, one 1/4 x 3 x 20, one 1 x 6 x 1, one 2 x 2-1/4 X 3/4,
one 1/4 x 2 x 2 plywood, one 1/16 x 2-1/2 x 1-1/2, one 1/32 x 2-1/2 x 1/2, one 9"
length 1/16 music wire, one 14" length 1/32 music wire.
Saucerer Plans <click for larger version>
Notice:
The AMA Plans Service offers a
full-size version of many of the plans show here at a very reasonable cost. They
will scale the plans any size for you. It is always best to buy printed plans because
my scanner versions often have distortions that can cause parts to fit poorly. Purchasing
plans also help to support the operation of the
Academy of Model Aeronautics - the #1
advocate for model aviation throughout the world. If the AMA no longer has this
plan on file, I will be glad to send you my higher resolution version.
Try my Scale Calculator for
Model Airplane Plans.
Posted July 29, 2024
(updated from original post
on 6/26/2011)
|