|
I did a quick Web
search on how to repair damaged book bindings, and as is typical, most of what
is out there is a rewritten regurgitation of other pages. Tape and glue are the
order of the day per those instructions, but that is really insufficient to
effect a good repair on books - particularly older volumes - which use string
and fabric along the spine to form a very rugged and durable binding for
standing up to repeated use. When you desire to restore a book to as close to
its original condition as possible, the more extensive method described in this
1965 Popular Mechanics magazine article is needed. All the tools and
materials required are described, as is instructions for assembling a book
binding press to compress the pages to form a minimal thickness, and to prevent
the spine edge from ending up thicker than the rest of the book.
Rebinding Damaged Books
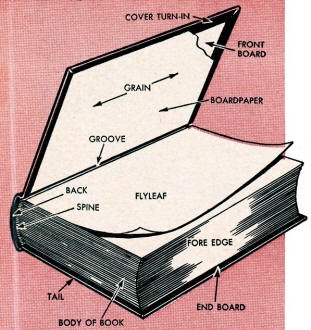
Anatomy of a book.
By Manly Banister
Nobody should throw out a good book just because the binding is damaged. Chances
are it's one of your favorites, for these always receive the most handling. Often,
the damage can be repaired in a couple of minutes with a little glue or paste. Sometimes
a complete tearing down and rebinding may be required. But in either case the investment
in time and materials is negligible when balanced against the result.
You don't need a lot of expensive equipment to repair books. The most important
piece of equipment is a book press, and the easy-to-build unit detailed on the opposite
page is quite satisfactory for most jobs. In addition, you'll need scissors; a ruler;
a hammer or mallet; a bone "folder" (or make a wooden one by curving the ends of
a flat stick and rounding the edges); a sharp knife, and a large needle.
Materials used in repairing books are also inexpensive. In addition to the paper,
mesh-cloth "super," cover boards and book cloth, you'll have to buy a spool of #25
linen thread, a cake of beeswax (for waxing the thread), a small can of hide glue
and a jar of library paste. All of these may be obtained at a bookbinder's supply
house.
One thing to keep in mind when repairing books: Paper, like wood, has a grain
running in a given direction, and every piece of paper put into a book must have
its grain running vertically, from the head to the tail of the book. Otherwise,
it's bound to buckle and cause trouble. One simple way of determining the direction
of the grain is to fold a sample sheet and wet the crease. If it dries smooth, the
grain runs parallel to the fold. If the crease buckles. you've folded the paper
across the grain.
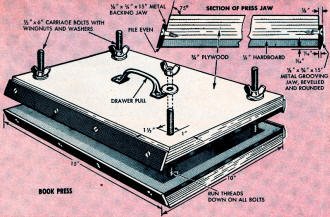
A homemade book press, a few common tools, and you'll be able
to handle anything from a torn hinge to a complete rebinding
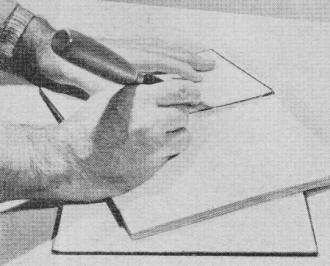
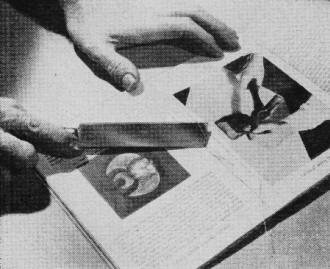
1 - With a sharp knife, cut through the hinges on both sides
to free the body of the book from covers.
2 - Clamp book in the backing jaws of the press and scrape
off all the paper backing, super and glue.
3 - Starting with the first section, find the center and cut
each stitch. Do the same to all the sections
4 - Separate body into sections and flatten the groove in each.
Cover with paper to prevent damage.
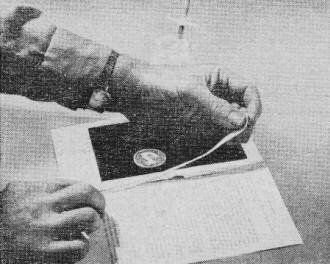
5 - If outside sheet of section is torn, repair it by pasting
a 1/2-in. strip of bond paper over the tear.
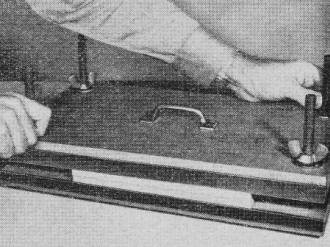
6 - Reassemble body, stacking sections fold to fore edge in alternating
groups. Keep in press overnight.
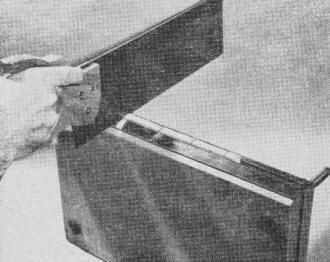
7 - Use a dull saw to make four unequally spaced cuts about 3/32
in. deep in spine of collected sections.
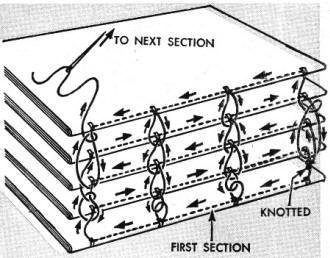
8 - Sew sections together using the lockstitch shown above. This
is described in detail in the article.
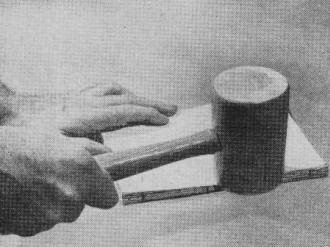
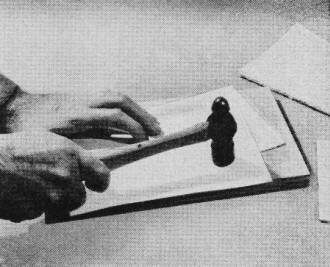
9 - Sewing thickens the spine, but pounding with a hammer or
mallet will embed threads in the folds.
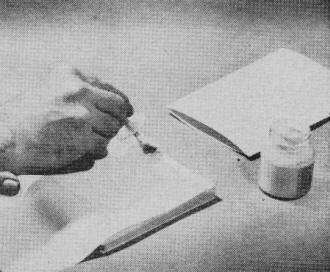
10 - To attach new endpapers, apply a 1/4.in. strip of paste
down the folded edge of outside sections.
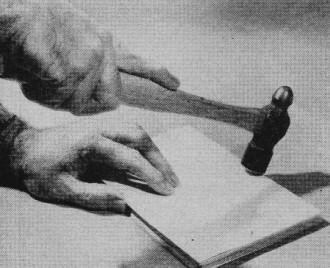
11 - After applying flexible glue to spine, tap it into a rounded
shape before the adhesive has set.
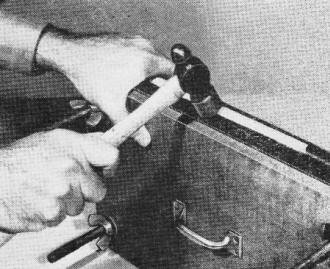
12 - With book clamped in angled backing jaws, turn edges of
sections outward with glancing blows.
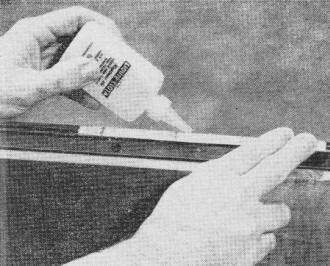
13 - Once shaping of spine is complete, apply a thin coat of
flexible glue and rub it in well with fingers.
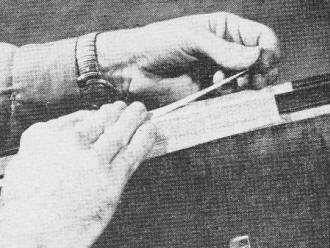
14 - Cloth backing, or "super," should be rubbed down into glue,
then covered with a strip of paper.
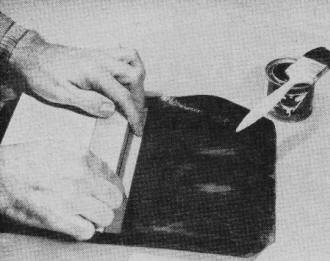
15 - When bookcloth has been cut, position body and boards on
it and glue spine-size paper in place.
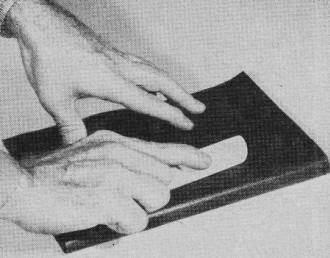
16 - With body in position, glue bookcloth to boards, working
out the excess glue by rubbing with folder.
The following steps, numbered to correspond with the illustrations, cover a complete
rebinding. This will probably only be necessary if the book is in very bad shape,
with the sewing loose and sections coming apart. To repair less severe damage-broken
cover boards, torn flyleaves, etc. - simply follow the appropriate steps.
Step 1. Cut the body of the book free of its cover by slashing
through the hinges on both sides with a sharp knife. Tear off the flyleaves and
throw them away.
Step 2. Clamp the book in the angled backing jaws of the press
and dampen the spine. (If old glue is really hardened, spread on a layer of library
paste and let it stand a while.) Scrape off the paper backing, the mesh super and
the glue, down to the folds of the sections.
Step 3. The body of the book is composed of sections called
"signatures" in the trade - a series of sheets folded together, usually forming
either 16 or 32 pages. Find the center of the first section, disclosing the sewing
thread, and cut each stitch down the gutter. Do the same to the rest of the sections.
Step 4. Carefully separate the sections. Note that each is creased
close to the fold. This is the "groove," formed in the backing, and it must be hammered
out. Protect the face of the section with a sheet of waste paper and hammer out
the groove, one section at a time.
Step 5. In separating sections, it often happens that the outside
sheet of a section becomes torn. Before resewing the book, it is necessary to repair
these sheets. Cut 1/2-in. strips of 11-lb. bond paper, or similar, as long as the
page. Layout the damaged sheet or sheets with the inside of the fold up. After applying
paste to the strip, stick it over the torn fold, being careful not to stretch the
paste-dampened strip. Then rub it down and put the sheet aside. When all such sheets
have been repaired, gather them together with protective sheets of waxed paper between,
squeeze for a few minutes in the press, and lay them aside to dry.
Step 6. Reassemble the sections and stack them with the fold
to the fore edge in alternating groups of two or three. Place a sheet of waxed paper
or aluminum foil on each side and run the press wing-nuts down as tight as you can.
Let the sections stand under pressure overnight.
Step 7. Take the sections out of the press and assemble them
in the proper order. (Take care you don't put a section in upside down!) Clamp them
in the backing jaws of the press, leaving about 1/4-in. projecting. Make four or
more unequally spaced marks across the back, and saw each mark with a dull saw about
3/32 in. deep (deep enough to cut through the innermost fold of each section). The
head and tail sawcuts should be placed 3/4 in. from ends of spine.
Step 8. Sewing by the lockstitch method has the advantage that
no special equipment is needed. Lay the first section face down on the edge of the
worktable.
Thread the needle with a couple of feet of thread. Pass the needle into the tail
saw cut at the head. Draw loops of thread out through the other sawcuts with a crochet
hook or poke them out from inside with the eye end of the needle. Lay on the second
section, pass needle in through sawcut at head and out through next sawcut down
the back. Pass needle upward through the loop protruding from the section below
and back into the same sawcut. Draw the loop firm (but not too tight) to form the
lockstitch. Finish sewing section one to section two and tie the two threads together
at the tail sawcut with a square knot.
Section three and all following are sewed in the same manner, except that there
are no loops protruding. Pass the needle behind the stitch in the next lower section,
then back into the section, out at the next saw cut, and so on.
At the end of each section, the section is anchored to the one below by means
of the "kettle stitch." Pass the needle behind the thread below, then bring it around
and up through the loop of thread thus formed and draw it snug. When you come to
the end of the thread, tie on another length so that the knot ends up inside a section.
When the final section is sewed on, finish off with a couple of kettle stitches
down the back and cut off the thread about an inch long. This will be glued down
to the spine of the book.
Step 9. Sewing leaves the spine thicker than the rest because
of the bulk of the thread. "Knock down the swell" with a mallet or hammer, embedding
the threads in the folds.
Step 10. New endpapers may be made from regular endpaper stock
(obtainable at any bookbinding supply house) or any other strong paper, even Kraft
wrapping paper. The fold is made with the grain, and the folded sheet should be
exactly the size of the body of the book. Protecting the face of the book with a
sheet of paper, apply a 1/4-in. strip of paste down the folded edge. Then lay the
endpaper over the body and rub it down. Turn the body over and attach the other
endpaper in the same way. Let it dry under a pressure.
Step 11. Normally, the book won't need trimming. However, if
the sections are badly uneven, have a printer trim about an eighth of an inch from
all three open edges with a guillotine. Apply a thin coat of flexible glue or Liquid
Cloth to the spine. (You can make flexible glue by adding 1 1/2 teaspoonsful of
glycerin to an ounce of liquid hide glue.)
Then, before the adhesive is wholly set, tap the spine into a rounded shape with
the hammer. Push in the fore edge with your thumb while drawing the top sections
toward you with the fingers.
Step 12. To complete the backing, place the body in the angled
backing jaws of the press, leaving 3/16 in. of the endpapers exposed on each side.
The idea here is to turn over the sections from the middle toward each side, reforming
the groove noted before you tore the book down. Draw the hammer toward you with
each stroke, making glancing blows that tend to turn the fold-edges of the sections
toward you. Work the full length of each side of the book until a smooth, rounded
spine is obtained, with edges bent over against the metal jaws of the press.
Step 13. Apply a thin coat of flexible glue to the spine of
the book and rub it in well with your fingers.
Step 14. Prepare a piece of super (a mesh cloth) or crinoline,
obtainable from a dry goods store. (Unbleached muslin can also be used, or canton
flannel, stiffened by dipping in a starch solution. Iron the flannel when dry.)
The super should be long enough to reach from tail kettle stitches to head kettle
stitches and wide enough to overhang the book 1 1/4 in. on each side. Rub the cloth
backing down into the glue. Now cut a strip of Kraft paper, or ordinary newspaper,
as wide and as long as the book's spine, and glue it over the cloth.
Step 15. To cover the book, you will need bookcloth or Fabrikoid,
obtainable from a bookbinder's supply house. (For this you can substitute paper,
leatherette, or even automobile upholstering plastic in sheet form. If the upholstering
plastic has a cloth backing, remove the cloth.) Do not use ordinary cloth or anything
else that will let the glue soak through and spoil the appearance of the book.
You can use the old boards or make new ones from mill board or heavy cardboard.
Be sure to cut the boards with grain running from head to tail. Make them the same
size as the old boards if the body wasn't trimmed; otherwise, make them as wide
as the body and 1/4 in. longer. When 1/8 in. is left at the back edge for the groove,
the boards will overhang the fore edge 1/8 in. all around.
Cut the bookcloth to wrap completely around the book, plus 3/4 in. extra at each
end and 3/4 in. along each side. Mark a rectangle the exact size that will be covered
by the book on the inside face of the cloth, then coat it with thin runny glue.
(If the glue is thick, thin it by heating in a pan of water.) Clip off all four
corners of the cloth to within 1/8 in. of the corners of the rectangle.
Lay the end board on the glued cloth in exact position, then position the body
of the book on the board. Cut a strip of Kraft paper as wide and as long as the
book spine and glue it to the bookcloth, as shown in the photo.
Step 16. Don't hurry! Glue sets slowly. Check everything for
squareness as you go along. Lay on the front board so that it overhangs evenly all
around, leaving a 1/8-in. groove between the back edge of the board and the turn-up
on the book. Bring the cloth tightly over the back of the book, lay it down on the
front board and rub it down with your folder. Use the rounded edge to rub in the
groove. Work the folder from back edge toward fore edge and to-ward head and tail
to work out any excess glue. (A sheet of waxed paper under the board will prevent
glue from running on the edges of the book). Now, turn the book over and rub down
the other side.
Step 17. Remove the case (as the cover is called) from the body
and lay it board-side up on the table. Turn the cloth over the edge all around and
rub down the turn-in, squeezing out all excess glue, which can be wiped up with
a damp cloth.
Step 18. Return the body of the book carefully to the case.
Place waxed paper or foil between the boardpapers and the boards and wrap another
sheet around the book. Insert in the grooving jaws of the press and tighten the
wingnuts. Tear the foil away from the back of the book and pick out and shape the
corners of the cloth with a pointed folder or stick. Leave the book in the press
overnight.
Step 19. Remove the book from the press and separate the case
from the body. If the case is stuck along the edges of the back so that the body
can't be freed, don't worry about it. The turn-in is trimmed only on the boards.
(Don't ever try to trim it across the spine, or you'll cut through the cloth and
spoil the case.) Mark the turn-in 3/8 in. wide around the open edges of each board
and trim out with a sharp knife and straightedge. Pull out the excess cloth and
discard it.
Step 20. Place newspaper under the boardpaper to protect the
book and coat the face of the boardpaper with thin glue. Glue the super tab down
to the boardpaper, but keep glue out of the groove.
Close the cover on boardpaper, then open and rub the boardpaper down with your
fingers. Withdraw the newspaper, replace it with waxed paper or foil and close the
cover, then glue the second boardpaper.
The book is now ready for a final pressing. Be sure to have waxed paper or foil
between both boards and the book to prevent moisture from soaking through. Wrap
waxed paper around the book and place it in the grooving jaws of press.
The title can be handlettered, typed, or printed if a small handpress is available,
on a piece of colored artpaper. Glue the title to the back of the book and leave
book in press at least 24 hrs.
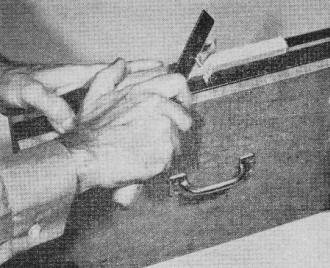
Repairing a Torn Hinge. Where one or both boards are pulled
away from the body of the book, cut the board free from the body of the book and
lay it back. Then glue a strip of super to the spine (with flexible glue) covering
its full width, plus about 3/4 in. to form the new hinge. Glue a strip of newspaper
backing over the super. Cut a strip of Kraft paper 1 1/4 in. wide and as long as
the page. Fold over 1/4 in. along one edge, paste this to the flyleaf and rub it
down. When dry, apply paste or hard hide glue to the strip, as shown in the photo,
fold the super over it and rub down. Close the board on the book with waxed paper
under the Kraft strip and press be-tween the grooving jaws for 24 hrs.
To avoid breaking the back when the rebound book is opened, open it this way:
Stand book on spine and let covers fall open. Open the book a few sheets at a time,
a few at front, and rub them down in the groove; a few at the end, and rub them
down. Continue thus until the middle of the book is reached.
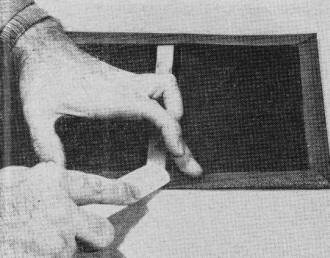
17 - Remove case and turn excess cloth aver edges all around,
squeezing out excess glue with the folder.
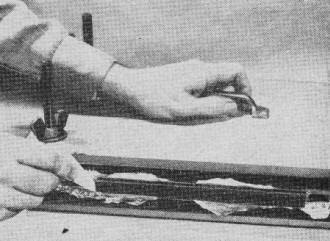
18 - Replace body in case and clamp book in grooving jaws of
press. Shape corners and let dry overnight.
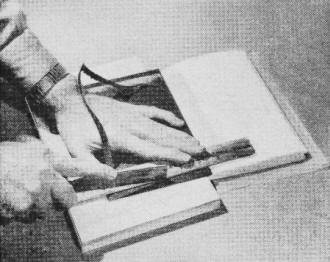
19 - Trim excess turn-in on boards (not spine) to leave about
3/8 in. around edges. Use a straightedge.
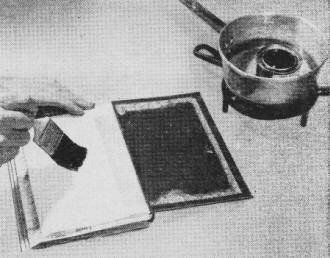
20 - Glue boardpapers to boards and place completed book in grooving
jaws for final 24·hr. pressing.
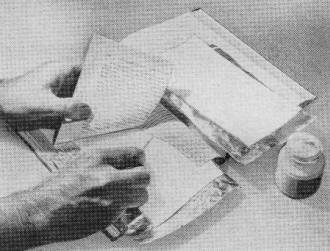
Repairing a Torn Page. Lay a piece of foil or waxed paper under
the torn page and top it with a piece of cleansing tissue. Using a toothpick, apply
library paste to the edge of the tear only. Bring the torn edges together and rub
with the finger. Lay on a piece of cleansing tissue, topped with foil. Close the
book and press overnight. Remove foil and tear away cleansing tissues. Clean off
adhering paper fibers with an eraser or razor blade.
|


