|
Website visitor Pat M. wrote to ask that I scan page 14 of this
Hi-Climber article that appeared in the December 1968 edition of
American Aircraft Modeler. I was glad to oblige, and while
at it, I processed the entire article. If the rubber-powered free
flight Hi-Climber interested Pat enough to build it, then chances
are someone else might like to as well. Hi-Climber is one in a long
series of "For the Tenderfoot" models promoting the entrance of
kids into the aeromodeling hobby.
Hi-Climber
Stu Richmond
 Here's
a little cutie that really flies! It builds quickly and has almost
no critical dimensions. It's designed like a contest model. And
it flies like one! Plans are full size as they appear in this magazine. Here's
a little cutie that really flies! It builds quickly and has almost
no critical dimensions. It's designed like a contest model. And
it flies like one! Plans are full size as they appear in this magazine.
A few suggestions will help you get best results. Make sure you
use stiff; warp-free wood for the wings and tail parts. The propeller
and wheels, along with wire parts may be had from the local hobby
shop, or from some ready-to-fly models costing about 25c. Any plastic
prop near 5 1/2 inches in diameter will do. They are easy to find.

Study the pictures, tool list and materials list carefully before
you start. Putting maximum winds to the motor by stretch winding
will take some help from a friend, but flights will be about twice
as long if you use a mechanical winder, or a hand drill with a hook
in it. If you use a hand drill, put a slight bend in the hook where
it fits inside the drill and get it tightened well so it won't pull
out and cause an accident to your helper or the Hi-Climber .

Everything you need, both in materials and tools.
Razor saw is a help, but is not essential. Use of winder described
in article.

Parts have been cut out, landing gear bent to
shape. Important to note is simple method for putting the dihedral
in the wing.
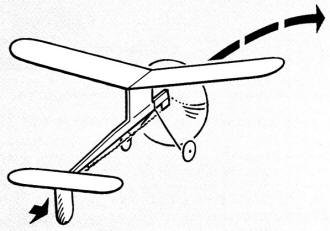
You can add clay or chewing gum under a wingtip to control turns,
as well as to the nose (if model stalls) or tail (if model dives)
as necessary. All models built and shown in the pictures have required
no such weight additions. You can experiment by moistening lightly
the rear of the rudder and bending it to either side to control
the turns.
If you wish to experiment further after building your Hi-Climber,
follow step #20 and build one-half again bigger.
Step 1: Make patterns of all balsa parts by putting tracing paper
over the plans, or carbon paper and a sheet of white paper under
the plans. Trace the outlines and cut out the patterns.

1. Trace paper patterns with carbon paper. Trace
around patterns onto balsa sheet using ballpoint pen. Lines are
easily seen.
Step 2. With a ballpoint pen, trace around the patterns lightly
onto the balsa wood.
Step 3: Cut out the balsa parts using a ruler where needed to
cut straight edges.
Step 4: Sand all parts smooth and round except where parts join
together.
Step 5: Bend all wire parts to shape as shown on plans. Get help
if needed. Put on wheels.
Step 6: Glue wings together by putting one wing flat on the work
bench and raising the other tip up 2 1/2 inches. Use wax paper under
wing joint to prevent wing from being glued to bench. This forms
the proper dihedral angle and makes the Hi-Climber stable in the
air. Let this glued joint dry overnight, or at least until thoroughly
dry.

2. Prop one wing half up so tip is elevated 2
1/2" for dihedral. Cement halves together, using wax paper to prevent
sticking to work board. When picked up, be sure bottom is dry.
Step 7: Use a pin to make the hole for rear hook to fit bottom
of fuselage. Push rear hook into fuselage and wrap joint with thread.
Coat joint lightly with glue.
Step 8: Cut 1/2" length of metal tubing and glue it and spacer
block to bottom front of fuselage. Wrap with thread and coat heavily
with glue. If available, use epoxy glue on the nose rather than
white glue (such as Elmer's).
Step 9: Glue pylon onto fuselage and allow to dry. Make sure
high side is forward toward propeller.

3. Cement wing pylon to motorstick, pinning it
while cement hardens. Bind with thread and cement landing gear,
spacer and thrust tube in place. It does not pay to hurry your work.
Step 10: Put landing gear in fuselage, wrap with thread and coat
with glue.
Step 11: Glue stabilizer on top rear of fuselage. Use pins to
hold temporarily if needed.
Step 12: Glue rudder on either side of fuselage and against bottom
side of stabilizer.
Step 13: Glue wing on top of pylon. Use pins temporarily to hold
in place if needed. Make sure all parts line-up when viewed from
top, front and rear, and let the Hi-Climber dry thoroughly.

4. Bind and cement rear hook in position. Cement
fin to side of motorstick. Make sure it is on straight as cement
dries.
Step 14: Put propeller shaft through metal tubing, put on two
or three thrust washers, put on propeller and bend end of wire to
keep propeller on the shaft. Put one drop of oil on the washers
only.
Step 15: Lubricate the motor lightly with liquid hair shampoo
or with rubber lubricant and hook in position. (Or melt a little
margarine - not butter - in palm of hand.) Don't use oil on the
rubber. Measure 3 1/2" of 1/8" rubber, tie the ends together and
double the loop to make 4 strands.
Step 16: Wind about 50 turns into the motor (don't wind backward;
turn prop to right as you face front) and launch with a gentle push
into the wind with the nose pointed slightly up. If the model turns
too tightly to the right, moisten and turn the rear of the rudder
to the left (as viewed from the rear).

5. Stretch four-strand motor three times its
length to wind maximum of 250 turns with winder. "Walk" it in as
you wind.
Step 17: The model should circle to the right and climb high
under power. In the glide it should turn to the left or possibly
glide straight.

6. Bend trailing edge of fin in direction you
desire model to turn. Breathe on wood, and bend gently while doing
so.
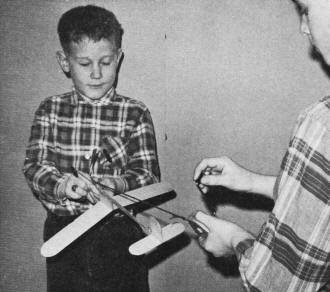
Step 18: Maximum winds are put in by following the picture which
shows the model held upside down by the propeller while another
person stretches the motor three times its normal length and begins
winding while slowly advancing forward until normal motor length
is reached. With practice, 250 winds of the motor are possible every
time. This may only be 40 to 60 turns of your winder. See how many
winds each turn of the handle twists into the rubber motor.
Step 19: Fly the Hi-Climber away from trees and houses. It really
goes! Your schoolyard makes a fine flying field. Use the ballpoint
pen to put your name, address, and telephone number on the bottom
of the wing for safety.
Step 20: You may wish to make a larger Hi-Climber by using wood
twice as thick and making all parts half again larger than these
plans. Be sure to keep the angle between the top and bottom of the
pylon the same, as this is the only critical part.
Step 21: Happy flying on calm days. Be patient if wind is blowing.

An important part of building a flying model
is checking out the alignment of flying surfaces. Should not be
crooked - no warps!

The secret of long, long flights. Use an escapement
winder, or a drill with hook. Stretch rubber, wind and slowly walk
it in.

Hi-Climber Plans
Tools
Modeling knife or single-edge razor blade for cutting.
Ruler (a metal one would be best).
Very smooth sandpaper (#500 or #400 if possible).
Needle-nose pliers (for wire bending).
Small hacksaw (to cut tubing).
Pencil or ballpoint pen and carbon paper for tracing outline
of balsa parts onto balsa wood.
A few straight, steel pins.
A sheet of tracing paper or carbon paper.
Materials
One sheet 1/32 x 2 x 36" balsa. Must be stiff and flat. If not
available, use soft, flat 1/16 x 2 x 36".
One sheet 3/32 x 2 x 36" very hard balsa for fuselage; 1/8" thick
wood may be substituted.
One piece 0.030 or 0.045 piano wire for landing gear and hooks.
Two plastic wheels - about 1" in diameter.
One plastic propeller 5 1/2" diameter. 5" may be substituted
or a 6" propeller may be cut to 5 1/2".
One 2 or 3 washers - piece of 1/8" flat rubber 36" long for 4-strand
rubber motor.
One piece of 1/2" long metal tubing big enough for the 0.030
or 0.045 wire to fit through - can be cut from inside a ballpoint
pen.
Miscellaneous
Small amount of liquid hair shampoo for lubricating rubber motor
if model-type rubber lubricant isn't available.
A winder for the motor. Use a small hand drill with a hook in
the chuck, or use an R/C escapement winder.
Bottle of white glue.
Spool of thread.
Some help in bending the small wire parts if you aren't strong
enough.
Drop of oil for the 2 or 3 thrust washers.
Small piece of wax paper.
Notice:
The AMA Plans Service offers a
full-size version of many of the plans show here at a very reasonable cost. They
will scale the plans any size for you. It is always best to buy printed plans because
my scanner versions often have distortions that can cause parts to fit poorly. Purchasing
plans also help to support the operation of the
Academy of Model Aeronautics - the #1
advocate for model aviation throughout the world. If the AMA no longer has this
plan on file, I will be glad to send you my higher resolution version.
Try my Scale Calculator for
Model Airplane Plans.
Posted June 20, 2015
|


