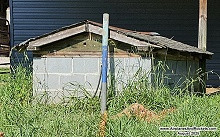
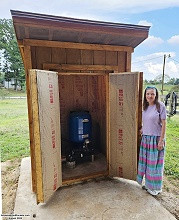
Original Field Well House (~6 ft. x 8 ft.)
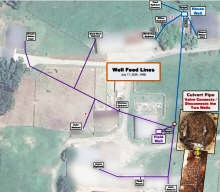
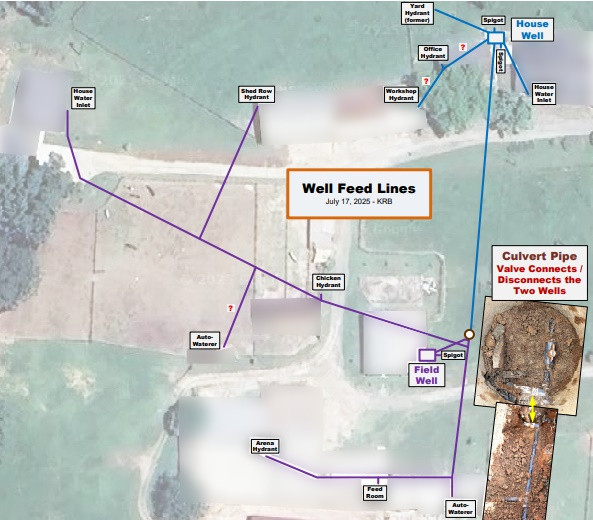
Water lines of the two well systems.

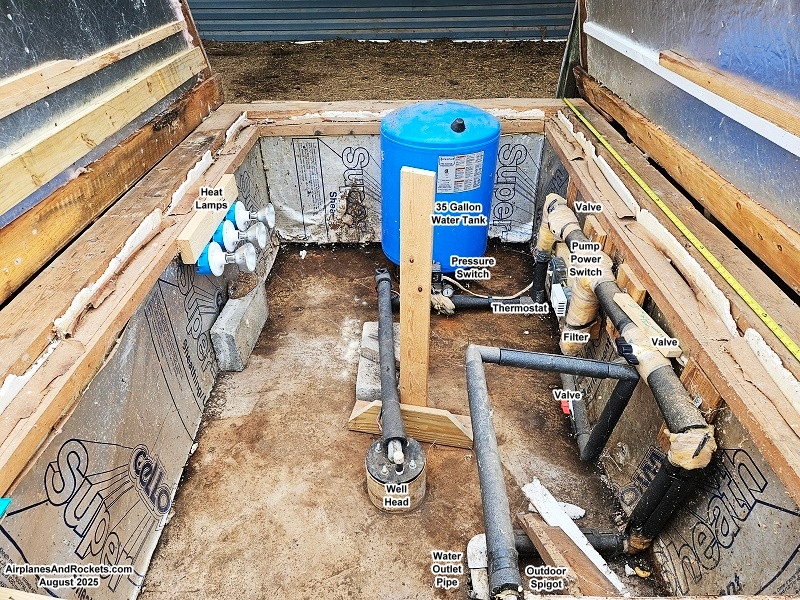
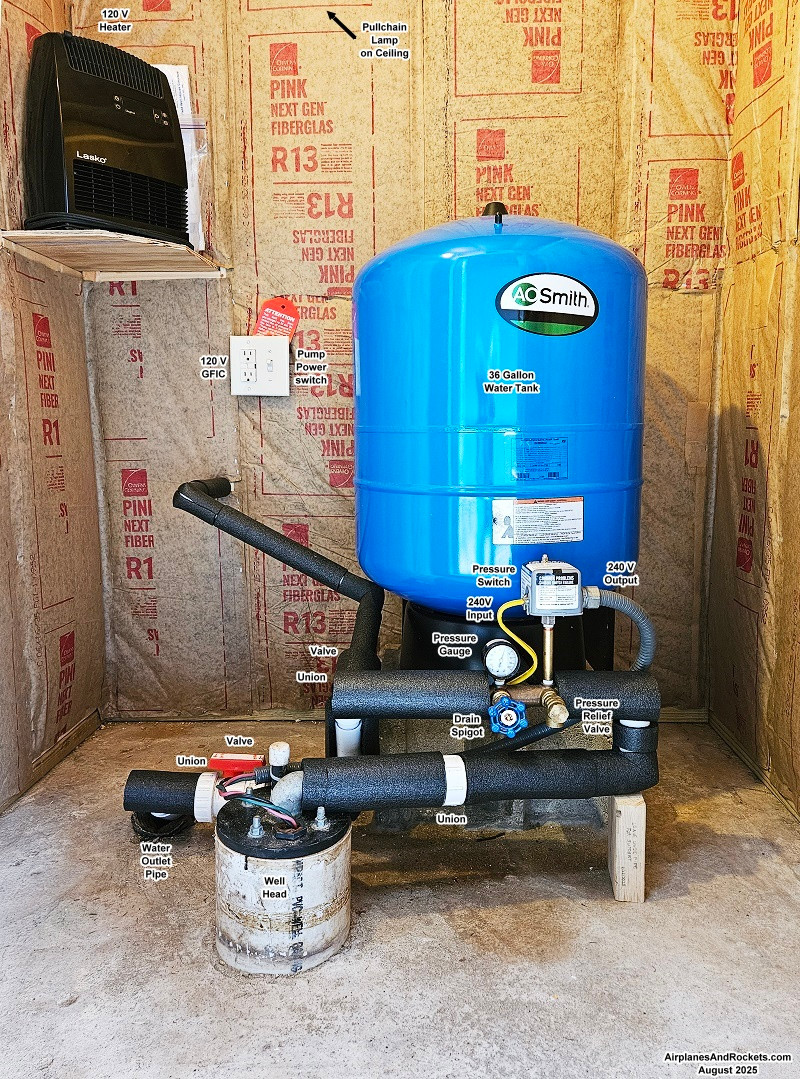
Original Field Well House component
layout. 35-gallon tank & controls, water valves, heat lamps, well head.

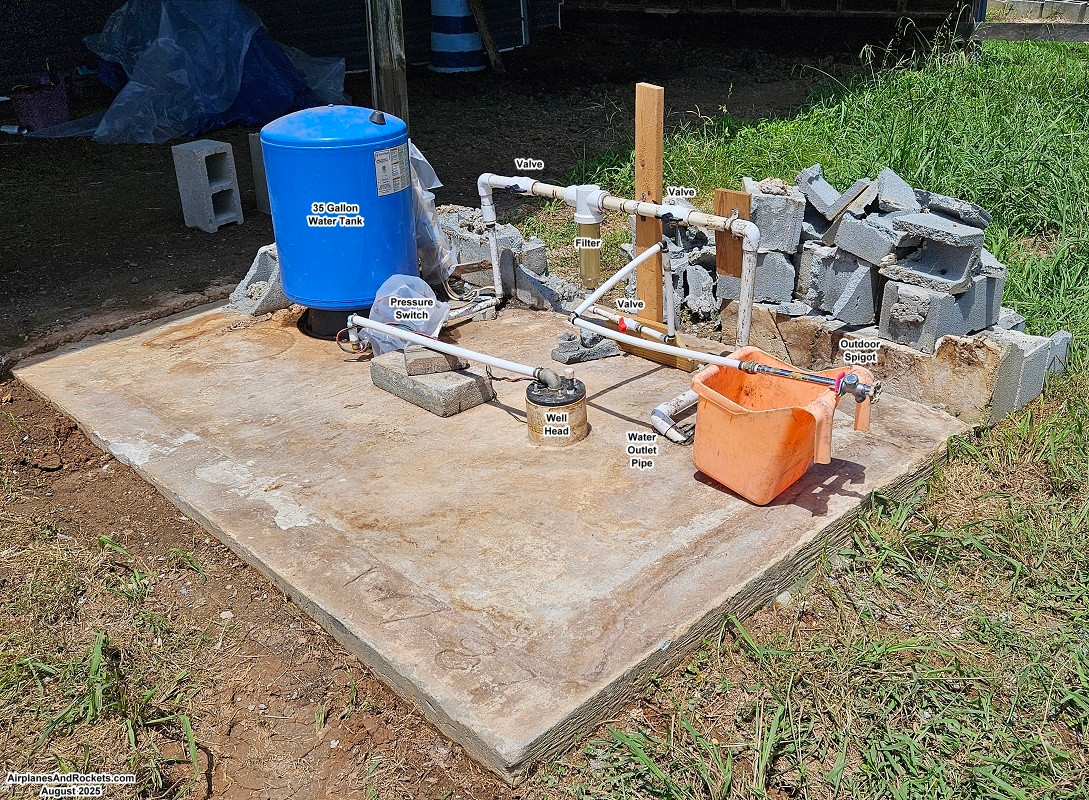
Field Well House original components
after building was torn down.

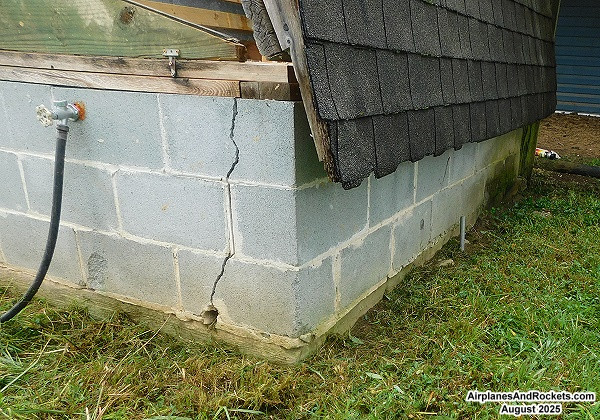
All corner blocks failed due to weight of very heavy roof halves
slamming against them when opening.
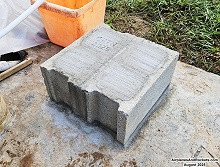
Mounting platform for water holding / pressure tank.
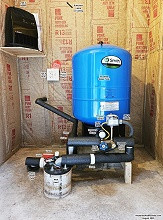
New plumbing components and system connections.
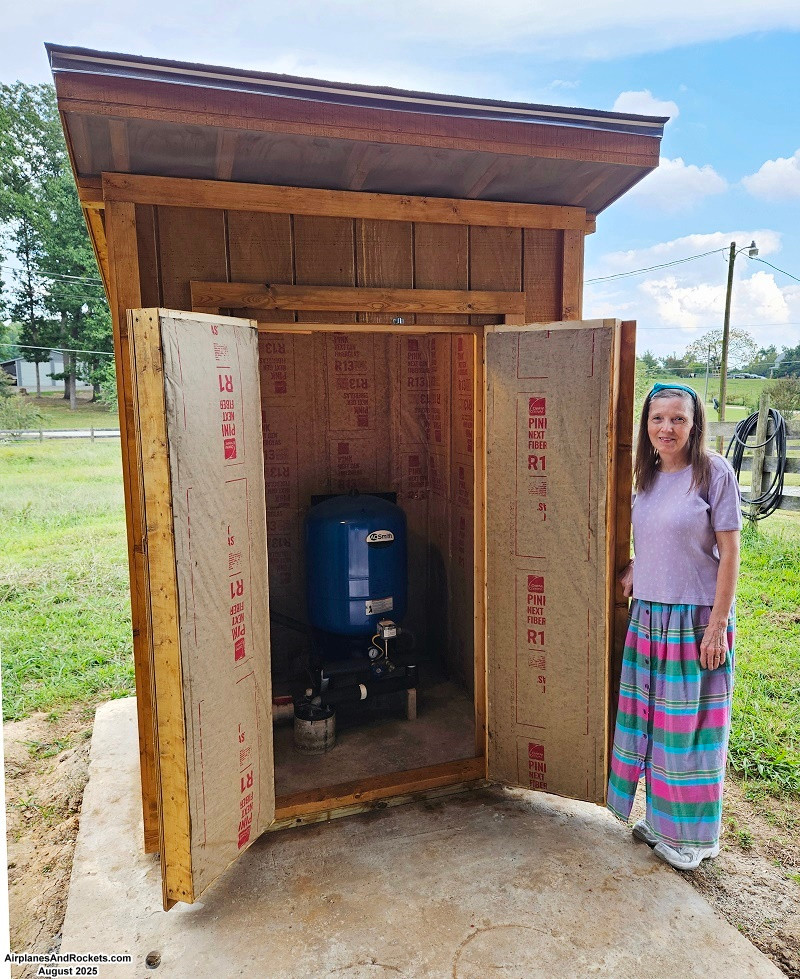
Interior view - plenty of room to work, weather-tight, insulated,
secure, lighted, GFIC receptacle. What more could you ask for?
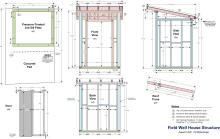
Plans for the Field Well House - use them at your own risk.
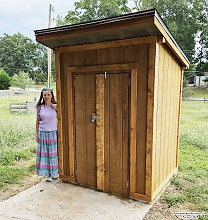
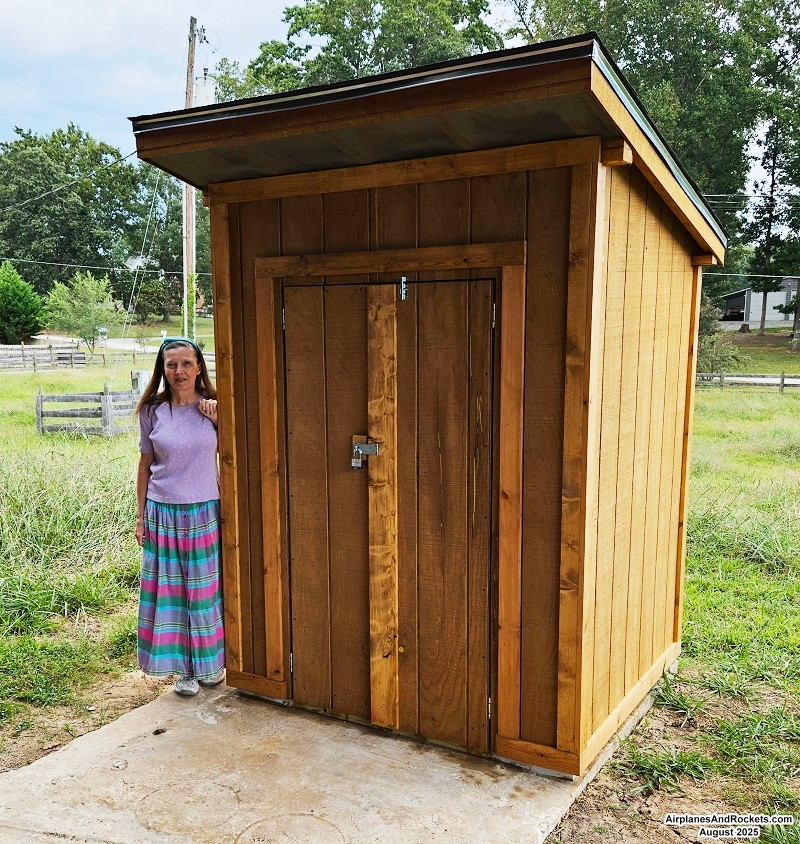
Melanie next to the brand new Field Well House.
My daughter and her husband bought an 11-acre chunk of a small, retired dairy
farm in North Carolina a few years ago. Their property included all of the original
buildings, including the house, a large workshop, farm equipment shed row, milking
stalls, milk processing area, hay storage, a chicken house, and a few other structures.
Nearly everything is at least 50 years old - and it shows.
There are two active wells on the property - one next to the house, and another
in a field next to a utility building. They are independent, but there is a pipe
connecting the two systems, with a valve in between to isolate them if necessary.
The photo/drawing to the right shows, schematically, what we believe, based on testing,
to be the water line layout. The valve was originally open, and then one day there
was no water service. With two pumps in parallel, if one pump fails the other will
supply sufficient water for all needs in what is now a domestic setting. No water
at all meant both pumps had failed. One most likely failed at a much earlier time
and went unnoticed. Then the second failed and, voila - no water at all.
We had to replace two submersible pumps in one day. The house pump had about
40 feet of pipe, and the field pump had 200 feet. $1,000 worth of pumps and a few
hours later, everything was fully restored and operational. I turned off the valve
connecting the two wells so that the next time a pump goes, we will be able to interconnect
the two systems while repairing the faulty one. Prices were a shock, but not unexpected
given how just about everything has increased by 50% or more during the 2020-2024
timeframe of massive inflation. Wait until I tell you what the new well house cost
to build and outfit!
Shortly afterward, the water pressure from what I call the Field Well House began
cycling up and down very frequently. The pressure switch checked out. OK, so I checked
the air pressure in the water pressure/holding tank and found to be 0 psi. It is
supposed to be 2 psi below the pressure switch's cut-out pressure. I had set the
pressure switch and tank air pressure on the systems after replacing the submersible
pumps. This 2005 vintage tank (35 gallons) did not have a replaceable air bladder,
so I tried reinflating it with a portable air compressor. The switch is set to cut
in at 40 psi and out at 62 psi (standard range), so I put 38 psi
on the bladder. To my surprise, it held. Maybe the valve (Schrader valve) had a
leak and connecting the air fitting fixed it.
 Great, I thought. That was easier than it
could have been. Turns out... it wasn't. Within a few minutes of having the water
turned back on in the house, pressure began dropping. A check of the pump system
showed it was fine. I said to myself, "Self, what else could be causing this?" A
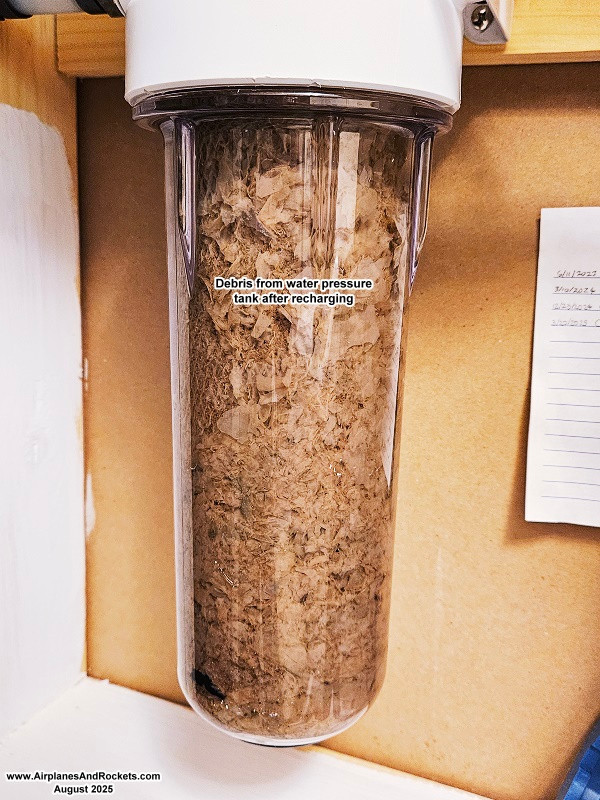
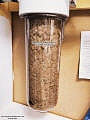
quick look at the whole-house water filter provided the answer. As you can see in
the photo, it was utterly clogged with what I presume was crud that had formed on
the outside of the bladder, and was released when I reinflated it. After multiple
filter cleanings, it was apparent that the tank should be replaced. It was manufactured
in 2005, so at 20 years, it's about due anyway. Great, I thought. That was easier than it
could have been. Turns out... it wasn't. Within a few minutes of having the water
turned back on in the house, pressure began dropping. A check of the pump system
showed it was fine. I said to myself, "Self, what else could be causing this?" A
quick look at the whole-house water filter provided the answer. As you can see in
the photo, it was utterly clogged with what I presume was crud that had formed on
the outside of the bladder, and was released when I reinflated it. After multiple
filter cleanings, it was apparent that the tank should be replaced. It was manufactured
in 2005, so at 20 years, it's about due anyway.
As you can see in the photo of the original Field Well House (upper right photo),
it was short and covered a 6-foot by 8-foot concrete pad. The roof was two pieces,
with each side hinged to swing up. It was cleverly designed so that the eaves were
long enough to limit how far they would open. Made of 2x4s, plywood, and asphalt
shingles, each side weighed about 100 pounds. They were very difficult to raise
with one person, and downright dangerous to lower. A close look at the photo to
the right shows how the force of the heavy roof opening caused the corner blocks
to fail. Since I do all the maintenance on everything on the farm, I decided this
was a good excuse for a complete overhaul and replacement of everything.
My plan was to tear down the original enclosure and replumb the entire system.
A 4½-foot by 5-foot building was plenty adequate to house everything if all
the components were condensed into a reasonable area. Originally, it was going to
be about 4 feet high, just enough to be able to easily pull the submersible pump
pipe out of the well casing, but my daughter wanted the edges of the roof to be
high enough that the horses couldn't poke themselves in the eye on them, so we settled
on 6 feet at the lowest point. A simple shed (lean-to) type roof was used for simplicity
in construction, plus that way all the water drains off the back.
Out of an abundance of caution (based on experience with my carefully planned
projects), I decided to build the new plumbing system first, and then build the
new enclosure around it. Doing so not only made working easier - with no obstructions,
but it also gave me the freedom to change planned positions of components if necessary.
I wanted to make the entire installation as compact as possible without sacrificing
serviceability. The original water tank sat directly on the concrete pad, but that
made getting to the associated parts (pressure switch, pressure gauge, pressure
relief valve, and drain spigot) difficult. A pair of standard concrete blocks did
the job. That's my
grandson's initials scratched in the mortar (see photo to the right).
The next photo shows the final configuration. Cutoff valves are installed inline
with the main service output pipe (1¼" PVC) and with the outdoor spigot (½"
PVC). I also installed union fittings in three places to facilitate easy disconnection
of the water holding/pressure tank and its associated components from the rest of
the system, because sooner or later, something will need replacement or service,
and having to cut pipe would be a pain in the posterior. The new water storage/pressure
tank is 36 gallons.
The original Field Well House had only a 240-volt service with a ground but no
neutral. Therefore, there was no 120-volt line available. The former owners created
a very hazardous 120-volt connection for a light bulb and heater by tapping one
side of the 240-volt service and connecting the return to the ground wire. The same
configuration was in the other well house, too. I have seen that kind of "trick"
done many times over the years. Most people do not realize the potential electrocution
problem that creates. The ground wire is supposed to be used only to provide a current
return path under fault conditions. A neutral wire running to the service panel
(circuit breaker or fuse) is the only legitimate, safe means of returning current
for 120 volts. Since the ground wire is usually uninsulated, touching it while under
load can cause electrocution.
Just because the neutral and ground wires might be terminated on the same bus
bar in the breaker box does not mean their uses are interchangeable. In fact, the
National Electric Code (NEC) rule for maintaining separate ground (aka safety, or
load fault ground) and neutral in every installation after "the first point of disconnect"
(usually the main service entrance panel) has been around since the mid-1960s. Accordingly,
if you have a secondary circuit breaker (or fuse), or disconnect switch installed
after the main panel, the ground and neutral must be isolated. Doing otherwise runs
the risk of having safety grounds carry normal (non-fault) load currents. Common
sense tells you if it was OK to use the ground wire as a normal load current return,
there would be no need for both a ground and a neutral wire anywhere in your house
(or commercial installation).
I remedied the problem by running a separate, insulated neutral wire from the
circuit breaker panel to the Well House. Now, there is a legitimate 120-volt supply
for an overhead pull-chain lamp and a GFIC receptacle, the latter of which powers
a small plug-in electric heater with built-in thermostat. Note that the Field Well
House is thoroughly insulated in the walls, doors, and ceiling. Screen is installed
in the front and rear eaves for proper ventilation.
Plans for the Field Well House structure were drawn using Microsoft Visio. Visio's
built-in tools for sizing, alignment, shape fill, line thickness, rotation, and
dimension lines is very handy for make a scale drawing to make sure everything will
fit. Sure, mechanical CAD software might be better for the application, but I own
and am very familiar with Visio, so that's what I used. In fact, I was so confident
in its accuracy that I actually cut out a complete kit of parts (to 1/32" accuracy
- which might look ridiculously hard, but is easy with a power combination miter
saw), labeling each part as I proceeded, and then assembled everything afterward
using screws (nails are too much trouble). All fit perfectly.
A base plate of pressure treated 2x4s was put down and secured to the concrete
slab with anchor bolts (sealing foam betwixt concrete and wood). Then, the frameworks
was screwed to the base. The bottom boards of the four sides were countered-bored
to clear the nuts and washers from the foundation bolts, so they are not visible
in the final product.
The electric service originally entered the concrete slab via a section of black
water pipe and emerged inside the structure. I terminated the original cable in
a weatherproof box on the farm building pole it ran down on. The cable and my newly
added neutral was put in section of electrical PVC conduit (gray) to come down the
pole, and run into a weatherproof PVC junction box, then PVC pipe was launched down
into a trench in the ground (18" deep per NEC), running alongside the concrete pad,
then back up and into the side of the new Field Well House. I always like to do
things as if they had to pass inspection. It is a matter of pride in workmanship,
and helps keep insurance companies from denying a claim later if anything bad should
happen.
The total cost of the project for all the plumbing and structure materials was
right around $1,500. That is horrendously expensive. Having purchased building materials
all my life (67 years old), I watched costs skyrocket in the 2020 to 2024 timeframe.
I paid $500 for a good quality ¾-horsepower submersible pump from Lowes that
cost about $300 in 2018 when a similar one was replaced in another location. Although
massive inflation of that era is gone, prices will never return to previous levels.
Seems the only thing that does not cost more these days is my custom-created software
items -
RF Cascade Workbook ($45) and
RF Stencils for Visio ($35). It's getting harder and harder to afford to live,
especially as insurance companies are permitted to penalize people for getting old
- even with no actions against them.
Side Note: One day during the project it began raining pretty hard, and I wanted
to get some plywood (about 10 sheets) that were leaning up against the side of a
building up on scraps of 2x4s, to keep them from getting wet. Everything was under
cover, but the roof has a few small leaks and water was creeping toward the plywood.
The ground around it was a bit wet. While shifting them, I had to pull the tops
out from against the wall to get the weight off the ones in the back. It was getting noticeably more difficult
to brace the plywood sheets against falling back toward me, and I was thinking I
had better push them back against the building and move a few at a time. At that
very moment, my foot began sliding backward, and I knew I was in trouble. Within
about 2 seconds I was on the ground with all the plywood on top of my left leg,
and my right leg was in close to a full split position. As I was going down, I knew
significant damage was being done. As I lay on the wet ground in awful pain, my
first thought was to get that leg back in a normal position, so I managed to yank
it around. Nobody was around, so yelling for help wouldn't have done any good, especially
with the noise from the rain. I just lay there for a half a minute or so, trying
to decide how to get that stack of plywood off my other leg, which was on top of
one of the 2x4 wall frames I had just built. With more might than I knew I had,
I was able to lift the pile enough to pull my leg out. As soon as I could, I forced
myself to stand to assess the damage. Miraculously, no bones seemed to be broken.
With great effort, I was able to limp around. There was no visible bleeding. Figuring
- maybe irrationally - that it would be good to keep moving to check for latent
damage, I actually completed the plywood shift job, then headed to the house.
My daughter later checked the Ring camera that monitors that area and the whole
incident had been captured - even my pathetic moaning from the pain. It's kind of
funny in hindsight.
To make a long story short, an online check with AI, having provided a detailed
description of the physical incident and physical symptoms, revealed that evidently I had a severely
torn hamstring and muscle damage in my right leg, and multiple skin contusions on
my left shin where the plywood fell on it. There was no sign of bruising and still
no bleeding, so I put ice on it and hobbled for a few days, and took regular doses
of Ibuprofen to help treat inflammation. About a week later, Melanie noticed that
the back of my entire right leg from the hiney down to my calf was black and blue.
Evidently, it took that long for the internal bleeding to migrate to the surface.
Now, four weeks later, all symptoms are gone, except for a slight sensitivity in
my right calf. I never did go to the doctor, figuring if things didn't improve,
I'd make the trip.
One really freaky result of the injury was that for about two weeks I did not
have the ability to stop the forward movement of my right leg. I first discovered
that during my first exercise session after the incident, where I lay on the floor
and grab the bottom of the sofa and swing my legs and back straight up, and then
let them down slowly. When my legs reached the up position, my left leg stopped
as usual, but my right leg kept going, out of control, and slammed into the back
of the sofa. It was a very strange thing to watch the leg keep going with no ability
to stop it! I also could not do my planking exercise because I absolutely could
not command my right leg to lift off the ground. There was no pain; I just could
not make it move, but at this point full control has been restored.
The human body's ability to repair itself is miraculous, n'est-ce pas?
My son-in-law and a good friend of his from high school days took pity on me
and helped assemble the sides and roof while I gave direction. Overall, in spite
of being crippled for a bit, the job took about four weeks from beginning to end
- not bad really, and the water was never off for more than a couple hours while
making the equipment change-out.
Other Woodworking Tips & Projects:
|