|
Du-Bro's Whirlybird 505 was
the first successful commercial helicopter kit (although successful is a relative
term as applied here). I was fortunate as a kid in
Holly
Hill Harbor, Mayo, Maryland, because there was a man down the street from me
who was an avid radio control modeler and seemed to buy just about every new type
of radio, engine, and kit available. I would anxiously await the sound of an engine
running, and instantly jump on my bicycle to ride down and see what he was doing.
The strange thing about it was that he had three step-sons who were notoriously
bad actors who counted it as sport to harass and occasionally beat up guys like
me, so I always approached the yard with a bit of trepidation. The gentleman himself
was very nice, and a few times even gave me some of his beat-up models and an engine
or two. I thought it was a magnanimous act of kindness, even if the stuff never
worked. Just having in my possession some of the great stuff that appeared in
American Aircraft Modeler and Flying Models was appreciated. I
certainly could not have afforded such treasures on my paltry newspaper delivery
route earnings, and my father's salary barely covered food and clothing for our
family of seven. Anyway, he had a Du−Bro Whirlybird 500 helicopter, and I remember
seeing him learning to fly it while being tethered. That method never was a very
good one; use of training gear like the one shown in this article works a lot better
better because the model is not abruptly halted when it reaches an extremity. He
later advanced to one of the Kalt (or was it a Schlüter?) Huey Cobras, but I never
witnessed any more than a brief hover by him. It sure was cool to watch!
See also the Du-Bro
Whirlybird 505 Review in the March 1972 issue of R/C Modeler.
Du-Bro's Whirlybird 505
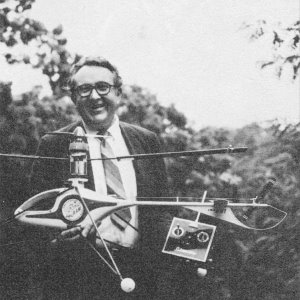
Author with our bird at the time of early testing with tripod
gear. Note ideal shape and fit of the O.S. Wankel engine. Spinner for starting only
but cooling fan needed.
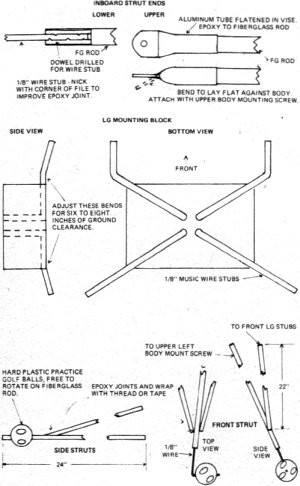
Helicopter training gear plans.
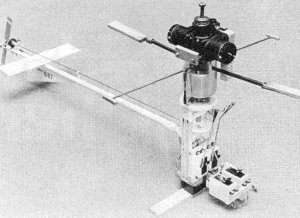
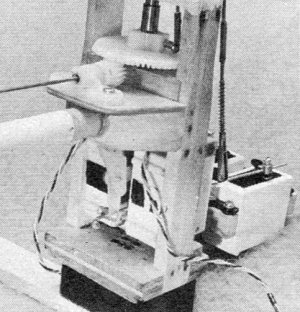
Complete frame with Ross engine installed. Short bar of lead
on this side of engine balances carburetor and exhaust slacks. All parts are quite
serviceable.
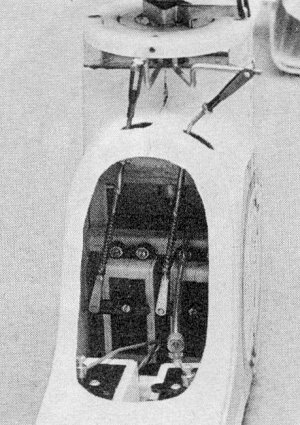
Canopy removed to view inside. Snug body keeps the exhaust mess
out fairly well. Incidentally, weight is not critical if you have plenty of available
power.
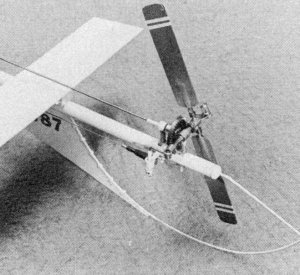
Tail rotor operates at nearly zero pitch being used only for
rudder function, not anti torque. Since photo was taken, we learned stabilizer should
be omitted.
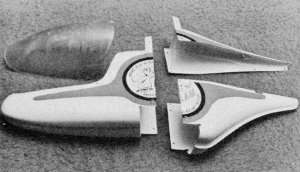
Six piece plastic body is easily assembled and long lasting.
Tail boom is tapering fiberglass rod and main frame is spruce.
Sturdy and light.

Silvertone servo linearity plot.
PART II - That "Goofy Thing" Dave Grey Designed, DuBro's Whirlybird 505. Building
and flying this model was pure fun and challenge.
Bob Beckman and Ed Sweeney
Building the Du-Bro Whirlybird was sheer delight, for two reasons: First, it
was a new experience in modeling. Helicopters are about the last "frontier" left
in RC modeling, and it is fascinating to dig into the details of their construction
and operation. Second, it's difficult to see how one could improve on the kit itself.
It's not an ARF, and several enjoyable hours can be spent building it. The quality
of the many metal, wood and plastic parts is excellent; the instructions are complete
and easy to follow.
One note of caution: If you don't know how to solder, learn before you start
constructing the Whirlybird. Most of the mechanical assemblies depend on solder
joints; neat, effective soldering is a must. And keep in mind that this is soldering
for mechanical strength, not electrical connection. Sta-Brite low temperature silver
solder is recommended.
Construction of the chopper is so well covered in the instruction book that only
two comments are needed here. The holes for the mounting screws at the lower end
of the cyclic pitch servos should be drilled before installing the mounts for the
throttle and tail rotor servos. And it is recommended that the horizontal stabilizer
be omitted. Experience, confirmed by Du-Bro, indicates that the bird is more stable
in windy conditions without the stab.
Early in the construction of the Whirlybird the decision was made to try the
OS Wankel rotary piston engine. This engine seemed to be a natural for this application,
even though its nominal displacement is less than the 0.40 called for.
Mounting the engine requires fabrication of a new mounting plate. A piece of
1/8" aluminum sheet is turned to the outside diameter of the Wankel's mounting ring,
the same diameter as the fuel tank on the Whirlybird. The new mounting plate is
then attached to the rotor head assembly with counter-sunk 4-40 machine screws.
Three 8-32 machine screws hold the Wankel mount-ing ring to the plate. The engine
is located on the plate with the throttle in line with the rotor blades. Final balancing
of the rotor assembly is accomplished by placing small pieces of solder in the end
of the rotor blade.
Several tanks of fuel were run through the engine before attempting tethered
flight. With the chopper firmly anchored (bricks on the landing skid), this engine
break in time also afforded an opportunity to check and observe the action of the
controls. Final trimming of the flybar linkage was made by observing the disc of
the flybar in motion and adjusting for a level condition with all controls in neutral.
Initial flight attempts were made with the two-line tether system described in
the instructions. The model weighed just under four lb. dry, and ten oz. of additional
weight was attached to the landing gear. The first "flights" were made in Bob Beckman's
backyard heliport, using a sheet of plywood as a landing pad. Two things became
immediately obvious: There was enough lift from the Wankel; there wasn't enough
tail rotor control. A quick trip to the shop to adjust the tail rotor linkage, and
we were back to the now greasy plywood.
Several days and many penguin-type flights later we were beginning to wonder.
The model obviously got light as power was applied, but it also started jittering
and swinging around as soon as it started to lift. Even the most charitable of spectators
couldn't say that the model was flying. At times it did seem 'that we had some control
over the bird's gyrations, but for the most part it was just banging back and forth
between tethers. We were beginning to question whether the engine had the power
to turn the rotor fast enough to provide the necessary control.
At this point we got a break. Dave Gray was in town to help with the AMA demonstrations
at TRANSPO '72, and he gave our bird a test flight. After re-moving the weights
and checking over the engine installation, Dave was ready to go. As he didn't feel
that Bob's back-yard heliport was big enough, we all trooped out into the street
in front of the house. The tank was filled, the engine started, and Dave took the
bird up. Just like that!
All doubts about the capability of the model were removed. Our difficulty had
really been the capability of the pilot. Dave made several flights that evening
(we wound up under the street light at the corner) with both the Wankel-powered
version and one of his own 40-powered birds. We reached the conclusions that: 1)
the Wankel will fly the Whirlybird nicely when it is putting out peak power, but
none of the margin of power is available that is so important to helicopter flying;
2) the marginal power situation further complicates the already difficult task of
learning to fly a new way. That the power is marginal is not surprising, since the
Wankel is a nominal 30. What is pleasantly surprising is that this rotary piston
engine produces enough power to fly the Whirlybird smoothly, once you know what
you're doing.
Dave had another valuable hint regarding the landing gear. Up to this point we
had been using the skid gear that came with the kit. This is quite adequate and
looks very scale-like, but as Dave pointed out, its narrow tread is what allows
the chopper to jitter and bounce around just before it becomes airborne. One of
Dave's models was fitted with wide stance, tricycle, training gear. The advantages
are: 1) as the throttle is advanced, the model remains stable until adequate control
forces have been developed by the main and tail rotors; 2) the wide stance of the
gear will help to avoid tipping over and breaking rotor blades; 3) the tether system
is not needed. Once the pilot's capability has been developed, the skid-type gear
can be used.
Several versions of the training gear have been made, and the final version is
shown in the drawings. Construction is simple, but a few words on evolution are
in order. The first gear made was fabricated from 1/4" dowels with rubber balls
on the ends. Looked great, but the rubber balls wouldn't slide so it was hard to
move the model around, the dowels were both springy and weak so on a hard landing
they either broke or bounced the model over and banged up the rotor. Ping-pong balls
were tried in place of the rubber balls, but they were too fragile. Small rubber-tired
wheels looked good for a while, but going sideways they would dig in and flip the
bird just like the original balls. The final combination of fiberglass rods and
plastic practice golf balls seems ideal.
By this time we really had the bit in our teeth on this business of helicopter
flying and we wanted to master it. The Wankel was temporarily retired, and we looked
around for something with enough power to make our tyro attempts a little easier.
The Ross twin looked like the answer. Here we had a setup where the counter-balance
has a piston in it to contribute to the power available. Mounting the Ross was simply
a matter of making another mounting plate and rigging a balance weight op-posite
the exhausts.
Flying the Whirlybird with the Ross has been a pleasure. The engine is easy to
start, smooth and quiet running, with more than enough power to do the job. The
first takeoff resulted in the bird climbing to a six ft. altitude before we realized
what was happening. That we got it back down undamaged proved that we were making
some progress in learning to handle this new type of RC flight. Since then we have
progressed to short duration hovering flights and, more important, learned that
we can fly the Whirlybird in moderate wind.
The Du-Bro Whirlybird has proven itself to be a fascinating and successful introduction
to RC helicopters. Its greatest value may be as a trainer in preparation for flying
other types of choppers. But we have to repeat the often-stated fact that it takes
a lot of time to learn to fly a model helicopter. After about four gallons of fuel
we're still a long way from being accomplished RC helicopter pilots. But we'll get
there!
Additional comments by the Editor:
Many modelers have given up on their Du-Bro 505's and claimed that they are not
flyable. This is just not so. They fly well and are a true helicopter even with
the torque reaction drive. Think of this as a coaxial helicopter. The Du-Bro is
the easiest helicopter to fly, too. I have become a pretty good fixed-wing RC pilot,
but I felt like a rank beginner in RC with my first three gallons of fuel through
the Whirlybird. It takes about four gallons to achieve smooth hovering. With a helicopter,
four gallons are used surprisingly fast.
Comments by other would-be Du-Bro 505 pilots indicate much misunderstanding of
helicopter characteristics. For example, the Du-Bro is not top-heavy just because
the engine is on top. Consider where the lift is coming from and realize that all
the weight is below the lift. The chopper may seem top-heavy because of marginal
control and stability when the rotors slow down or are unpowered when chopping the
throttle. Because this model has a low rotor speed, that speed is critical.
Helicopters when within one rotor diameter distance from the ground are flying
on a very slippery bubble of air. All control inputs are concentrated on keeping
on top of that bubble. When the model is up to five ft., it is riding on a more
stable column of air, not just a bubble. Also, the Du-Bro is a rigid rotor design
and must be in full free flight off the ground (by at least an inch) before any
control inputs are meaningful. Inputs on the ground have no relation to the direction
of flight or movement of the model. So, bring the rotors up to speed, then lift
off quickly but slightly before expecting controls to take effect.
As mentioned by Bob Beckman in the above text, we switched from the Wankel engine
to the Ross to try the model with additional power. I made this conversion after
achieving significant power increases. Unfortunately, Bob did not get to fly it
with the improved Wankel operation.
The engine loves lots of nitro and K&B 500 seems to be its best fuel. A Fox
short idle-bar plug improves rpm by nearly 800 rpm over the original O.S. Wankel
plug. The engine overheats and then sags fairly soon after running up to full speed
on the helicopter, as there is almost no cooling in this application. Simple aluminum
cooling fan of eight blades, 4-1/2 in. dia. mounted just under the flying prop,
provides the necessary engine cooling air. Use an 11x4 prop to fly the helicopter
.
You just can't beat having extra power and the Ross is the way to over-power
the Du-Bro 505. However, by using a high pitch prop (11x7-1/2), more energy is put
into the main rotor via torque at liftoff speed. More torque means more rotor rpm
and thus both more control and more stability.
The tripod landing gear is quite easy to make either with fiberglass rods into
a base block or with bent wires into the original landing gear mounts. We'll sketch
the elaborate tripod gear, you can simplify it to suit yourself. Please, build one
for your model, it makes learning to fly more successful and possible.
https://plans.modelaircraft.org/
Posted October 16, 2021
(updated from original post on 10/1/2011)
|