|
Gold
Rush III is an R/C pylon racer that was ahead of its time -
and its competition - in 1962. Virtually none of the features of
the plane can be found in today's pylon racers, though, except maybe
the fiberglass fuselage. The homemade retractable landing gear (or
any type of retracts for that matter) is the most notable exception.
Full building instructions are featured on the plans. AMA rules
at the time called for a whopping 766 sq. in. of wing area with
a .19 size engine. If you are looking to build a vintage model that
probably flies pretty well both for speed and aerobatics characteristics
using a modern lightweight radio and much more powerful engine (or
electric motor), then the Gold Rush III would be worth considering.
Winning R/C Racer - "Gold Rush III"
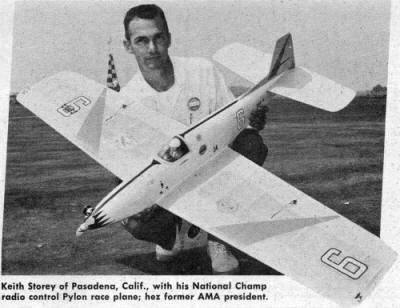
Keith Storey of Pasadena, Calif., with his National Champ
radio control Pylon race plane; hez former AMA president.
|
"Gold Rush III" is a fun airplane to fly. It is really gentle and
sure on the controls, yet lively enough for pylon racing and it
goes where you point it. She seems to have few if any bad habits
- this pilot does though and the plane tends to forgive gracefully.
Don't let the "III" on the name fool you; this is not a series plane
developed through many years of "etc., etc." I just like the name
Gold Rush, and it seems to like me since we have been lucky together.
It was first pinned on a control line speed model back in '47, then
later used on my first scale-like R/C Bonzo in '57. Planning
and designing Gold Rush III was a lot of fun, too. I included several
things I have always wanted to try. I guess we have all dreamed
of a retracting gear that is strong and reliable enough for competition.
Secondly, I have been very interested in fiberglass for control
line fuselages in team racers and speed models. They worked well,
did not absorb fuel and weighed no more than a good balsa body.
I wondered what the results would be in a large R/C model. The first
step in these tests was to make one complete Astro Hog fuselage
in balsa and another of fiberglass. All-up weight of the 'glass
airframe was 10 ounces lighter! It was stronger in the problem areas
and much lighter yet still sufficiently strong in the tail section,
too. This fully monocoque fuselage gave almost one inch
more working area inside because it had no long motor mounts or
awkward bulkheads and stringers. Light weight 3/32" balsa at the
wing saddle and stabilizer gave all the rigidity necessary. Because
we used a female mold the exterior finish was mirror smooth and
we could incorporate extra details such as wing fillets and otherwise
difficult compound curves. The pre-cut and sanded engine mounts
were molded together with the skin so that it formed a very solid
unit. By this time we were getting pretty excited and so started
drawing lines for the Pylon Racer. Construction of Gold
Rush III with its fiberglass fuselage and retracting landing gear
proved to be more time consuming than planned. We missed the Dallas
Nationals in '60 by four days. But this was really an advantage
since it meant time for a thorough check. There were a few nutty
"bugs" too - like the landing gear escapement being mounted across
the fuselage with butt glue joints only. On the second flight the
gear came up just fine, but the flying gyrations loosened the glue
and the gear stayed up! Belly landing, here we come. We were quite
surprised ... she slid in smoothly. But you can bet that escapement
mounting was changed and quick!
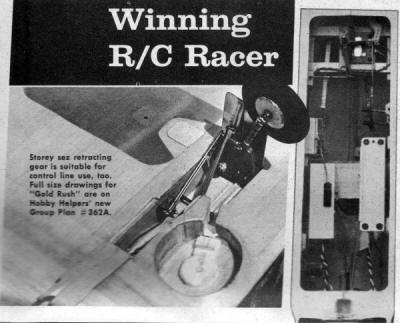
Storey sez retracting gear is suitable for control line
use, too. Full size drawings for "Gold Rush" are on Hobby
Helpers' new Group Plan #362A. |
Speaking of belly landings, the ship has made three more since then
on dirt, grass and asphalt. I'll take the hard flat surface anytime.
The fuselage underside seems to be curved just right and the dihedral
sufficient so that the wing rubber bands take the worst of the shock.
I had tried to make it clean and smooth knowing that sooner or later
it was bound to come in wheels-up. Although Pylon Racing
is still a young event, several design requirements and compromises
have become evident. I would class them basically as speed-vs-maneuverability,
steady power plant, number of controls, easy ground handling, light
weight and strong construction and for my own pleasure I like a
touch of realism. Aim was to balance all these requirements in order
to obtain a consistent performer. No two approaches are exactly
the same which gives a variety of designs and styles on the line
and in the air. Starting at the top of the list, we have
all seen some very fast models that could not take advantage of
their speed because they could not fly straight and level and were
grasshoppers in the turns. Conversely, there are planes and pilots
that make perfect pylon patterns, but their speed is too low to
get into the winner's circle. So it appears we should have a combination
of each, and when compromise is necessary it would be best to shave
a little off the top of each. If there had to be a choice, I would
prefer sacrificing two or three miles per hour for finer, more accurate
control. For example, the ailerons on my first pylon racer were
adequate at high speed when all was well. But at less than full
speed, or in those tough unusual positions I seem to get into, the
control was too slow - much too slow. The ailerons on this new model
are much larger and have less travel for smoother response at all
speeds. These larger units could slow the airplane down a little
- this is theoretical, but even if they did it would be well worth
it.
This
more accurate control means a higher average speed on the course
as well as the "saving" factor described above. The faster your
model flies, the more critical it becomes and the more practice
it takes to fly a low tight pattern. Goofing a turn by going too
far or too slow or over-controlling can mean precious seconds on
your average speed. "S" curving down the straight-a-ways and jockeying
for a good turn position also slows your time. An airplane that
is quick, accurate and sure will save those seconds. Plain practice
with your present model using various control travel ratios can
be both pleasing and surprising. The ideas from just such experimenting
are in the Gold Rush III. This was really fun trial and error.
The engine-and-fuel combination will probably lend more
to consistency than any of the other factors, except for a pilot
who may sometimes get a little extra nervous. Just as in C/L speed
or team racing, a reliable engine is essential to achieve top performance.
The powerplant must operate the same or as nearly the same as possible
every time before we can practice racing, evaluate control response,
check efficiency of fuel and propellers, or make any changes for
improvement. I picked the McCoy 19 because it had the consistency
I needed for such practice. Using a crankcase pressure fuel system,
it developed the power to swing slightly larger props necessary
for a large wing area model. An AMA .19 size model must have 766
sq. in. of wing area, more than many stunt jobs with .45s in the
nose. For pressure use the Veco adapter with an .018" hole plus
a one inch long piece of 1/32" ID tube in the fuel line to give
non-surge running. Fuels that are too hot or too cold, just
as the "super hot" engines, can be a real problem. Those exotic
home-brew fuels have probably caused more no-flights or incomplete
flights than all other reasons combined. I have used Thimble Drome
Sport fuel (blue can) for practically all my flying. It is a good
medium range fuel for most weather conditions and will give the
Mac about 12,000 rpm on a 9" x 7" or 8 3/4" x 7" prop. That means
85-plus mph on a two-way average for straight flight as timed by
the FAST Club's FAI electric timers. There are many ways
to control a pylon racer. We have seen good planes with proportional,
relay and relayless equipment. The question is really how many control
surfaces must be moved to give accurate flight. Here again there
is no single answer. Match your equipment with the controls you
desire and are most comfortable with. Gold Rush III uses
an Orbit relay 6. It drives Duramites for elevator and a combined
aileron-rudder, and an escapement for elevator trim in conjunction
with the retracting gear. The relayless radios are much lighter
but were unavailable way back when. Mounting is simply gobs of sponge
and a couple of rubber bands shown in the profile view.
Combining aileron and rudder has become quite popular. Flight tests
have shown it is much easier and more consistent to use aileron
to roll an airplane on point smoothly and quickly to a 90 degree
position for your pylon turn. Rudder itself will drop the nose while
it banks the model and this can cause palpitations of the heart
- this action results in those grasshopper antics that can be rough
when two planes are in a turn at the same time. It costs nothing
to link them (CAR), and when combined the rudder area and travel
are both reduced. The results are smoother turns and better directional
control on the straightaways. You wouldn't really need rudder
at all if the takeoff wasn't part of the timed run. I have found
that if the wheels are hard rubber and placed between 15 and 17
degrees ahead of the actual CG, and your rudder travel is adequate,
you should be able to steer the plane just like a race car regardless
of the wind. This will also give you a lot of confidence when there
are two or more planes at the starting line. The escapement
on the fifth channel operates both landing gear mechanism and the
trim at the same time. There is a big change in the drag when that
gear comes up and I feel this elevator trim is essential. It is
a ground adjustable system and the fine threads on the IBM clevis
unit allows very accurate settings for hands-off flying.
The retractable landing gear does add to the speed of the Gold
J Rush, 4½ to 6 mph. The reduced drag helps keep a higher
speed through the turn and acceleration after the turn, as well
as take-off acceleration. Rubber bands do all the work of hauling
it up and extending it for landing. We chose rubber bands because
they are lighter than an electric motor, are very high in usable
power and provide a quick operation. If you are like me, you are
busy during take-off and don't want to let go of the controlling
switches for too long a time, so the faster you can retract the
gear, the safer it will be. I must admit I always get a
thrill when the gear snaps into the wheel wells and the plane goes
by looking almost real. This system should work equally well on
F/F and C/L models for that little extra performance or realism.
Our last two design items of light weight and strong construction
should be grouped together. Selecting the balsa wood for the wing
and tail carefully can mean a saving of four to eight ounces without
sacrificing strength. Silk the wing and paper cover the tail for
two or three more. All these little things do add up to higher performance
and less crash damage. The average Pylon Racer weighs about four
pounds, give or take a few ounces. This brings us to making
the fuselage and your question will be the same as mine. Does it
have to be fiberglass? No, it doesn't. But I can promise you more
strength and no additional weight, absolute settings for the wing
and tail, clean and easy to maintain, no fuel problems and corresponding
gain in weight, more room to work inside and ease of repair or very
fast construction of another one. It's fun, go ahead and give it
a try. If I still haven't sold you on the merits of fiberglass,
the plans do include ideas for a balsa fuselage. Cross section "C"
shows a view through the engine mount area with the bulkhead, double
sheet sides and Berkeley type 1/2 round planking for the compound
curves. Very light and strong bulkheads can be made by sandwiching
1/4" balsa sheet between two pieces of 1/32" plywood and cutting
to shape. Repeat this basic pattern on all cross sections except
"I". Remember the engine mount will be 1/8" less on the outside
or profile to fit into the smaller area. If you are eager
and ready to try fiberglass, look at cross sections "E" and "H".
These represent the balsa pieces used in the pattern from which
the mold is made. The fuselage will be in .two parts, a left and
right side. The 1/4" x 2" sheet balsa will hold all the formers
in true alignment. Those are 1/8" formers with 1/8" balsa sheet
as noted on the profile plan and the 1/2 round planking for the
curves. Each cross section should be repeated as "E" and "H". Set
these formers on the 1/4" sheet and lay up your form (pattern).
Sand it to the right size and don't be afraid to really put a finish
on the pattern. A thick filler or primer material will give quick
and good results. The better the finish on your pattern, the smoother
your completed airplane, so give it a little extra. Each
half of the fuselage should be glued onto a rigid 3/4" or 7/8" piece
of plywood that has also been well finished. The mold will be made
of a water base material such as casting plaster or preferably Hydrocal,
and we don't want any warps. Locate a dealer who handles casting
materials and obtain that Hydrocal if at all possible. Get his ideas
for a parting agent, too. He may have better ideas or newer products.
If not, a good cooking grease like Crisco should be spread evenly
over the pattern and the plywood. base. If you use Hydrocal,
mix as directed and apply a layer over the pattern and ply base.
Use some canvass or binder and build up the thickness to no more
than 1". Let the mix set up thoroughly before you remove your finished
mold. If everything went well, the inside surface should be just
perfect for the finished glass model. We will get into the lay-up
techniques, coloring and completion of your fiberglass fuselage
as well as the set up and check out of the landing gear in a subsequent
article.
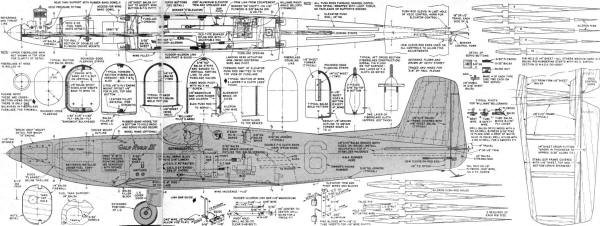
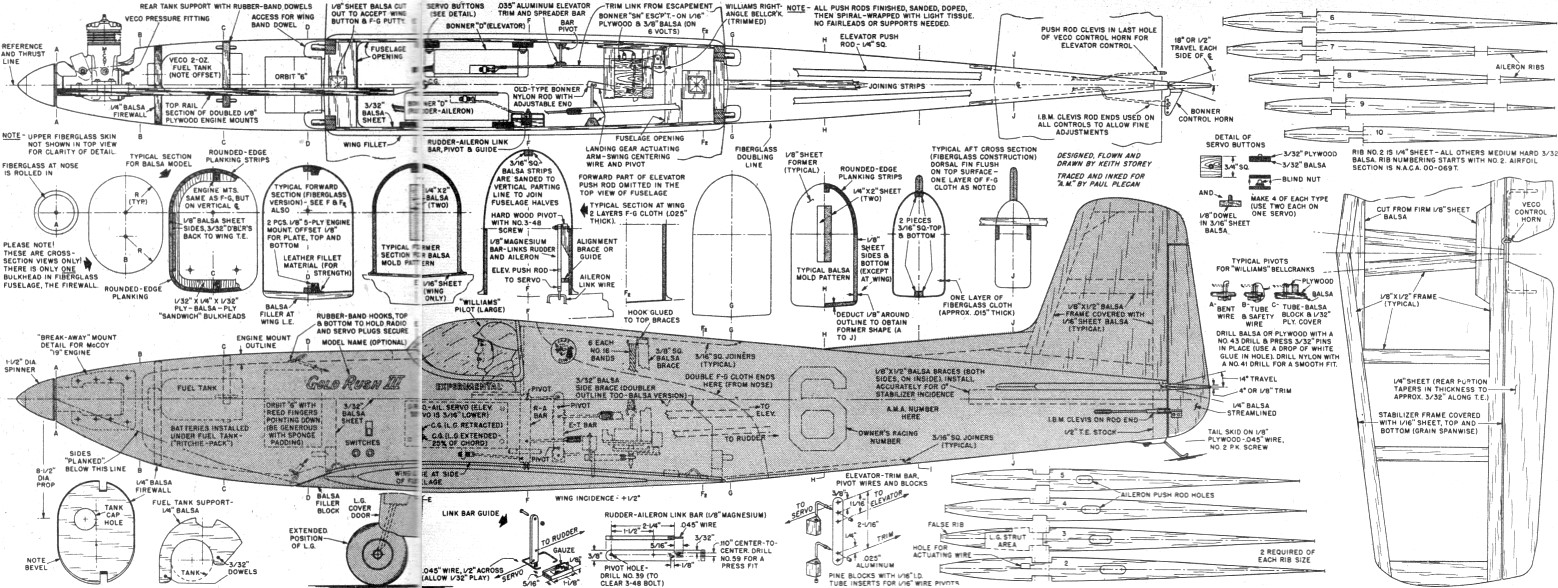
Gold Rush III Plans
(sheet 1)
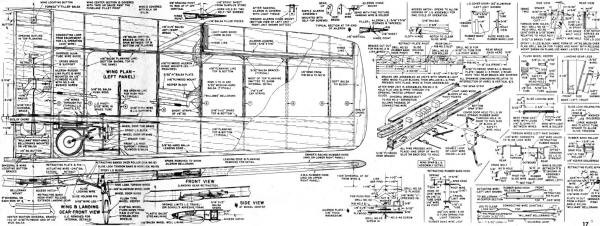
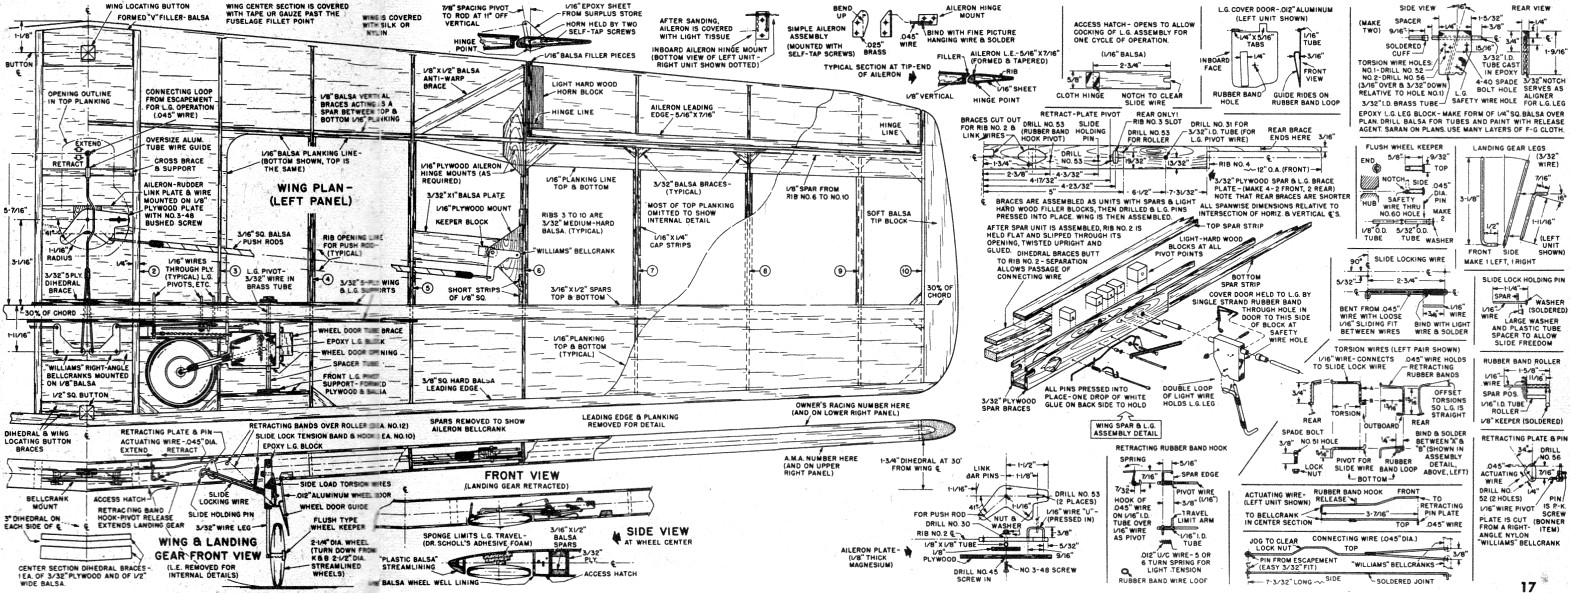
Gold Rush III Plans
(sheet 2)
Notice:
The AMA Plans Service offers a
full-size version of many of the plans show here at a very reasonable cost. They
will scale the plans any size for you. It is always best to buy printed plans because
my scanner versions often have distortions that can cause parts to fit poorly. Purchasing
plans also help to support the operation of the
Academy of Model Aeronautics - the #1
advocate for model aviation throughout the world. If the AMA no longer has this
plan on file, I will be glad to send you my higher resolution version.
Try my Scale Calculator for
Model Airplane Plans.
Posted November 28, 2013
|