|
Before electronic heading-hold
and rate-hold gyroscopes, coaxial rotors, and mass-produced, highly engineered and
prefabricated model helicopters, the pioneers had to design, build, and then learn
to fly their creations without the benefit of someone to teach them. Such was the
case even as relatively recently as 1972 when Gene Rock wrote this article about
his trials and tribulation involving his home-grown S.S.P. radio controlled helicopter.
Those certainly were not "the good old days" for those who desperately wanted to
won and fly an R/C helicopter, but did not possess the skill and/or resources to
do what Mr. Rock did. Here is the article from a month earlier that describes the
construction of the S.S.P.
See also SSP-5.
Learning to Fly the S.S.P. - Part II
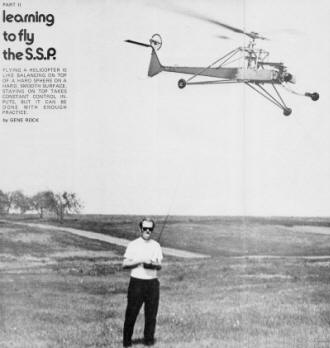 by Gene Rock by Gene Rock
Flying a helicopter is like balancing on top of a hard sphere on a hard, smooth
surface. Staying on top takes a constant control inputs, but it can be done with
enough practice.
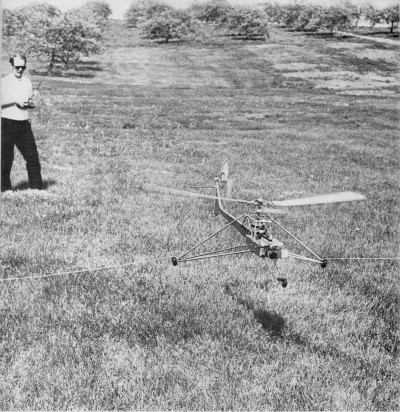
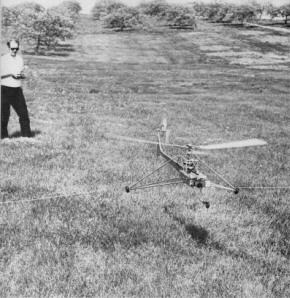
The next step is to tether your model. Put two stakes into the ground about 50
to 60 ft. apart if possible. (Weights can also be used.) Place the model in the
center facing one of the stakes. Tie a cord from one side of the main landing gear
to one stake and the opposite side to the other stake. Do not allow any slack. This
tethering allows the model to yaw 90° on the ground but keeps the cord away from
the tail rotor. The model can move fore or aft ± 10 ft. and sideways ± 2 ft. approximately.
The model can also rise 8 to 10 ft. off the ground.
Now you are ready to briefly raise your model off the ground. Again advance the
throttle slowly. Play with the cyclic stick and watch the main rotor. If there is
a wind, try to keep the rotor horizontal or slightly high down-wind. Let the model
rise off the ground and immediately settle back; if the model yaws, adjust the tail
rotor collective by either the pitch arm or the servo linkage. If the tail rotor
rate gyro is used, adjust the collective so the gyro remains vertical at operating
speed. Remember, make your adjustments for tail rotor collective when the engine
is running at a constant speed.
Next, observe the pitch. Add weight just behind the nose-wheel until the model
hovers with the swash plate horizontal. The model may hover slightly nose down.
It should balance about 1/4 to 1/2" forward of the rotor shaft. (I have never had
a nose-heavy helicopter.) The swash plate probably will be tilted slightly left
to offset the tail rotor thrust. Again observe the rotor when applying cyclic. Does
it move purely fore and aft when longitudinal cyclic is applied? If not, rotate
the swashplate. My pitch link on the swashplate leads the blades by about 10°.
This entire procedure may seem long and tedious, but in time will become in-stinctive
and will not require more than a half hour if you are already familiar with fixed-wing
RC flying.
Using an electric starter. Note long needle valve extension.
Flying: This is where the fun starts. It can also be an extremely
trying time if you have a ship of your own design, for it can take up to two months
to debug it. But then, nothing is more satisfying than flying one's own creation.
The S.S.P. in the configuration shown has been debugged and should present few problems.
With your model tethered, play with the controls to familiarize yourself with
them while the model is on the ground. Try to taxi it. I found it difficult at first
to work all four controls simultaneously. Raise the model off the ground occasionally.
The easiest way to take off is to taxi to the extreme forward position and apply
power - the tail will rise. Slowly pull back on the stick. As soon as the model
is horizontal, neutralize the stick, or the tail will drop and it will start flying
backwards. Using this procedure, you should be able to fly the model to the top
of the tether. This is an exercise to familiarize yourself with longitudinal (fore
and aft) cyclic. Since the tether lines are taut, lateral (sideways) cyclic and
yaw are stabilized. Another exercise is to keep one tether line taut by applying
a small amount of lateral cyclic. Raise the model off the ground to about a three-
or four-ft. altitude. This is a throttle, longitudinal cyclic and yaw exercise.
A pure lateral cyclic, yaw or throttle control cannot be obtained with this tether.
Although limited, this tethering system should prove satisfactory for most people.
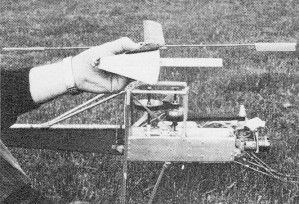
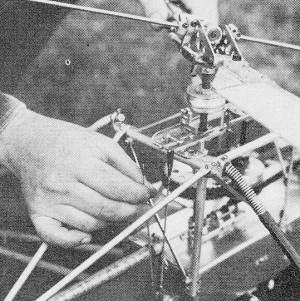
Setting main rotor pitch at 8 degrees.
Another more sophisticated method, proposed by John Burkam, is to attach pulleys
to the stakes so the cord is. a closed loop. Attach a five-ft. cord some-where along
the return cord. Secure this cord to a third stake. This method of tether allows
the model to move sideways as much as it does fore and aft. As you become more familiar
with your model, and keep it in the air for longer periods of time, it will jerk
when the tethering limits are reached. A screen door spring cut to four in. long
and attached to the landing gear will soften this blow.
Because the tether does not pick up the model at the center of gravity, a strong
moment is applied when the model is in the extreme aft position. Forward cyclic
will not right the model. Chop the throttle and taxi back to the center.
Securing main rotors after adjusting.
After three to five hours of tethered flight, you should be familiar enough with
the controls to fly free. When the model is released from tethering, flying it is
a whole new ballgame. Be very cautious as you were when starting tethered flight.
Start by putting the model into the air and try to keep it from translating (i.e.,
into forward flight). Keep practicing until you can keep the model in the air for
about 30 seconds in a confined space, 50' x 50' x 50' for example.
I find the best way to control the model is to give the cyclic stick a large
displacement for a second and then to back off to about 1/4 to 1/2 of its travel.
The model is very slow to respond to a small input because of the large main rotor
gyro. If the gyro is made smaller, the model will respond faster but will be less
stable and therefore harder to fly. The opposite is also true, provided more cyclic
can be fed into the paddles on the gyro. At first your stick motions on the transmitter
will be very erratic; in time, you will learn to anticipate the model because of
this time lag and the stick motions will become smoother. It took about 15 hours
before I could hold the model in one spot. Don't be surprised if it takes you just
as long!
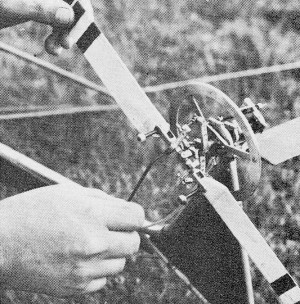
Adjusting tail rotor collective by setting both blades individually.
Note horizontal stabilizer for trimming forward flight.
When learning to hover, a slight breeze is helpful. The wind keeps the model
pointed into it, therefore less tail rotor correction is needed.
It takes less power to fly the model just off the ground up to a distance of
1 1/2 times the main rotor diameter. The model is riding on a cushion of air - this
is called ground effect. The helicopter can be very skittish in this region, like
a ping-pong ball rolling off a table. (This effect is less noticeable over grass.)
The fuel tank level plays an important part on the trim of the model. A full
tank makes the nose heavy, and a low tank, the opposite. The trim pot on the transmitter
should be able to correct this, but in time you will not notice this change as much.
A central tank draining into a small tank at the engine using the chicken feeder
system could correct this, but I don't recommend it as this system is troublesome
and does not allow stunting. The fuel pick-up in my tank is in the front because
the model usually flies nose down.
Now you are ready for forward flight. Select a calm day and take the model to
a large field. Practice flying forward for about 50 feet, then set the model down.
You will notice that, as the model picks up speed, it will climb as long as the
rotor remains close to horizontal. In hovering, tail rotor collective is used to
yaw the model. To yaw in forward flight, lateral cyclic is used and made smoother
if tail rotor collective is also used. This is just like coupled rudder and aileron
on a fixed wing. When making a turn, longitudinal cyclic is neutralized or slightly
aft to keep the model's nose from dropping just like up elevator. When coming out
of a turn, forward cyclic is fed back in. If not, the helicopter will climb like
a rudder-only model. Fixed wing experience is very helpful in forward flight especially
when the model is coming toward you. Learning to fly a helicopter in forward flight
can be a slow process without this knowledge.
Try flying the model in 50-ft. diameter circles around you. Keep the forward
speed down to about 10 to 20 mph. Once you are proficient at circling, try figure-eights.
When you can come out of one turn and proceed into the opposite without pitching
up, you have achieved your rotary wings.
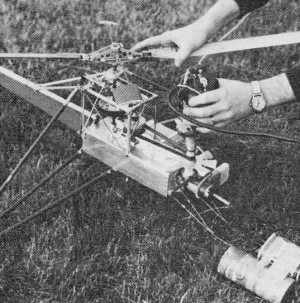
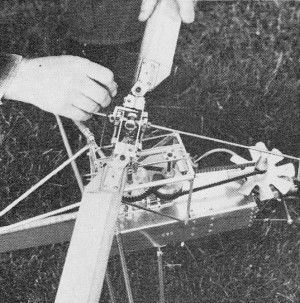
Setting up the links for the swashplate for lateral and longitudinal
control.
The tail rotor in forward flight becomes more efficient, causing the model' to
turn to the left. This is very noticeable when flying in a wind of 10 to 20 mph,
If the trim pot is full left when hovering, there should be enough right trim for
forward flight. Unlike fixed wing, there is no "neutral" cyclic stick on a helicopter,
so you may not notice this effect. The main rotor also becomes more efficient in
forward flight as long as it remains close to horizontal; therefore it takes less
power to fly at about 20 mph. The maximum power required is when the model is traveling
at its maximum speed. This is because the rotor is about 20° to 30° off of horizontal
and the model requires power to drag it through the air. A good way to illustrate
this effect is to taxi down a paved surface. Gradually build up speed with throttle
and forward stick. When the model is traveling anywhere be-tween 20 to 40 mph, neutralize
the cyclic stick. The model will jump into the air and continue to climb. This is
a good way to lift a heavy payload. You may find your engine four cycling in forward
flight to maintain a given altitude. This makes for long engine life.
Observing main rotor for proper tracking. It helps to have different
color tips on the blades.
To adjust the horizontal stab, select a day with winds of 20 to 30 mph. Fly the
model forward as fast as it will go with full throttle. If the model dives, shim
the leading edge down. If it climbs, shim the trailing edge down. Once trimmed,
the model should have good penetration. The horizontal stab also acts as a pitch
damper when hovering.
If the model is built without the tail rotor rate gyro, a vertical fin is a must.
The vertical fin would act as a yaw damper and make controlling with tail rotor
collective much easier. A vertical fin painted a bright color also makes the model
easier to see at a distance. The fin should have about 1/3 to 1/2 the area of the
tail rotor disc. This will require more power to the tail rotor but will not be
noticed.
After flying this model for awhile you will find large landing gear can create
an optical illusion interrupting your orientation. For this reason, keep the model
upwind. Scale-like skids and a fuselage can correct this. As you get better, shed
the large landing gear. I would like to remind you that this model was designed
as a trainer and as such is limited.
I don't expect anyone to follow the plans completely and if a fuselage is decided
upon, make it integral. An integral fuselage would require extensive redesign but
would not add the extra weight that a fuselage shell, only for looks, would. Try
to keep the fuel tank visible.
Trimming:
Fill the fuel tank and start the engine with an electric starter, making sure
the engine throttle is on idle. Use a starter with an rpm range of 2000 to 3000
- a higher speed starter would engage the clutch causing unnecessary wear even though
it would start the engine. I like to hold the model above my head when adjusting
high throttle; others like to adjust the model by lying on the ground. After high
speed is set, adjust low speed so that the clutch does not engage. Again hold the
model above your head and tilt the model fairly rapidly in one direction, then stop
suddenly. If the main rotor gyro is functioning properly, it should take 1 1/2 to
2 seconds to become perpendicular to the main rotor shaft. If the interval is less,
add weight to the gyro. Yaw the model physically (rotating about the vertical axis).
The model should resist your force if the tail rotor gyro is working. Next check
your controls. Make sure you have a good grip, as the force can surprise you, especially
the yaw control. Have your helper move the stick slowly. If the swashplate is hooked
up improperly, or the tail rotor is backwards, 'don't feel bad - I still make that
mistake.
Tracking the main rotor blades can be quite simple if the tips are painted contrasting
colors. Use an adjustable protractor or the equivalent to set the collective of
the main rotor blades. An 8° setting can be used with the Enya 45 and the Murphy
muffler. Start the engine and slowly advance the throttle. Observe the blade tips
and adjust until they describe the same plane by rotating -20. When the blades are
tracking, lock their setting by tightening the No. 6-32 x 1 1/4" bolts in the hub.
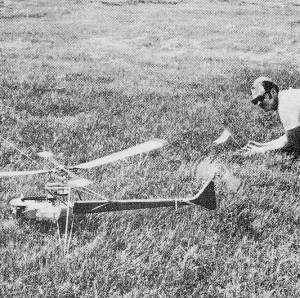
Tether system allows learning forward and aft cyclic control
only. Taut lines prevent a turn-over. Tail rotor control can also be practiced.
Hovering in a crosswind can be very difficult requiring almost total tail rotor
collective. Increase tail rotor collective travel to +20° -5° if required.
Chopping the throttle back to idle when the model is hovering can be disastrous.
The model drops into its own downwash arid continues to drop; applying power will
only make this condition worse. Push the cyclic stick forward. This will pull the
model out of the downwash. The only time that this can happen is when the model
has no velocity with respect to the surrounding air. This sometimes can be the case
when dropping in for a flaired landing. Always keep the model moving forward during
this maneuver.
The flaired landing is performed from forward flight by pulling back on the stick
to slow the model and chopping the throttle to keep it from climbing. Give a short
engine burst just before touchdown.
To spin the model, just hold full tail rotor collective. A slight amount of opposite
lateral and forward longitudinal cyclic may be required. Don't do this maneuver
until you have complete confidence in yourself and the model, for it is easy to
loose orientation.
As you improve you will find that this helicopter can be banked almost 90°. This
requires hard lateral cyclic, then ease off. The 90° bank should only be continued
for about 30° of the turn, for the model will drop drastically. You might even roll
it if full lateral cyclic is held.
The stall turn is performed at close to maximum speed. Pull back the longitudinal
stick until the model climbs at about a 45° angle. When the model slows down and
stops, give it hard left tail rotor. When the model has spun 90°, let up on tail
rotor while still holding some aft cyclic. The model will come right back down the
same path. Learn this maneuver well for it just may save your model some day. Using
lateral cyclic when downwind to turn the model takes time and allows the model to
drift further downwind.
The same procedure that is used for stall turns can end up in a loop if just
longitudinal cyclic is used. The S.S.P., with the large landing gear, will not coast
through a loop because of the low center of drag. The loop has been accidentally
performed by the Dieter Schluter Hueycobra when making a stall turn.
The S.S.P. weighs about 7 lb. and has been flown at 9-5/8 lb. This represents
a lot of fuel when going for an endurance record. Do not load the model up over
10 lb. for it will suffer a control loss. The main rotor thrust is about 11 lb.
I am very interested in hearing about your progress in this field. Please do
not hesitate to ask questions. Write to me in care of AAM.
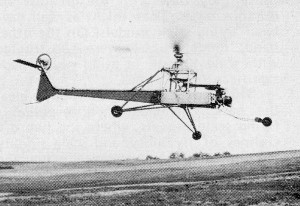
In flight with the tethers very loose. Happy landings.
Notice:
The AMA Plans Service offers a
full-size version of many of the plans show here at a very reasonable cost. They
will scale the plans any size for you. It is always best to buy printed plans because
my scanner versions often have distortions that can cause parts to fit poorly. Purchasing
plans also help to support the operation of the
Academy of Model Aeronautics - the #1
advocate for model aviation throughout the world. If the AMA no longer has this
plan on file, I will be glad to send you my higher resolution version.
Try my Scale Calculator for
Model Airplane Plans.
Posted February 18, 2012
|