|
Even though I have never attempted
to build a model covered with microfilm, it is easy to appreciate what a delicate
task properly preparing the solution, covering the frame, and handling the delicate
airframe is, along with the precision handling required to obtain the correct film
thickness and coverage. There have probably been improvements in microfilm solutions
and airframe materials and gluing techniques, but ultimately you need to form the
film on the wing, tail, and propeller surfaces. This 1971 American Aircraft
Modeler magazine article should still be useful for contemporary indoor flyers.
See Part 1: Bandersnap, Part 2:
Pouring and Covering with Microfilm, and Part III:
Bilgri
Patching and Covering Methods.
Pouring and Covering with Microfilm
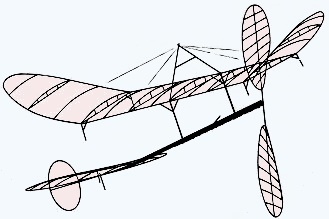 Tom Vallee Tom Vallee
Last month, the Bandersnap, a low-ceiling contest-type model was presented by
the author. Here he shows the art of covering it.
A number of excellent indoor model designs have been published in the last ten
years. Unfortunately, many modelers who thought it would be fun to try building
such a model have come to grief when attempting to make microfilm, or they have
given up in despair when, after finally managing to pour some microfilm, covering
the model resulted in disaster.
Such discouragements are a real shame because building an indoor model is not
the difficult thing many people imagine it to be. It's merely a matter of mastering
a few simple techniques! The problem is that, while many excellent designs are available,
no major magazine recently has run comprehensive articles on the techniques of building
and covering indoor models. An excellent series by Joe Bilgri appeared back in 1960,
but ten years is a long time and this information bears repeating.
Microfilm is a thin lightweight plastic film used to cover indoor models. Unlike
the Japanese tissue, silkspan, etc., used for outdoor models, it is not available
in the local hobby shop. The builder has to make it himself and this is where the
fun begins!
Microfilm solution is made from a nitrocellulose base (guncotton) dissolved in
a mixture of various solvents, with plasticizers added to give the desired qualities.
The solution has the consistency, appearance and smell of clear nitrate dope.
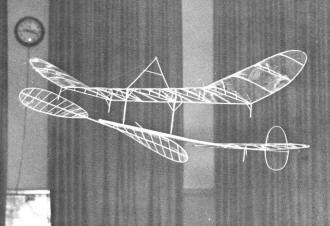
Snark Mk II FAI model is off on a record flight. It has regularly
exceeded 20 min. under less than 20-ft. ceilings and set five national records.
Note its intricate wing ribs and bracing. These features permit construction with
superlight and ultra-thin balsa.
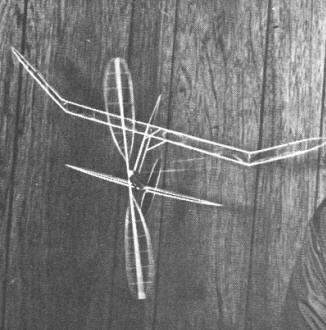
The Bandersnap in flight. For full-size plans, see pages 36-37,
January 1971 AAM.
Although some experienced builders make excellent microfilm by starting with
a mixture of clear nitrate dope or guncotton and complex mixtures of solvents and
plasticizers, the indoor beginner should avoid home-brew microfilm. Having learned
the hard way, I recommend strongly that for his first attempts the indoor beginner
should use a standard commercial film solution from one of the following sources:
(1) Micro-Dyne Type B microfilm - Micro-Dyne Precision Products, Box 2338, Leucadia,
Calif. 92024; (2) Dead Slack American-type microfilm - Micro-X Indoor Model Supplies,
5200 Seven Pines Dr., Lorain, Ohio 44053; and (3) Sig Microfilm Solution - Sig Manufacturing
Co., Inc., 401 (A) South Front St., Montezuma, Iowa 50171.
Briefly, microfilm is made by pouring a small amount of microfilm solution onto
the surface of the tank of water from just above that surface. The solution spreads
like an oil slick and then dries, leaving a thin film of plastic, known as microfilm,
floating on the water.
After several minutes, a wet balsa frame is laid on the floating microfilm and
the excess film is folded over the edges of the frame. The frame of film is now
ready to be lifted by gliding it across the water toward one side of the tank. The
leading edge of the frame is lifted slightly and air breaks the suction between
the film and the water at this edge. As the frame moves forward and its leading
edge is lifted higher, the finished frame of microfilm literally glides free of
the water. Drain off excess water and set the frame aside to dry. The photos and
diagrams should make the whole process clear. Microfilm tank construction is easy.
A simple rectangular frame is made from four 1 x 2" boards (approximately 3/4 x
1 1/2" in cross section) two each cut to the desired width and length of the tank.
Set this frame on top of a table or workbench and layover it a sheet of vinyl or
polyethylene plastic (available at any dime store) several inches larger than the
frame in all directions. This makes a complete microfilm tank with the plastic as
a waterproof liner. Pour water in the tank to a depth of one half inch and allow
at least a half hour for the water temperature to stabilize before pouring film.
Tank size is determined by the size of the frames of film needed. In general,
the tank should be 18 in. to two ft. longer and wider than the largest frame. Thus,
to pour 20-in. frames of film (such as are needed to cover last month's Bandersnap)
, build a tank about 38 x 30". When determining tank size, remember that better
film is made in a large tank than in one that is a little too small.
My microfilm tank is a 3 x 4' sheet of 1/2" plywood, with 1 x 2" boards nailed
to its edges. While this tank is more elaborate than necessary, it is convenient
because I can set it up on a table with dimensions slightly smaller than those of
the tank. This tank is used to pour frames up to 30 in. long. A 3 1/2 x 5' tank
will take frames large enough to cover even the largest indoor models.
Microfilm frames are made from 1/4 x 1/2" balsa strips, with the corners reinforced
as shown. My standard microfilm frames are 12 in. wide by at least two in. longer
than the span of the longest wing I plan to cover.
For pouring microfilm, an ordinary spoon is an excellent device. The thickness
of the film is governed mainly by the amount of microfilm solution used. The more
solution used, the thicker the film. Using less solution makes thinner film.
After successfully pouring the first frames, notice that the microfilm, when
held in front of a light at the right angle, shows colors because it is thin like
a soap bubble! This important characteristic permits the modeler to judge the microfilm's
relative thickness and strength by its color. Silver and gold are the thinnest film,
while blue, red and green film are progressively thicker (and stronger). The beginner
should use relatively thick microfilm (blue to green) which is easier to handle.
If it is difficult to lift those first frames of microfilm from the tank, it
may be that not enough microfilm solution was used and the film is too thin and
weak. Use more solution on the next pour and the thicker film should lift easily.
Sometimes dry (nonsticky) film will slip off the frames. In this case, coating the
frames with rubber cement should solve the problem.
It's good practice to make enough microfilm to cover several models before starting
to build. It can be stored in a spare model box or cabinet until needed. After several
weeks the film should go slack (loose) on the frames and be ready for covering a
model by the techniques outlined below and illustrated in the photographs.
If, when needed for covering, the microfilm is still tight on the frame, it can
be made to go slack by stretching the film. Light the gas on the front burner of
the kitchen stove and hold the frame (moving it back and forth) in the rising column
of warm air, about 18 to 24 in. above the heat source. The film will stretch and
billow up, so remove the frame from the heat quickly and it will be ready to use.
This is a variation of a technique outlined in Joe Bilgri's indoor articles.
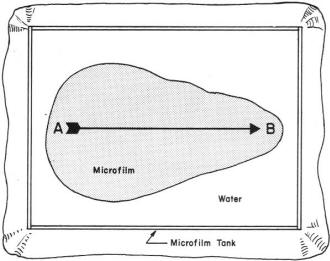
Fig. 1 - Start pouring microfilm solution at A, moving hand across
surface of tank at a uniform rate. Pouring is finished at B. Solution spreads across
surface of water like an oil slick to form microfilm (shaded area) shown at moment
pour is finished at B.
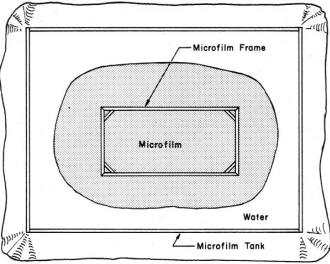
Fig. 2 - Solution finishes spreading to form an oval of microfilm
on the surface of the tank. After the microfilm has dried for several minutes, a
wet microfilm frame is placed on the film.
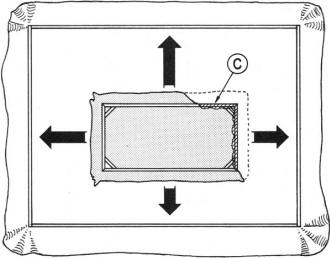
Fig. 3 The microfilm frame is now floated to within two inches
of each side of the tank. This gathers film outside the frame close to edges of
the frame. This excess film can easily be folded over the edges of the frame as
indicated by C. When this process is completed, the film is ready to be lifted from
the tank.
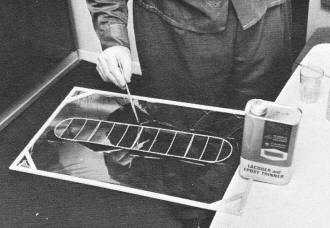
D - To remove wing from film, use either brush dipped in acetone
or a hot wire to cut material. Whole wing is done at one time.
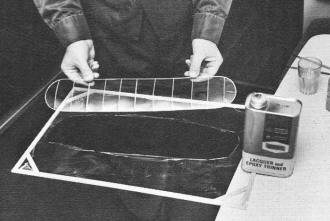
E - Finished job is beautiful, but fragile. Refer to last month's
article on the Bandersnap to complete the model.
Caution: If the film is held too close to the burner it goes poof and nothing
is left but an empty frame!
The simple covering process takes three steps. (1) The wing (or stab, etc.) is
laid upside down on a frame of slick microfilm.
(2) The wing (or other part) outline is wet carefully, a few drops at a time,
with a brush dipped in tap water. Moisture causes the film to stick to the wood.
(3) After the wing (etc.) is partly dried, a hot wire or a soft, pointed brush
dipped in acetone is used to cut the wing free of the frame. When using the brush,
take care to use just enough acetone to cut the film. Too wet an acetone brush may
make holes in the covering.
One important technique is patching holes. Despite several years of building
experience, I seldom complete a model without punching at least one or two holes
in the film. If Bill Bigge hadn't shown me how to make patching material, my first
indoor model might never have been airborne.
Microfilm patching material is made as follows. A sheet of Japanese tissue is
laid on the building board. Over this is placed a frame of microfilm which is then
covered with another sheet of tissue. Cut around the inside edge of the frame with
a sharp blade and lift frame and excess paper clear. What is left is a large sheet
of patching material, a sandwich of microfilm between two sheets of paper. It is
easy to cut with a pair of scissors to any size or shape needed.
Cut a patch and separate the two sheets of paper. The film will stick to one
piece of paper. Before mending, apply just a few droplets of water with a soft,
pointed brush around the edge of the hole or the patch. This will help the film
to stick. Lay the patch, microfilm to film, over the hole and pat the mend between
two fingers until film adheres to film. Carefully peel the tissue free and the model
is ready to fly.
Hopefully this article will help the beginner avoid common pitfalls. Other information
and assistance is available from a number of sources. The Joe Bilgri articles are
an invaluable investment for indoor model builders. Reprints are available from
Bud Tenny, Box 545 Richardson, Texas 75080.
At the same time, join NIMAS (National Indoor Model Airplane Society). Its monthly
bulletin, "Indoor News and Views," is chock-full of data on indoor modeling - the
latest designs, building techniques, and where indoor models are being flown. Membership
is three dollars. Again, contact Bud Tenny.
NIMAS is also organizing a group of indoor instructors across the country. For
their addresses. send a letter and a stamped, self-addressed envelope to Roger Schroeder,
4111 W. 98 St., Overland Park, Kansas. If you have any other questions, please write
me in care of AAM.
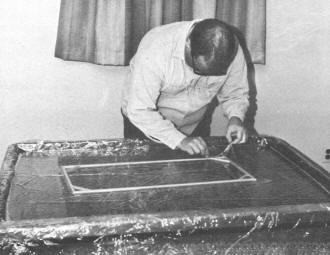
A - To hold film to the frame, carefully fold excess material
over frame edges. Must be no breaks or open areas inside.
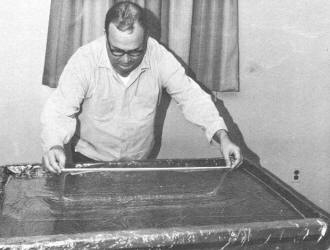
B - Lifting is ticklish, to say the least. Actually, the frame
is glided off. Slide it to one edge of pond and lift free edge slowly.
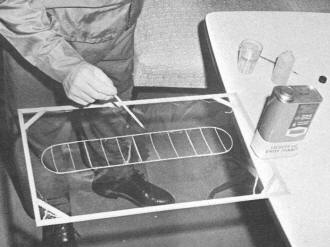
C - Covering process begins with wing on the film. Use a soft
brush dipped in water to wet all contacting woodwork, ribs too.
Posted April 16, 2016
|


