[Table of Contents]
People
old and young enjoy waxing nostalgic about and learning some of the history of
early electronics. Popular Electronics was published from October 1954 through April 1985. All copyrights (if any) are
hereby acknowledged.
See
Popular Electronics articles
on aircraft modeling. See all articles from
Popular Electronics.
|
Even after half a century, there is still a debate
about whether nickel-cadmium (NiCad) batteries exhibit a "memory," and if so, how to best rejuvenate
their ability to store a charge. Chemistry, materials, and manufacturing advances have vastly improved
the NiCad to where if there is still a memory phenomenon, it is very minimal. If you are still using
NiCads from a couple decades ago, first, congratulations for being an excellent tender of batteries,
but second, it really is time to replace them. NiCads are by far the least expensive type of battery
for R/C modeling, and are still included by default with new radios - both for the transmitter and the
receiver. Nickel metal hydride (NiMH) have a higher energy storage density and are more ecologically
friendly, but they cost about 25% more than NiCads, so if you want them in your radio, you'll have to
buy them separately.
See complete list of Popular Electronics
articles on aircraft modeling.
Rejuvenate R/C Batteries
By Paul F. RungeDon't waste money by discarding batteries which test low; this rejuvenator
extends their life.
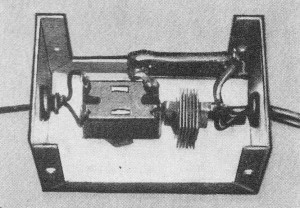 Subchassis view of the complete rejuvenator.
It is a safe bet that quite a number of R/C batteries are discarded as worn out long before their active
life is really over. This procedure is not only expensive but also entirely unnecessary when the simple
process of rejuvenation is used.
Rejuvenating a dry cell is entirely possible, theoretically and practically. Many of the larger electronic
manufacturers have published plans for rejuvenators in some of their books and pamphlets.
In practice, as a dry cell is used, the carbon electrode gathers hydrogen. If the drain is fairly
high, hydrogen gathers faster than the battery can dissipate it during the "off" periods. Consequently,
when it is used again, only a little of the hydrogen has been removed. Continued operation adds more
hydrogen, with the result that the battery becomes useless long before the chemical agents in it have
been fully used.
Ideal operation of dry cells calls for intermittent use spaced out over a period of time. In this
way, the zinc container will be well used up when the battery shows signs of wearing out. In radio control,
batteries are employed fairly frequently and the drain is high, so that the zinc is barely touched and
the chemicals only slightly used. However, the hydrogen keeps the battery from functioning the way it
should.
To rejuvenate a battery, the carbon electrode should be depolarized. This depolarization assists
the battery chemicals in removing the hydrogen after each use.
Tests indicate that R/C batteries - from the smallest pen cell to the 67 1/2-volt transmitter "B's"
- when rejuvenated after each use, will last two to four times as long as when they are not. Under average
conditions, the active R/C'er will save the cost of a rejuvenator in less than a season.
Because R/C batteries are generally small in size, the design of the rejuvenator can be considerably
simplified. The charger to be described uses the battery itself as a capacitor, and thus will automatically
adjust its voltage and current to the size of the battery being charged. The design also allows for
complete enclosure, minimizing shock danger. Construction is very simple, since a minimum of parts is
used.
Begin by drilling the three holes required in the Bud "Minibox." Install grommets in the a.c. cord
and battery-lead holes, and mount the switch with its "on-off" plate onto the cover.
Insert the a.c. cord and tie a knot on the inside so that it cannot be accidentally jerked back through
the grommet. Solder the two leads to two poles on the double-pole, single-throw, toggle switch. Such
a toggle switch is used so that, when the charger is turned off, the circuit will be completely isolated
from the 117-volt line.
Bend the minus terminal of the 65-milliampere selenium rectifier to fit against one switch contact
and solder. Solder the wire lead of the 2000-ohm, 10-watt resistor to the other contact of the switch.
Bring the output leads through the other grommet. Again, tie a knot inside the box to prevent a pull
through. Solder the red output lead to the plus side of the rectifier and the black lead to the remaining
terminal of the 2000-ohm resistor.
Alligator clips are now installed at the ends of the battery leads. Before replacing the cover, test
the rejuvenator with a d.c. voltmeter. Set the d.c. range to the 0-100 scale. Make sure the switch is
in the off position and plug the charger into an a.c. outlet. Fasten the alligator clips to the correct
meter leads, and turn the switch on. Without a battery in the circuit, the meter should read between
40 and 50 volts with the needle slightly unsteady.
Now the charger is ready to be used. Just one word of caution - this is a rejuvenator in the true
sense of the word, and so will not recharge dead cells. The purpose here is to prolong the ordinary
life of the battery, and this can best be done by charging the battery after each time it is used, for
approximately the length of time that the battery has been in operation.
As each battery is charged, it should be touched occasionally for warmth. If the battery is a great
deal warmer than body temperature, the rejuvenator should be turned off for a short period. Charging
should be resumed if the battery voltage is still below normal for the battery.
1 - Bud CU2101 "Minibox" 1 - 6' a.c. line cord with plug 1 - 18" length of #20 red flexible
hookup wire 1 - 18" length of #20 black flexible hookup wire 2 - Alligator clips (one red, and
one black) 1 - 65 milliampere Federal selenium rectifier 1 - 2000 ohm, 10 watt wirewound resistor
1 - D.p.s.t. toggle switch 1-Toggle "on-off" switch plate 2 - 3/8" mounting hole grommets
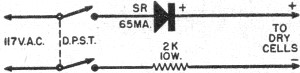
Schematic diagram of the rejuvenator and parts list: note the unit's simplicity.
Be careful of electric shock. The minus side of this rejuvenator is "above" ground and must not be handled
or touched by the operator. A severe shock can result.
When using a voltmeter during charging periods to check on the battery voltages, it should always
read higher than that normal for the battery under charge. In the case of "A" batteries, the reading
will only be a little bit higher; while with "B" batteries, it may go as high as 10 volts over the rated,
voltage. After charging, the battery will probably read somewhat higher than its rated voltage, but
this will not do any harm.
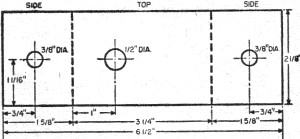
Dimensional diagram of the Bud "Minibox" showing the holes for the a.c, line, battery leads, and
the "on-off" toggle switch.
Many builders hook up new batteries to their rejuvenators for a few minutes to "wake them up" from
their shelf life.
An especially good feature of the charger is its automatic charging voltage and rate. Because of
this feature, batteries in series or parallel may be charged in an installation without removal. Simply
double the time for two batteries which are connected. The only exceptions are 67 1/2-volt batteries,
which must be charged separately.
Because the charger is designed as a rejuvenator, do not attempt to charge wet cells. It will not
furnish a high enough current to be effective.
Get the most out of your R/C batteries. Keep them fresh!
Posted February 19, 2012
Vintage Popular Electronics Magazine Articles
- R/C Notes, January
1956
- R/C Triplex: Three Controls on One Channel,
November 1956
- R/C Reliability,
March 1955 Popular Electronics
-
Robot Helicopter, November 1956
-
Model Boat for the 27 mc. Citizens Band , March 1953 Radio & Television News
- Adjusting
the Power - R/C Plane, January 1955
- Rejuvenate
R/C Batteries, July 1955
- 3 and 4 Finger
R/C Escapements, January 1955
- Radio Control
of Models, October 1954
- The R/C Cloud, February 1960
- Radio
Control Installations, February 1955
-
Compound
Escapements & Servos, February 1955
- Flying the R/C
Plane, December 1954
- The Lorenz
Transmitter, December 1954
|