|
Ace R/C was in its heyday in the 1970s. It was manufacturing one of the
nicest
single channel proportional radio control systems available and had a
small line of models to go along with it. The models -
Ace All Star Biplane,
Ace High
Glider,
Ace Pacer, and the Ace Simple Series - all used the very popular Ace
foam wing set, which had both straight and tapered chords. This Ace High
glider is one of the first I remember seeing and wanting in American
Aircraft Modeler magazine in 1971 when I about 13 years old and
penniless. Grass mowing jobs could pay for the glider kit, but the R/C
system was way out of reach. Ace High glider kits still show up on eBay
occasionally for less the $100, which is a pretty good price these days for
a vintage kit.
Ace High Glider

Pretty Jennifer Kampen poses with shining Top-Cote chrome-covered ACE High.
A touch of lift and away it goes. Long high flights are what this one is
all about.
By Owen Kampen
Interest in RC gliders has soared to new heights, with each season bringing
new converts to this relaxing yet challenging form of flight. Plans for these
slim-winged beauties appear with increasing regularity in model publications,
and an ever-growing number of kits are being offered.
Yet far too many would-be soarers remain grounded for reasons such as these:
(1) Long wings are built with lots of ribs and other pieces, thus requiring
considerable care and skill in assembly and covering to prevent bends and twists.
(2) Many parts of the country are unsuitable for slope soaring, and towing devices
are expensive and complicated for an individual who flies alone. (3) The need
for extra RC gear can be expensive for a fun plane or for a beginner, whose
pocket jingle is well below a hundred dollars.
Enter Ace High, the super solution sailplane. Wing construction is simplified
through use of both straight and tapered sections of ACE R/C molded foam wings.
No ribs, no spars, no warps! The launch problem is handled by a stock Cox Baby
Bee engine, which puts the ship hundreds of feet high and allows plenty of minutes
for thermal seeking. Purists may object to powered sailplane, but they do provide
built-in slope for those who are far removed from coastal and mountain areas.
Finally, this long, lean craft can be remote-controlled with some of the
most reliable and inexpensive RC equipment available - namely, the ACE Commander
RO Pulse transmitter and receiver, coupled with a standard single Adams actuator.
The whole package is available for about $60. Generally overlooked in today's
mad rush for digital gear, simple pulse proportional rudder updated to 1971
standards of integrated design reliability is hard to beat. With no motors to
wear out or gears to break and operating with but one moving part, this system
is the essence of simplicity. And it works and works and works.
The fuselage is a fast-building, modified slab-sided box which holds everything
together with minimum drag. As a result, Ace High can be airborne with a minimum
investment of time, effort and money. It then stays airborne to a degree which
exceeds all expectations. Still air flights of six to ten minutes are common.
A touch of lift and away it goes, so keep those batteries charged and ready
for long, high flights.
Flight testing assistance was provided by Paul Yee and Tom Runge, who were
separated by 500 miles and flew individually-built versions of the Ace High.
Their test results were remarkably similar and confirmed the soundness of the
basic concept. Changes suggested by each were incorporated in the final plans
shown here. My thanks to both of them.
Tom's account of the first flights follows. "George Schwarzer and I flew
the first proto design of the Ace High. Knowing that changes had to be made
to improve performance, we started with the original numbers and had a fast,
but fairly flat test glide. Under power, the plane gained very little altitude,
and the glide was a long way from floating. In subsequent flights, we consistently
increased wing incidence and moved the CG back by 1/4" increments.
"By the fifth flight, we had moved the CG back to about 35 percent and the
wing incidence to about +4 degrees. Under power, the Ace High from launch to
engine cutoff maintained about a 30-degree climb with absolutely no lack of
control or tendency to drop off or stall - almost as though it were being towed
up or high-started. When the engine quit (with good transition), the ship went
into a nice flat, slow, almost nose-up glide, with fantastically quick yaw response
to the stick and absolutely no stall tendency. We have yet to see the plane
stall. It seems to just fly slower and slower while maintaining its altitude.
"We experimented with a built-up empennage to decrease the overall weight.
Performance was improved in the glide but wind penetration was impaired because
of less weight. The ship flew beautifully in fairly calm weather. To date, when
flying we haven't had any thermal activity to see how the Ace High would ride
on convective activity, but with the good yaw-type moves we get, the ship should
have no problem staying in a thermal and riding it to its limits.
"Our next experiment is trying a T-tail configuration. The Ace High is so
inherently stable and maneuverable that we're not afraid to try drastic alterations
to change flight or looks. Flying was done with an ACE Pulse Commander. Elevator
control was not missed - the plane just doesn't need it."
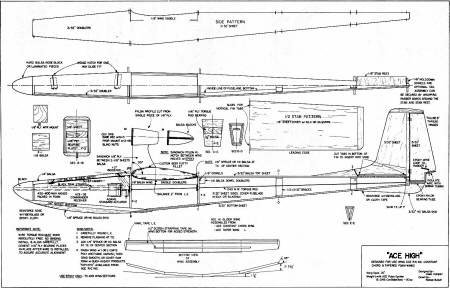
Ace High Glider Plans
Paul Yee's comments on trimming and first flight testing will lead to success
if these procedures are followed carefully. "Before test flying, align the surfaces
as accurately as possible. The model must balance as shown on the plans, and
the wing and stab must be straight. Check the angular difference between the
wing and stab by first setting the model on a flat table and blocking up the
tail until the leading and trailing edge of the stab are the same distance from
the table. Now measure the distances from the wing trailing edge to the table
and from the wing leading edge to the table. Make these measurements right at
the fuselage side and use the faint molding lines at the leading and trailing
edges of the foam wing as reference points. The leading edge should be set half
an inch higher than the trailing edge.
"When ready for some test glides, block the rudder in neutral and pick a
nice grassy area. Run with the model and then gently push it forward with its
nose pointed slightly downwards. The model should glide at a shallow angle and
then slide along the grass when it lands. However, it should not tend to skim
along the top of the grass. If it dives, remove nose weight or shim up the trailing
edge of the stab 1/32" at a time. However, be sure the zoom is not caused by
launching with the nose pointing upwards or by launching with too much speed.
"When the glide tests look good, some powered test flights can be made. The
model first should climb steadily and reach an altitude of 300 to 400 feet by
the time the engine quits. Then there should be no more than one or two gentle
stalls as the model transitions into a nice lazy glide.
"Make any necessary corrections to the transition and glide. If the model
abruptly drops its nose when the engine quits and goes from a short dive into
a steep fast glide, shim up the stab trailing edge or remove some nose weight.
If the model keeps stalling after the engine quits, shim up the stab leading
edge or add nose weight. "Only after the transition-glide is adjusted properly
should corrections be made to the powered flight. If the climb is too slow,
it can be increased a little by adding engine up thrust. This is done by putting
washers under the bottom engine mounting lugs. If the model climbs in steps,
alternately climbing and leveling out, add engine down thrust. Finally, the model
may tend to turn slightly to the left under power. This can be corrected by
adding engine right thrust."
Construction
The idea of building from plans often appears too formidable for most members
of the die-cut set, but a few suggestions will simplify and speed up the process.
(1) Buy a set of full-size plans - don't scale up from the magazine. The time
saved and accuracy gained is well worth the price. (2) If you don't want to
cut up plans, buy two sets. Use one and save one. (3) Rubber cement patterns
directly to the balsa sheets (the cement rubs off afterwards).
(4) Use a steel straight edge for all straight cuts. (5) Use a sharp cutting
tool. (6) Follow the wood grain direction indicated. (7) Check-fit pieces before
gluing. (8) Laying out the pieces carefully conserves balsa by reducing waste.
(9) Use the parts as patterns to trace for a second model.
Use contact cement to glue fuselage doublers and braces in place for both
a left and a right side. Formers F-2 and F-3 go in next - keep them square.
Then add the other side, holding in place with weights. Clamp the tailpost in
place, making sure the fuselage is evenly tapered and true. (Here is where unwanted
turns get built in.) Use rubber bands or masking tape to hold F-1 in place and
then add the bottom braces at the back part of the fuselage. Top and bottom
sheeting come next. The nose is carved from hard balsa - either a block or laminated
from sheets. The skid is glued to F-1 and F-2 before sheeting the nose bottom.
It is recommended that fiberglass reinforcements be used at the nose and
tail and the whole body covered with silk or Silkspan for added strength. Use
epoxy at all high stress points and especially-to fit the pylon to the foam
wing. Wing notes are on the plans and further information comes with the foam
wings from ACE R/C.
Big rudder really wheels this gilder around with the Adams actuator flapping
away.
ACE High uses ACE Minifoam wing sections.
While a variety of wing finishing methods have been tried, the use of polyurethane
varnish is the simplest, and lightest. Sears Hi-Gloss spray works very well.
For a more finished look Top-Cote covering is recommended. The silver metallic
variety was used on the model pictured and provides excellent visibility when
it flashes in the sun. However, it tends to wrinkle under stress. Clear, transparent
Top-Cote can be used as is or doped any desired color.
Install all RC gear forward of the wing and balance should not be a problem.
Other details are covered in the plan notes and should be self-explanatory.
Posted February 23, 2019
|


