|
Canards, or tail-first airplanes, were popular back in the 1970s.
That was the era of the
VariEze and the
Long-EZ homebuilt fiberglass and foam airplanes from
Burt Rutan, which fostered great interest in the modeling community.
Many of the world's jet fighters were adopting the canard configuration
as well.
Hiram Maxim, inventor of the
Maxim machine gun and father of the American Radio Relay League's
(ARRL)
founder Hiram Percy Maxim, experimented with a
canard aircraft design in the late 1890s. Much aerodynamic information
has been learned about the canard over the last century and the
concept is no longer a matter of great curiosity, but looking up
into the sky and seeing an airplane 'flying backwards' till cause
most people to do a double-take and wonder about what they are witnessing.
Tailup
Be the first on your block to fly backwards. Complete plan on
back of centerfold.
By Ray Malmstrom
|
Medium grade balsa
2 sheets 1/16 x 3 x 36"
1 strip 1/16 x 1 x 20"
1 strip 1/4 x 3 x 20"
1 sheet 1/8 x 3 x 4"
6" length 18 gauge wire
3/4" length 3/32" OD aluminum tubing
2 washers
7" 7" dia. plastic propeller, Kaysun or Sleek Streak
1" length of 1/8" dia. dowel rod
Piece of notepaper
Piece of tissue (approx. 5" sq.)
1 t1 tube rubber lubricant
1 tube balsa cement
1 bottle clear dope
Flat rubber strip. 1/8" wide
1 52" length
1 80" length
Enamel or colored dope
Waterslide decals (squadron numbers)
1 small bubble canopy
Medium and fine grade sandpaper
Tracing paper
Pencil
Ruler
Modeling pins
Dope brush
Wire Cutters
Long-nose pliers
|
|
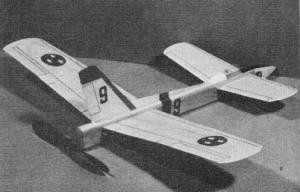
Tailup free flight canard pusher.
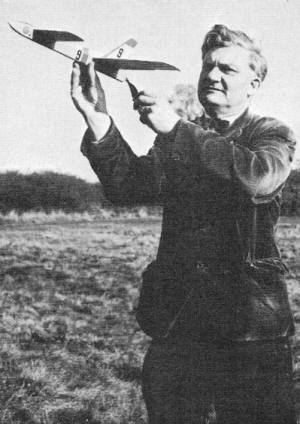
Author demonstrates launching technique. Plane must have
adequate airspeed before release, no prop wash over surfaces.
|
Those who built the fascinating little
Tail First
(a canard-type model in the November 1969
AAM) will need no urging to get going on this follow-on model
with its easy sheet construction and modern fighter-like appearance.
Trace the fuselage side and transfer it to 1/16" sheet balsa.
Cut out two sides, making sure the front elevator and wing slots
are lined up accurately. Cut a length of 1/4" and one of 1/16" balsa
for the top and bottom of the fuselage and build this assembly (see
sketches), adding reinforcing .pieces A and B. Carve and sand the
fuselage top, and round off the bottom edges to the section shown.
Push a length of 1/8" dia. dowel rod through the hole at the front
of the fuselage.
Make the nose cone from three pieces of 1/4" sheet and cement
it to the front of the fuselage. Fair the nose cone into the fuselage
shape with fine grain sandpaper. Then give the fuselage two coats
of clear thin dope.
Construct the propeller block from a piece of 1/4" sheet cemented
to two thicknesses of 1/16" sheet. Accurately drill a 3/32" dia.
hole and insert a short length of 3/32" outside dia. aluminum tubing.
Insert the propeller block in to the fuselage rear and sand it to
shape.
Take a 7" dia. Kaysun plastic prop or a small Sleek Streak prop
and sand or file the center flat. Bend a loop in a piece of 18-gauge
wire and push the wire shaft through the prop. Since this is a pusher
model, the prop must go on with the front of the prop facing the
propeller block. Slip two washers or beads on the shaft and insert
it through the prop block (see sketch). Then form the hook for the
rubber motor with small pliers, and the prop assembly is complete.
Give the block two or three coats of dope and put a tiny drop of
lubricating oil on the shaft. Check prop for absolutely free revolving.
Cut the fin from 1/16" sheet, noting the grain direction, as
well as the small cut near the bottom. The fin fairing piece also
is cut from 1/16" sheet. Pin all sheet surfaces down to a board
and dope one side at a time. Pinning avoids warps. Give these parts
two coats of thin clear dope, lightly sanding between coats. The
canopy can be a commercial bubble type or, as we used, the end from
a plastic toothbrush container.
The wing is cut from 1/16" sheet (joining is needed with the
usual 3" wide sheet). With a knife or razor blade, score, but do
not cut through, the centerline on the underside of the wing. Crack
along the scored line and tilt the wing panels upward. Run cement
into the crack and pin the wing to the building board while the
tips rest on the dihedral jigs(x). Wax paper under the joint will
prevent the wing from sticking to the board.
Elevators are fitted as shown in the wing construction sketches.
Round off all edges with sandpaper and give the wings two coats
of dope, following the same procedure as for the fin. Two layers
of tissue doped over the center of the wing on the underside reinforce
the center section. Repeat this method for front elevator, using
dihedral jigs (y).
Ballpoint pen lines can be drawn on the wing and elevator, and
the insignia (ours is that of the Swedish Royal Air Force) can be
painted directly on the model, or painted on thin paper, cut out
and glued in position. Wing and front elevator are then slipped
through their respective slots, checked by viewing from the front
for equal dihedral and firmly cemented in place.
Make up the test motor (see plan), lubricate with rubber lube, and
install it in the model. Balancing is important. Many beginners,
and old hands too, so often neglect this all-important item before
flight testing. Suspend the model from a thread tied to a pin which
is pushed into the balance point shown on the plan (black arrow).
Put a little weight (sheet lead or folded empty cement tube) into
the recess provided in the nose cone until the model hangs level.
The ship should not hang with one wing down (front view). If it
does, add a tiny spot of plasticine or modeling clay to the top
of the lighter wing.
Choose a calm day for flying and test over long grass. Without
winding the motor, launch the model into the breeze, from shoulder
height, with a smooth follow-through movement of the arm. Never
throw the model. It should glide down straight ahead and land about
15 to 20 yd. away. To get a really shallow glide, bend the elevators
on the wing tips up a wee bit (about 1/16"). Correct a sharp turn
in either direction by gently warping the rear part of the fin in
the direction opposite to the turn. Now it is ready for a power
flight.
Wind the propeller in a counterclockwise direction and put on
about 200 to 250 turns. The model should climb away gently from
a smooth follow-through launch, cruise a short distance and glide
in to a smooth landing. If the model dives, put a piece of 1/16"
sq. balsa strip between the bottom of the prop block and the fuselage,
or bend the elevators up a little more. If the model stalls (climbs
steeply, falls backwards, and then nosedives) put a piece of 1/16"
sq. balsa strip between the top of the prop block and the fuselage.
When the model is making short but steady flights, install the larger
motor, which will take about 700 turns on run-in lubricated rubber.

Tailup Free
Flight Canard Plans
Notice:
The AMA Plans Service offers a
full-size version of many of the plans show here at a very reasonable cost. They
will scale the plans any size for you. It is always best to buy printed plans because
my scanner versions often have distortions that can cause parts to fit poorly. Purchasing
plans also help to support the operation of the
Academy of Model Aeronautics - the #1
advocate for model aviation throughout the world. If the AMA no longer has this
plan on file, I will be glad to send you my higher resolution version.
Try my Scale Calculator for
Model Airplane Plans.
Posted January 10, 2015
|


