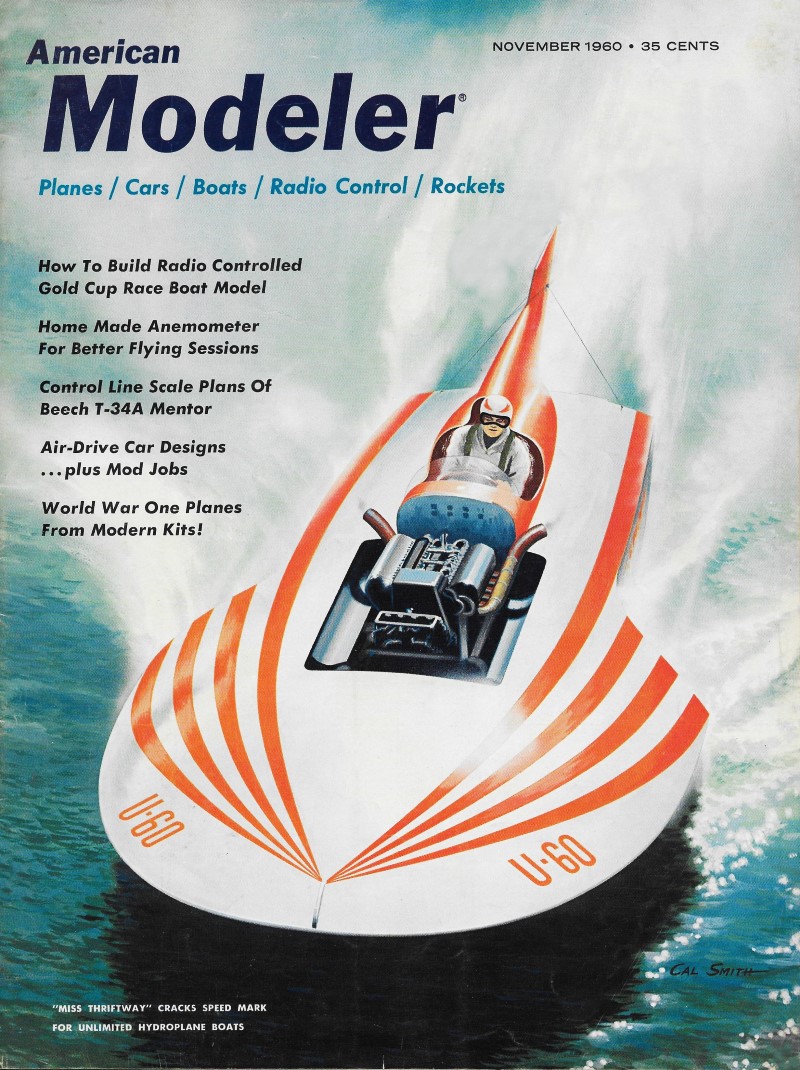
|
Airplanes
and Rockets website visitor L. Ross wrote to request that this article
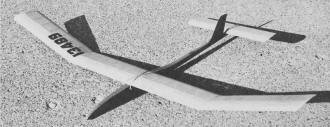
featuring Warren Kurth's Jetstream A-1 towline glider be posted. I recently purchased
the November 1960 issue of American Modeler magazine, where it appeared,
so I scanned and processed the images and text. Detailed building, covering, and
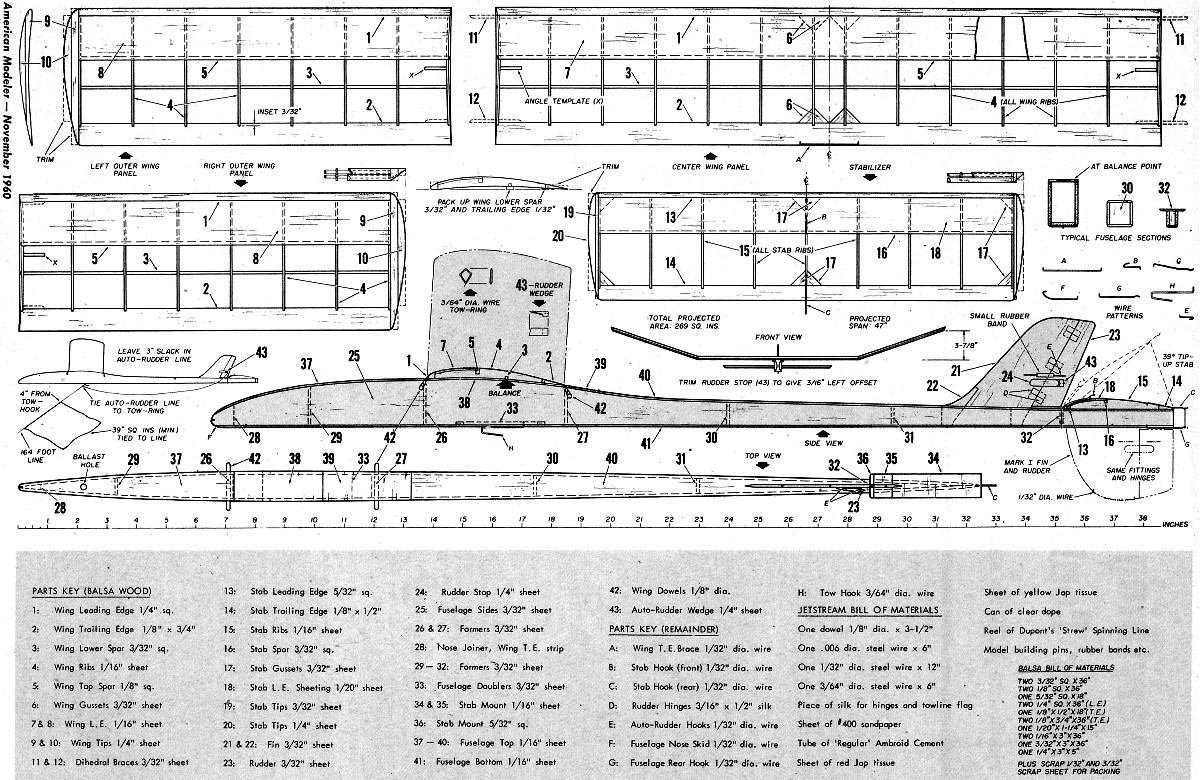
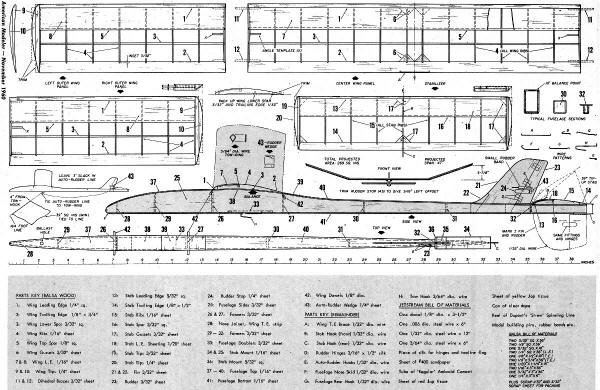
flying instructions are provided by Mr. Kurth. The Jetstream's projected wingspan
is given on the plans as 47", with a wing area of 269 square inches. The fuselage
is 31" long with a balsa box construction, while the wing an tail surfaces are sticks
and sheet ribs. The wing airfoil is undercambered, which makes covering with Jap
tissue a little tricky, but the horizontal stabilizer uses a flat bottom lifting
airfoil. Instructions for making the regulation A-1 towline is even given. The model
is built so light that it requires more than 1.5 ounces of ballast to bring it up
to the A-1 class minimum of 5.08 oz (144 grams). Hopefully, Mr. Ross will
provide a photo of his completed Jetstream for posting here.
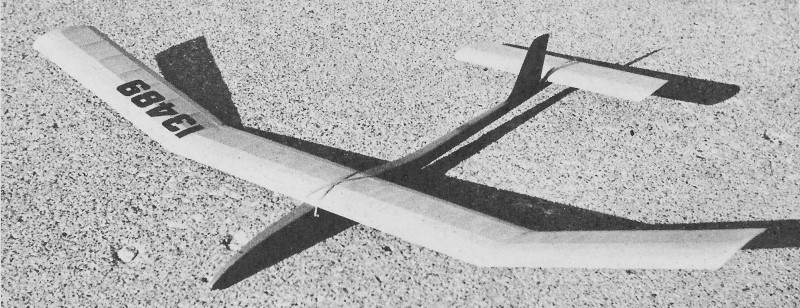
A/1 Jetstream Towline Glider
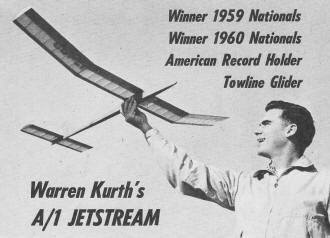
Warren Kurth's A/1 Jetstream
Winner 1959 Nationals Winner 1960 Nationals American Record
Holder Towline Glider
By Warren Kurth
Now and again there appears on the model scene a design that looks every inch
a contest winner-such as Goldberg's immortal Zipper, Hansen's '53 Nordic Winner
or King's '54 Wakefield winner. Sometimes they sport slinky Bardot curves; sometimes
no-nonsense lines like a Volkswagen. But almost without exception the world's top
contest craft seem to share an unmistakable functional beauty. Such a model is Warren
Kurth's 1960 and 1959 Nats-Winning and AMA Record-Holding A-1 towline glider-one
of the finest examples of towline design to ride the thermals for many a season.
Warren's "Jetstream" is simple and rugged. Its proportions were developed after
careful study of dozens of top glider designs-plus extensive flight testing and
contest experience. The original model was built early in '59, taking 4th in the
first contest entered (combined A-1 and A-2 event at Cedar Rapids, Iowa) and 1st
in its second contest (combined A-1 and A-2 at Chicago Midwestern Championships).
It is particularly easy for a beginner to adjust and fly.
Originally dubbed "Spike" (3-view appeared in May 1960 "A.M."), the new name
came about following the suggestion that a less vulnerable upper fin be substituted,
forward of the stab. The subsequent Mark Two version with the jet-age swept fin
is reported to give slightly better flight characteristics. It won with 11 minutes,
26 seconds at this year's Dallas Nats. The plans give both types, you take your
pick! The plans show cut-out parts arranged on 3" x 36" balsa sheets. Parts are
numbered in correct building sequence; you'll sidestep snags and finish in the shortest
possible time if you follow this procedure...
Pick out firm (but not heavy) balsa stock. Sand off any fuzz before marking patterns
on to the sheet balsa (with carbon paper or by pinpricks). Warren's original models
have no rear wing spar this is added on the magazine plans as a safety factor for
the average modeler. If you use the best wood and have already built a few lightweight
gliders, the rear spar may be omitted (but then remember not to cut the rear spar
notches in the ribs). It's important that wing tips and tail surfaces be light so
quick recoveries occur from stalls or rough air disturbance. Leading edge sheet
for flying surfaces should bend easily to follow airfoil curves.
Rub over your working drawings with a bar of soap at all rib/L.E. and rib/T.E.
joints to prevent parts from sticking to plans. Wax paper over plans isn't such
a good idea since it retards cement drying.
 WING. Build the three panels separately.
Start by sanding trailing edge strips to shape and slotting them to take the ribs.
Pin down leading edges (1) and trailing edges (2) directly over plan blocking up
T.E. with scrap 1/32" sheet. Pin lower 3/32" square spars (3) over plan, packing
up with scrap 3/32" sheet balsa. Cement ribs (4) in place, using dihedral-angle
template (X) to slant four dihedral-break ribs correctly. Add top 1/8" square spars
(5); avoid distortion of ribs by not using excessive down pressure. Install center
section gussets (6). Give all joints two more coats of cement (use cement sparingly).
Allow to dry for several hours before unpinning from building board. WING. Build the three panels separately.
Start by sanding trailing edge strips to shape and slotting them to take the ribs.
Pin down leading edges (1) and trailing edges (2) directly over plan blocking up
T.E. with scrap 1/32" sheet. Pin lower 3/32" square spars (3) over plan, packing
up with scrap 3/32" sheet balsa. Cement ribs (4) in place, using dihedral-angle
template (X) to slant four dihedral-break ribs correctly. Add top 1/8" square spars
(5); avoid distortion of ribs by not using excessive down pressure. Install center
section gussets (6). Give all joints two more coats of cement (use cement sparingly).
Allow to dry for several hours before unpinning from building board.
Next, attach top wing leading edge sheeting (7 and 8) first cementing to leading
edges and front 1/8" of each rib. When dry, cement sheeting to remaining portion
of each rib and to main spars. Give sheeting joints an extra coat of cement, except
at leading edge/sheeting seams and spar/sheeting seams (which could pull sheeting
down and out of shape). Add wing tip pieces (9 and- 10); carve them to shape when
dry.
Carefully sand the three wing panels; check for weak or broken joints. Clear
dope and lightly sand with #400 paper, at leading edges, trailing edges, wing tips
and end (dihedral-break) ribs. Also dope undercambered lower rib edges (two coats).
Now line up the three wing panels, pinning center panel to building board and packing
up each tip panel 3-7/8" under the tip rib at front and rear. If facing ribs of
the three panels do not fit flush, carefully sand them to correct this.
Give each facing rib two coats of cement and let dry before finally cementing
panels together. When quite dry, cut away front and back ends of ribs, add dihedral
braces (11 and 12). Give all dihedral break joints another coat of cement, then
cement center section wire brace (A) to trailing edge.
Your wing is now ready for covering with Jap tissue (cover dry), using clear
dope as adhesive. Make sure that tissue is firmly doped to undercambered edges of
ribs. Water spray or gently dab covering with sponge of cotton to tighten it. Constantly
check for warps (twist panels in opposite direction if any should appear as tissue
dries). When dry, apply four coats of clear dope (thinned 50% with thinner); gently
sand any rough spots with #400 paper after the first coat. Dope only one panel at
a time; watch carefully for warps as the dope dries. It's good practice to pack
up each panel with scrap 1/8" sheet at leading and trailing edges and hold assembly
in place on building board with small weights while dope dries. Any trim should
be cut from colored tissue. Dyes such as "Rit" or "Tintex" can be dissolved in the
thinner if a translucent coloring is desired.
STABILIZER. Built much the same as the wing panels, except its
airfoil section is flat so no trailing edge packing is required. Start by sanding
trailing edge to shape; slot it for ribs. Pin leading edge (13) and trailing edge
(14) over plan. Add ribs (15) and 3/32" square upper spar (16), followed by gussets.
(17). Give all joints another coat of cement, allow to dry for several hours before
unpinning from building board. Add leading edge sheeting (18) and tips (19 and 20).
Finish off, cover and dope in the same way as wing; finally add the two wire hooks
(B and C) cementing them in place and covering with small patches of thin silk.
FIN AND RUDDER. For either fin hinges and auto-rudder details
are the same. Join two fin pieces (21 and 22) flat on plan. Sand this assembly and
fin (23) to sections. shown in top fuselage view-then cover each separately with
tissue. Join fin and rudder with small silk hinges (D), give four coats of dope,
add wire hooks (E) and rudder stop (24).
FUSELAGE. Cut fuselage sides; be sure they match exactly and
bottom edges are flat. The grain ends of formers and lower doubler (for tow hook)
are given two coats of cement. Bevel inside faces of fuselage sides at rear (25);
join with two formers at wing position (26 and 27). Check that sides are correctly
aligned and set flat along their entire length when placed on building board.
Now pull together and join at nose and tail (adding 28): checking fuselage top
view by placing it over plan. Add remaining formers (29 to 32), bottom doubler (33)
and stab mount (34-36 assembled flat over plan). Add top (37 to 40) and bottom sheeting
(41). Cover fuselage with tissue, apply three coats of clear dope. Cement rudder
in place, checking its alignment in both top and rear views. Add wing dowels (42),
nose skid (F), rear hook (G). Make balsa auto-rudder wedge (43). Add .096" dia.
steel wire "D/T limit."
Fasten wing and stabilizer to fuselage with rubber bands. Add lead weight to
nose compartment until model balances 2-5/8" behind leading edge of wing. If total
weight is still less than 5.08 ounces (the minimum required under A-1 rules), cut
away small piece of top fuselage sheeting under wing, fasten required weight to
inner face of this sheet and cement it back in place. Warren's original model needed
1.6-oz ballast weight under wing to bring it up to the required minimum. Carrying
ballast this way is preferable to "building up" to the 5.08 oz. A light model with
ballast has a low moment of inertia and recovers quickly from a bad launch or a
stall off the towline.
Now add towhook (H) so vertical towing portion is 1-7/8" behind wing leading
edge. This is a safe towhook location. With experience, you may like another hook
up 1/4" behind first one (see "Flying and Adjusting"). Recheck all-up weight after
several days. The dope continues to "cure" making the model slightly lighter. Add
your AMA license number to wing (minimum height 1.2"), fuselage and tail (minimum
height .4").
FLYING AND ADJUSTING. Make 164 foot towline from DuPont "Stren"
(# 12 test monofilament nylon spinning line) using the improved clinch knot shown
on instructions provided with this product. (Any braided fish line of at least 8#
test can substitute.) A quick winding reel will add a lot to your flying pleasure
and convenience. Remember to attach the 39 sq. in. flag (required in A-1 rules).
Tie the flag around the line and not the line around the flag, since the latter
method will eventually cause the line to break.
Check the model for correct balance. Steam out any flying surface warps. As a
starting point; the rudder should be offset about 3/16" to the left at its trailing
edge. Pick a calm day for the first flights. Hand glide the model over long grass.
Launching on a slightly downward flight path from shoulder level should result in
a flat, shallow glide with very slight left turn. Confine all trimming adjustments
to the tail surfaces only; do not change the balance point after this has been correctly
positioned 2-1/8" behind the leading edge. Correct diving tendencies by shimming
up the stab trailing edge 1/64" at a time. Correct stalling tendencies by shimming
up the stab leading edge in a similar manner.
Once satisfactory hand glides have been obtained, the first tow-launch may be
made. Check that the rudder is straight for towing-with the towline and wedge (43)
attached. The model is fairly sensitive to the rudder setting under tow; any offset
will cause the model to pull to one side.
Have your helper hold the model at about a 15 degree angle of attack, with the
auto-rudder line draped over the top of his hand (between thumb and index finger).
Tow directly into wind. Your helper should run a short distance until the wings
begin to lift-at which point he gently releases the model. As soon as the model
"catches the wind" and starts to "kite" upwards, slow down and ease the model to
the top of the tow. In windy weather, be prepared to run towards the model. When
the model approaches the top of the tow, slow down so that the flying speed is normal
at the moment of release (to avoid stalling). To release, run back towards the model
and throw your towing hand towards model, but do not let go of the line as this
results in a disqualified flight during a contest.
Carefully observe the flight pattern from the tow-launch. Re-adjust the stab
and rudder setting if necessary to obtain the optimum settings. For best duration,
adjust the rudder to give circles of about 100 yards diameter in calm weather conditions.
The model will turn more tightly as it enters a thermal. In windy conditions, give
a little more left rudder, to keep the model turning steadily and prevent stalling.
This is easily done by adding masking tape shims to the rudder wedge.
For flying in areas where windy weather conditions prevail, it is desirable to
move the towhook forward about 1/8" at a time, to obtain a slower (less steep) climb.
Under very calm conditions, a slightly more rearward towhook position will give
maximum possible tow altitude, by steepening the towing angle. Experienced glider
modelers may make slight balance point changes-moving it back slightly for calm-air
or forward for windy weather. The tow hook and balance locations as shown on the
plans are best for average flying conditions.
A-1 Jetstream Towline Glider Plans
(AMA Plans Service
link)
Notice:
The AMA Plans Service offers a
full-size version of many of the plans show here at a very reasonable cost. They
will scale the plans any size for you. It is always best to buy printed plans because
my scanner versions often have distortions that can cause parts to fit poorly. Purchasing
plans also help to support the operation of the
Academy of Model Aeronautics - the #1
advocate for model aviation throughout the world. If the AMA no longer has this
plan on file, I will be glad to send you my higher resolution version.
Try my Scale Calculator for
Model Airplane Plans.
Posted December 19, 2020
|