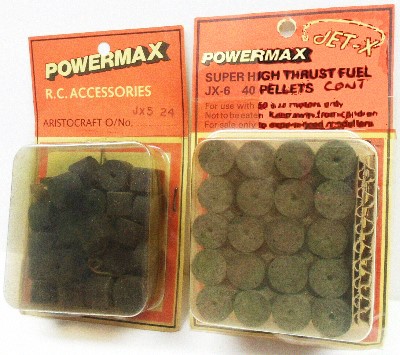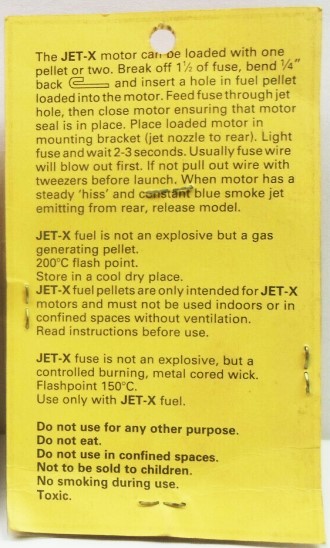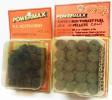
Powermax Jet-X Fuel Pellets for Jetex 50 Motors (eBay images)
It is surprising that today there is no equivalent to the
Jetex type motors that provide a simple
and safe form of jet propulsion for small airplane models. you can still buy
Jetex engines on eBay for not too much money, but the fuel pellets are quite
expensive. Over the years, a couple companies have manufactured Jetex-compatible
fuel pellets, but all of those are gone now, too. A couple decades have probably
passed since Jetex fuel pellets were available. American Modeler and
a few other magazines used to run build and fly articles for Jetex powered model
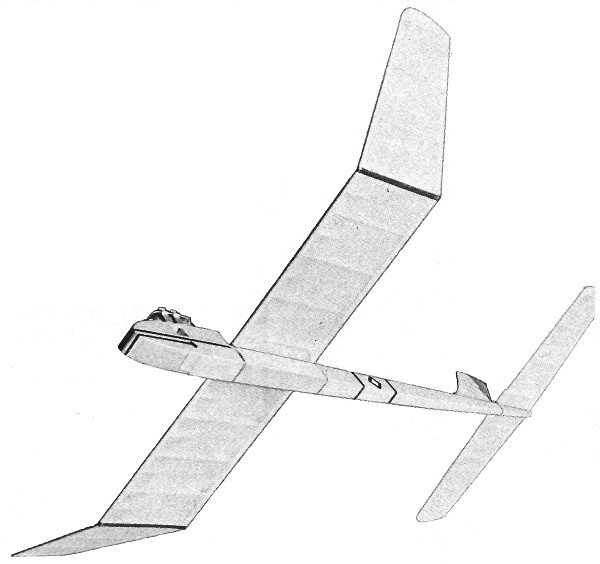
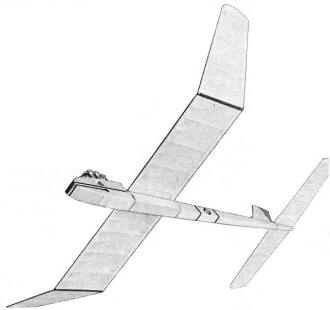
airplanes. This April 1960issue included plans for the JexJet, which uses
the Jetex 35 or Jetex 50 size engine. A built-up wing (23" wingspan)
and horizontal stabilizer helps keep the weight down. If anyone knows of an
available Jetex fuel pellet source, including instructions for safely making
your own, please send me an e-mail.
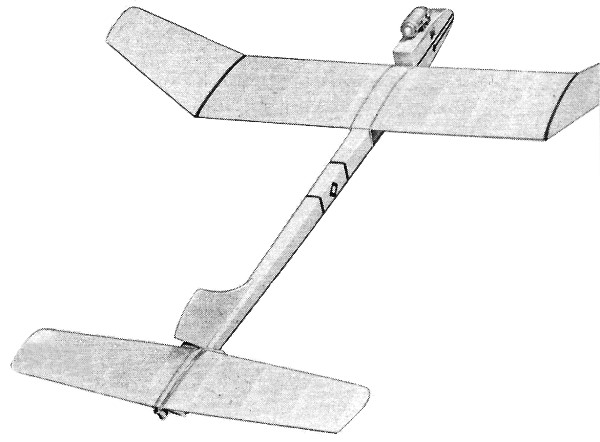
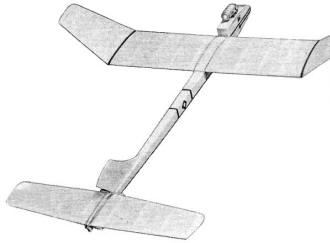
Jet Powered "JexJet" for Youthful Payload Pilots Article &
Plans
 With fine prizes being offered in many
meets and comparatively few entries to compete against, one is sure missing
out on a lot of fun and prizes by not making one of these fine-flying Jetex
powered jobs. This design, made as stable as possible for use by beginners,
is almost impossible to loop because of its long tail moment arm. With fine prizes being offered in many
meets and comparatively few entries to compete against, one is sure missing
out on a lot of fun and prizes by not making one of these fine-flying Jetex
powered jobs. This design, made as stable as possible for use by beginners,
is almost impossible to loop because of its long tail moment arm.
Adjustment is quite easy. The stabilizer is set at the angle shown, the engine
position shifted to obtain the best gliding angle. Then the Jetex engine is
permanently fastened and powered flights are a cinch. More about that later.
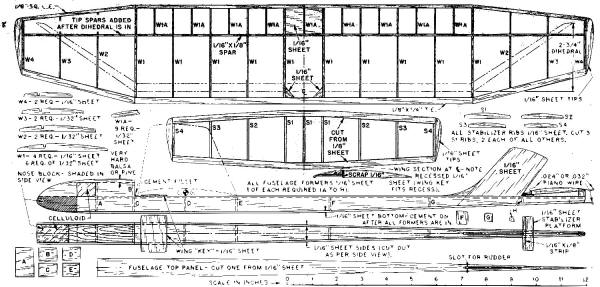
Interested? Well, stock up on some very soft 1/16" sheets, that is the primary
size used. We used Sig "Contest Balsa" in our model. From the full size plans
obtain the proper outlines for the fuselage sides and top panel piece. Also
cut out all required formers and rudder parts. Cement the side pieces to the
nose block; be very careful to line up the sides. Pinning the tail ends of the
side pieces together with help. Cement former A in place, then the fuselage
top panel, which rests against the back of A and is flush with the upper edges
of the side pieces. The formers cement in the places shown on the plans. The
bottom sheeting is next-when the cement has dried thoroughly, the sheeting is
trimmed flush with the side sheeting.
The roof of the cabin area is cut out of very hard balsa or pine, shaped,
and cemented in place. The celluloid windshield and side windows are added.
When cementing the rudder to the fuselage dab some cement on along the lower
edge before inserting through rudder positioning slot, since we want the lower
part of the rudder to be glued to the inside bottom sheeting for maximum strength.
Add the rudder fairing piece (curved) to the front of the rudder, then the various
stabilizer mount parts.
The little block under the trailing edge of the stabilizer is soft, so it
can be easily cut for changing stabilizer incidence during flight tests. Bend
and cement de-thermalizing hook in place. The fuselage assembly is sanded and
given one coat of clear dope. Re-sand lightly with No, 400 Wet-or-Dry sandpaper.
The leading and trailing edges of the stabilizer are cut from 1/8" sheet
and can be pre-shaped somewhat before pinning down to the workbench for assembly.
The ribs are cut out as per plan outlines and cemented in place. Tips cut from
1/16" sheet are added. Sand entire stabilizer to a smooth airfoil shape, then
cover with light tissue (we used "Airco" thin grade). The front stabilizer hook
and de-thermalizing hook are bent and cemented in place. Water-spray assembly
lightly. When dry give a single coat of clear dope that is a 50-50 mixture of
thinner and standard clear dope. For each ounce of the above "mix," it will
be necessary to add three drops of Castor Oil to "plasticize" it so the covering
will be less brittle when thoroughly dried out.
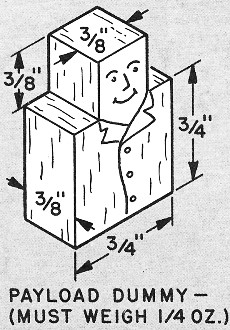
The dummy is cut out of 1/16" sheet and "ballasted" with bits of solder to
weigh 1/4 ounce. He should be 3/8" deep (front to back) and 3/4," square for
the body part, topped off with a 3/8" x 3/8" "head." These are minimum dimensions
which may be exceeded, but do not build this character undersize. Note that
the "cockpit" is fairly deep front to back - this allows the dummy to ride forward
or rearward for minor balancing of the model when flight testing. Wherever the
dummy rides, use soft balsa spacer blocks of 1/16" or 1/8" sheet to keep him
from shifting position. (With a 3/8" deep dummy in a 3/4" cockpit, a total of
3/8" of scrap will be needed to fill up the empty space.)
 The wing ribs are cut out - don't forget
notches for the spar. The center section is pinned down and cemented together
first, then the tip panels. Tip spars are omitted until the assembled tip panels
are propped up for dihedral. Then the tip spars may be added ... Less work fitting
them to the dihedral angle this way. The false ribs are added to the center
section and "recess" made for the wing key. This "key" is merely a rectangular
piece of 1/16" sheet that fits a corresponding recess in the wing bottom to
position the wing exactly the same for all flights. Use scrap balsa under the
spar in the center section where the "recess" is made, so it is flush with the
rib bottom edges for covering. Apply covering after sanding smooth the assembled
wing. Wing covering is similar to that described for the stabilizer. Do the
bottom of the center section first, then the top. Tip panels are done last.
If a good sprayer or atomizer is not handy for water-spraying, a small piece
of folded tissue dipped in water will do the job. Be very careful in "brushing"
on the water with it, as the moistened covering tissue is very weak. Keeping
the water used to a minimum is one way of not poking holes in the tissue covering,
and usually results in less warps. The wing ribs are cut out - don't forget
notches for the spar. The center section is pinned down and cemented together
first, then the tip panels. Tip spars are omitted until the assembled tip panels
are propped up for dihedral. Then the tip spars may be added ... Less work fitting
them to the dihedral angle this way. The false ribs are added to the center
section and "recess" made for the wing key. This "key" is merely a rectangular
piece of 1/16" sheet that fits a corresponding recess in the wing bottom to
position the wing exactly the same for all flights. Use scrap balsa under the
spar in the center section where the "recess" is made, so it is flush with the
rib bottom edges for covering. Apply covering after sanding smooth the assembled
wing. Wing covering is similar to that described for the stabilizer. Do the
bottom of the center section first, then the top. Tip panels are done last.
If a good sprayer or atomizer is not handy for water-spraying, a small piece
of folded tissue dipped in water will do the job. Be very careful in "brushing"
on the water with it, as the moistened covering tissue is very weak. Keeping
the water used to a minimum is one way of not poking holes in the tissue covering,
and usually results in less warps.
Colored trim is okay if you use colored tissue to do it with. Colored dope
weighs too darned much for these lightweights, so it is o-u-t ... OUT. Ditto
for doping - the one coat of clear, throughout, is all that is allowable.
 The balance point shown on the plans should
be marked on the model before any flight-testing is attempted. For the first
few glide-tests, strap the Jetex unit in approximate position atop the cockpit
with rubber bands ... just enough to hold it during glide-tests. If your wing
and stabilizer are quite warp-free, you should get reasonably good gliding angles
on the first attempts, providing that the wing and stabilizer incidences match
those on the plans closely. Minor adjusting can be made by sliding the Jetex
forward or aft. Once satisfied with the glide, fasten the Jetex to the cockpit
roof area - position it as straight as you can. The Jetex charge should be omitted
throughout all glide-tests. The balance point shown on the plans should
be marked on the model before any flight-testing is attempted. For the first
few glide-tests, strap the Jetex unit in approximate position atop the cockpit
with rubber bands ... just enough to hold it during glide-tests. If your wing
and stabilizer are quite warp-free, you should get reasonably good gliding angles
on the first attempts, providing that the wing and stabilizer incidences match
those on the plans closely. Minor adjusting can be made by sliding the Jetex
forward or aft. Once satisfied with the glide, fasten the Jetex to the cockpit
roof area - position it as straight as you can. The Jetex charge should be omitted
throughout all glide-tests.
Power flying should be a snap. Load the Jetex as per manufacturer's instructions,
then light the fuse with the model held in a steep 90 degree bank. This avoids
sparks falling onto the wing as would be the case when the model is held level.
Once you hear (and feel) the increase in thrust, you can launch the model. A
slight nose-up attitude is best, with a moderate "heave." But not like a hand-launched
glider, lest you "fold" your wing. Watch the entire flight to see if climb,
glide, and circling (if any) are satisfactory. If the power flight is alright
and model glides straight, tilt the stabilizer (without changing the incidence)
to achieve some circling in the glide. The glide circle should be in the opposite
direction to the power circle. This balance of circling directions steepens
the climb to the maximum attainable without looping. A swooping turn during
power climb is desired - if the model turns too tight, loosen the Jetex unit
and re-screw like you would offset in an engine. Once really satisfied after
continued testing, a small fillet of cement can be added around the base of
the Jetex mount for additional strength. The Jetex mounting does not get too
hot to do this, but don't touch the Jetex unit after a charge has burned - it
gets HOT. If you desire, you may. add a little aluminum foil to the wing center
section as protection against flying sparks. A piece about 3" long, about 1"
or 2" wide in front and 3" or 4" wide at the back will protect the fan-shaped
area of the wing center most susceptible to the sparks. Just light gluing around
the perimeter of the aluminum foil will do - weight is all-important in a model
of this size.
Remember these main adjusting hints: Power turns adjusted with the Jetex.
Gliding turns through stabilizer tilting. Rudder always left alone (dead straight).
Above all, follow the instructions about cleaning out the jet motor. And that
means every flight. The same goes for use of de-thermalizing cord - this model
has real soaring capabilities, so avoid losing it by lighting that dethermalizer
on every flight.
If dear old Dad has helped in flight adjustments, let him get his kicks with
a few flights. But be sure you get to know your own flight adjustments - nothing
looks worse at contests than having Dad carry the model, light the fuse, make
the adjustments, launch it, and retrieve it. Under those conditions, it isn't
really entered in the Junior event, is it?
Full size construction plans for "JexJet" are on Group Plan #460 from Hobby
Helpers, 770 Hunts Point Avenue, New York 59, N. Y. ($1.10).
JexJet Plans
Notice:
The AMA Plans Service offers a
full-size version of many of the plans show here at a very reasonable cost. They
will scale the plans any size for you. It is always best to buy printed plans because
my scanner versions often have distortions that can cause parts to fit poorly. Purchasing
plans also help to support the operation of the
Academy of Model Aeronautics - the #1
advocate for model aviation throughout the world. If the AMA no longer has this
plan on file, I will be glad to send you my higher resolution version.
Try my Scale Calculator for
Model Airplane Plans.
Posted February 27, 2021
|