|
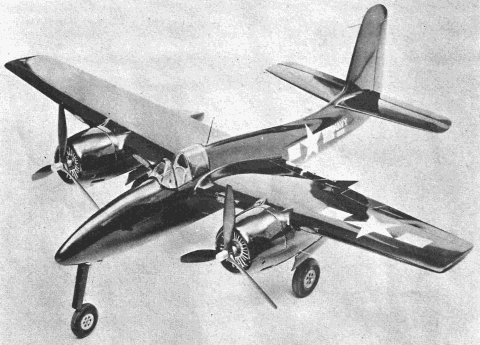
Here
is an example of the Grumman F7F "Tigercat," as presented in the
June 1957 edition of American Modeler. Designed, drawn and described
by Paul Plecan. "The Grumman F7F Tigercat was the first
twin-engined fighter aircraft to enter service with the United States
Navy. Designed for the new Midway-class aircraft carriers, the aircraft
were too large to operate from earlier decks. Although delivered
to United States Marine Corps (USMC) combat units before the end
of World War II, the Tigercat did not see combat service in that
war. Most F7Fs ended up in land-based service, as attack aircraft
or night fighters; only the later F7F-4N was certified for carrier
service. They saw service in the Korean War and were withdrawn from
service in 1954." -
Wikipedia
Long a favorite with scale fans, the Tigercat has been used
with increasing success in the Navy Carrier event. Aerodynamically
clean, moderately simple (as twin-engine jobs go) and devoid of
"frills," the F7F is a "natural" Carrier job. While not
a beginner's project by any means, it is not unduly complicated
for the slightly advanced model-builder it is a worthwhile project.
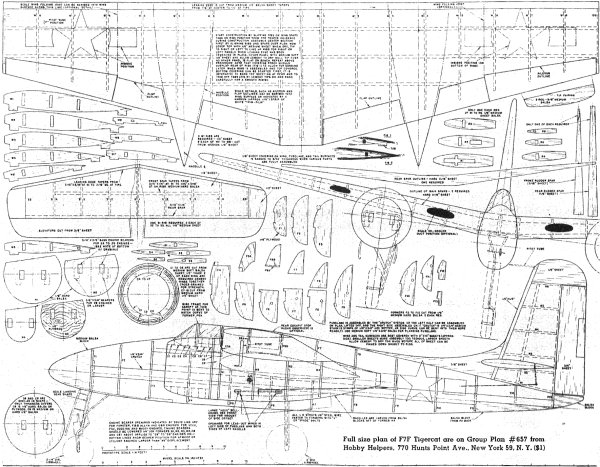
Due to a fair number of parts that are cut from heavy sheet balsa,
a jig-saw is a "must." For this we found a vibrator-type jig-saw
best, but any powered jig or band-saw will do. Construction
can be started with either the wing or the fuselage, but do the
wing first-it's a little easier that way. After butt-joining two
widths of hard -3/16" sheet (3" wide) and splicing in an end piece
to obtain an overall length of 43 or 44", trace the spar shapes.
The two main spars are copied. off the front view. The rear spar
is shown directly above the front view. Use firm, fairly hard balsa
for these. Once the ribs have been cut, proceed with actual
assembly. Note that "tabs" are used on the rib bottoms to position
them on the work board for proper incidence (since there is no "flat"
section to the undercamber, it would be difficult to line up the
ribs otherwise). Refer to the front view now and mark rib positions
on the main spars in ink. The three W1 ribs are pinned down
on the wing plan then covered with ⅛"
medium sheet. Sheeting for right and left panels butt into center
section over outboard W1 ribs, so cover only to the "center" of
these ribs, leaving some contact area for cement. When cement
is fairly dry, pins are removed from center-section area and wing
assembly tilted so ribs on left panel touch workbench .. Once ribs
are aligned in position, cement in place. Now cover entire panel
with ⅛" medium sheet. It is easiest
to use 2" x 10" sheets; they can be pinned down before the cement
dries too much. If you are using a slow-drying cement, larger sheets
can be handled. Or you may. prefer to "plank" the area with
⅛" x ⅜"
strip •. In any event, overlap the trailing edges of the ribs by
½" (see Fig. 1) so the top covering
can be beveled later to conform with the undercamber line. The right
panel is made similar. Allow ample time for all top sheeting cement
to dry before removing wing assembly from workbench. This prevents
warps. Remove assembled wing from work bench, trim all "tabs"
Bush with undercamber. Cover bottom wing in same manner as top.
To quickly trim trailing edge flush with undercamber line use a
large flat sanding block with medium grit garnet paper. Note that
the bottom sheeting protrudes ½" beyond
trailing edge of top sheeting (see Fig. 2) so it can be sanded to
conform with top camber line. Trim the trailing edge thickness to
about 1/32" (or just under 1/16"). Add several coats of dope or
sanding sealer to strengthen the wood against nicking. Sand sheet
covering in front flush with ribs, add leading edges, allow to dry.
Trim to airfoil shape, sand, then apply several coats of sanding
sealer to fill in balsa. Note ⅛" sheet
was used for covering; however, in using a flat sanding block and
smoothing irregularities here and there, final thickness will be
about 3/32", so don't worry about weight. The fuselage can
be assembled either by the crutch system or flat on the plan. If
you assemble on the profile plan leave the fully-covered assembly
pinned to the workbench overnight to allow cement to "set" fully.
It is best to leave the top sections of formers F5, F6, F7 and F8
off in assembling the primary fuselage structure; once sheeting
is trimmed to the undercamber curve, the wing can be added to the
fuselage and sections 5 to a added before sheeting in area behind
cockpit. Mark nacelle and fuselage .positions on bottom of wing
(in ink) to facilitate alignment later. Lightly scribe aileron and
flap lines at this time. Tail surfaces are of orthodox
construction, so no detailed description will be needed. Be sure
all control linkages work smoothly with no binding at any point.
Since this job is lugging two good-sized engines around, be sure
of strength in all connections---doubly so in the mounting of the
landing gear struts, wing-to-fuselage and wing-to-nacelles joints.
Add a small cloth reinforcing strip at all these joints (sanding
sealer will hide these later). Nacelle construction is straight-forward--similar
to the fuselage and covered with ⅛"
by ⅜" strips.
Cowls
are laminated out of a series of balsa rings. Cement the rings together
(cross grained) as shown and sand down to proper curvature. Make
sure that the inner curves match, too. Positioning of engine
bearers is indicated for all types of motors. Only 29's or 35's
will be the "easy" displacement in this design. Anyone contemplating
19's will have to use them at full power constantly and will have
to trim weight here and there. The use of 49's or 60's is strictly
for the big guy who has the arm to keep things in line-this model
exerts quite a pull on the lines when flying with 29's or 35's,
let alone 60's. Finish and detailing depend on the builder's
whim. The "Tigercat" is a subject worthy of your best efforts.
so take it slow and do it right. One of the most stirring sights
the author has seen in a1moat 20 years of contest-going was the
carrier flight made by one of the New Jersey boys at the 1955 RAMS
(Republic Aircraft Model Club) meet. Robert Killmer's "Tigercat"
was the same size as the one we show and mounted two K&B-Allyn
35'11. It had retractable landing gear and 2-speed engines. Bob
made a real short take-off. Once airborne, the wheels tucked up
in true prototype sequence-first the nose, then one of the main
wheels, followed by the other. High speed run was signaled by the
dummy pilot in the cockpit raising his hand over his head-rudder
in neutral, as the lines were real tight. Upon completing the high
speed run, the flaps came down, ditto for the wheels, and the rudder
popped over about 20 degrees to maintain line tension as the engines
were put in slow speed. Once the slow-speed run was completed. down
she came for the landing. This was quite "hot," and the model went
off the end of the carrier deck:-the only damage sustained was a
thrown nose tire. It might be mentioned that the landing would have
been normal, but the "deck hands" were so bug-eyed watching the
flight that no one stretched out the" arresting cords" and sandbags
that stop the model on the carrier deck. It was such a beautiful
sight watching those yellow-tipped prop arcs! I Oh, yes--the landing
gear struts on that job were fully machined. much dural, and working
"scissors" to keep the wheels aligned. Try out my
Scale Calculator for Model Airplane Plans.
<click for larger
version>
Notice:
The AMA Plans Service offers a
full-size version of many of the plans show here at a very reasonable cost. They
will scale the plans any size for you. It is always best to buy printed plans because
my scanner versions often have distortions that can cause parts to fit poorly. Purchasing
plans also help to support the operation of the
Academy of Model Aeronautics - the #1
advocate for model aviation throughout the world. If the AMA no longer has this
plan on file, I will be glad to send you my higher resolution version.
Try my Scale Calculator for
Model Airplane Plans.
|