|
Canards are another form of aircraft
that causes people to stop and stare. Most people have never seen an airplane with the
wing in the back and the horizontal stabilizer up front, and the pusher propeller configuration
just adds to the amazement. For all the hoopla canards have enjoyed over the years, except
for an occasional Long EZ at the local airport, you don't see very many. There are a
couple military jets with a small supplemental forward control surface, but I don't really
consider them canards in the truest sense. If you would like to try modeling a canard,
plans and a construction story appeared in the October 1967 edition of Model Aviation.
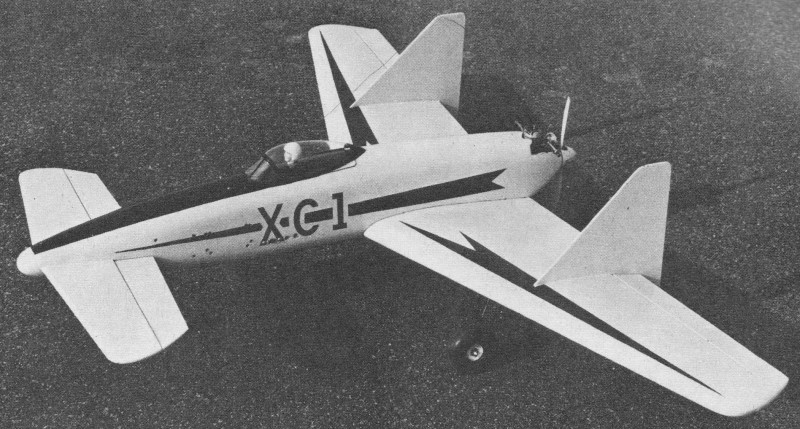
The 64" wingspan make it a fair size model; the original was powered with an Enya .45.
Experimental Canard
Ever had the feeling that design is in a rut, and wished you could build something
just a little bit different? Here's your chance!
By Robert Kendall
 A canard's advantages include a lack of exhaust
dirt - and "first-flight" engine protection. |
You probably will agree that most planes today look like a modified Taurus, Kwik-Fli,
Esquire, etc. This is how I felt when I started looking for a different design.
Going through old magazines I came across a picture of a canard - the Japanese Shinda
- and later the U.S. Curtiss Ascender. They intrigued me very much and I thought, why
not? This was about as different as one can get - with everything backwards, wing and
motor in the rear and elevator in the front.
I started doing research on canard design but couldn't find much on the center of
gravity, thrust line, decal age and such. So along with what I could find, and what I
could figure out for myself, I started drawing and building.
I found out there are several advantages to the canard. First and most obvious is
the elimination of oil and dirt from the plane. The protection to the motor itself was
one of the first things I noted - especially on the first flight! Due to insufficient
fin area I would get a snap roll at lower speeds and was not able to get back to the
field. I had to land in a bean field adjoining our flying site.
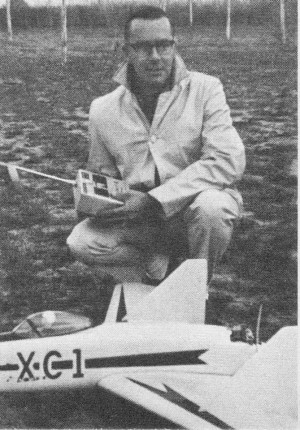 Bob and the beast. Enya 45, Grish reverse-pitch
10-6 prop, balloon tank work well. |
The beans were about 2 ft. high and even after passing through about 6 ft. of them the
motor was still running. This alone could be worth the effort of building a canard if
you fly like I do and quite often land in chin-high weeds, corn, beans, etc. With the
motor still running it is much easier finding the model.
Also, the canard is the easiest on stalls of any plane you will ever see. When pulled
up into a stall, instead of dropping off sharply and going into a dive, the nose just
sort of mushes down to level, and off it goes again. This is due to the extreme decalage
between the elevator and wing, causing the elevator to stall out first while you still
have lift with the wing - which is the main lifting force on the plane. The canard is
smoother flying and much easier in the maneuvers. It doesn't zip around, dipping, diving,
and looking more or less like a controlled crash about to happen.
There are several possibilities with the canard design. With a swept, constant-chord
wing the model will be more stable, but not nearly as pretty. Also a delta configuration,
such as the B-70, would work very well. This will be my next project. True, the canard
will never be a contest ship, but will fly more like a real plane. I have put mine through
all the maneuvers except the spin.
After reading that the United States gave up work on the Ascender because it was almost
impossible to recover from a spin, I didn't have nerve enough to try it with mine! As
long as I was going this far, I decided I would try some other ideas. The torsion rod
principle on the ailerons, using brass tubing instead of wire, worked out better than
expected. I had tried music wire before but got too much flexing. The tubing eliminated
this.
Always having trouble covering leading edges on my wings, I thought I would try aluminum
edges. Here is something I think the model industry should look into, and do something
about. I used 18 gauge for mine but 22 or 24 gauge would be better. This would be superior
to the balsa leading edges with but very little difference in the weight.
I started
bending mine over a form I made out of hardwood. But as they kept springing back, I ended
up working them by hand without too much trouble. If you will bend them slightly more
than the leading edge radius, they will have a clamping action, helping to keep them
tight while the epoxy is setting.
Originally, I had the rudders connected but the rudder servo is too far forward to
maintain balance. I had to use pushrods back to the wing, then 45-degree bellcranks to
pushrods in the wing. With all this linkage they didn't work well, so I disconnected
them, leaving the servo for the steerable nose wheel only. As the rudders are used very
little in actual flying, this is no problem. It is a good idea to make the rudders moveable
by using either copper wire or aluminum hinges; then be used for trim.
As most people building the canard will be experienced, I won't go into much building
detail. Some of you no doubt will want to work in some of your own ideas.
To begin with, it isn't as hard to build as it looks. First, cut out the 3/32 sides
and glue the 3/8 x 3/8 x 45 gussets on the inside of each half. Contact cement the 3/32
doublers between the gussets. The 1/2 x 3/4 sheet strips for top and bottom are better
cut to the top view shape; when glued to top and bottom they will form the sides to proper
shape. The 1/2 sheet top and bottom is made from soft material and is pre bent to more
of a curve than needed. I do this by running hot water on the sheets for a couple of
minutes, then blocking up both ends and putting weight in the middle. Wait till the next
day for it to dry and it will retain its shape.
Putting in the motor mounts, formers and such is standard procedure. The fuel tank
is different than normally used. I bought a 39¢ balloon punching bag in the dime store.
Insert a 2-in. length of brass tubing in the neck and wrap with rubber bands. When using,
draw out all the air, then fuel up. Insert just enough fuel to fill out balloon. You
don't need to build up pressure. When flying, no matter what altitude the plane is, the
engine will always draw, as there is no air in the tank.
The elevators are built standard with 3/16 square with the exception of the 1/16 plywood
covering top and bottom. The first elevator I built was covered with balsa, but being
out front, it is susceptible to any thing you might hit, even heavy weeds - which broke
off my first one. Since covering with the plywood I have had no trouble. The extra weight
also helps to get the center of gravity ahead of the wing.
The wing is built as you would any other, except for the torsion rods to the ailerons,
and the aluminum leading edges. If you have any doubts as to "noise" caused by tubing
affecting the receiver, you can use nylon blocks for the bearings instead of the 5/32
tubing. I experienced no trouble with my Bonner Digimite 4.
I always construct my wings in one piece on a jig with the dihedral built in. This
is the best way because the wing will come out straight, without warps. You can use styrofoam
instead of balsa to fill in the front and rear of the center section, if you wish. Styrofoam
will be easier to work.
The largest pusher prop readily available is a 10-6. If you wish to use a larger prop,
a left-hand shaft is available for the Enya 45. A standard prop of any size can then
be used. One thing you want to remember is that, with the elevator in the front, be sure
the elevator goes up for down and down for up.
I guarantee you will get a lot of attention at the field and plenty of comments, such
as, "It won't fly," "You must be crazy," and other endearing remarks that will make you
know they love you.
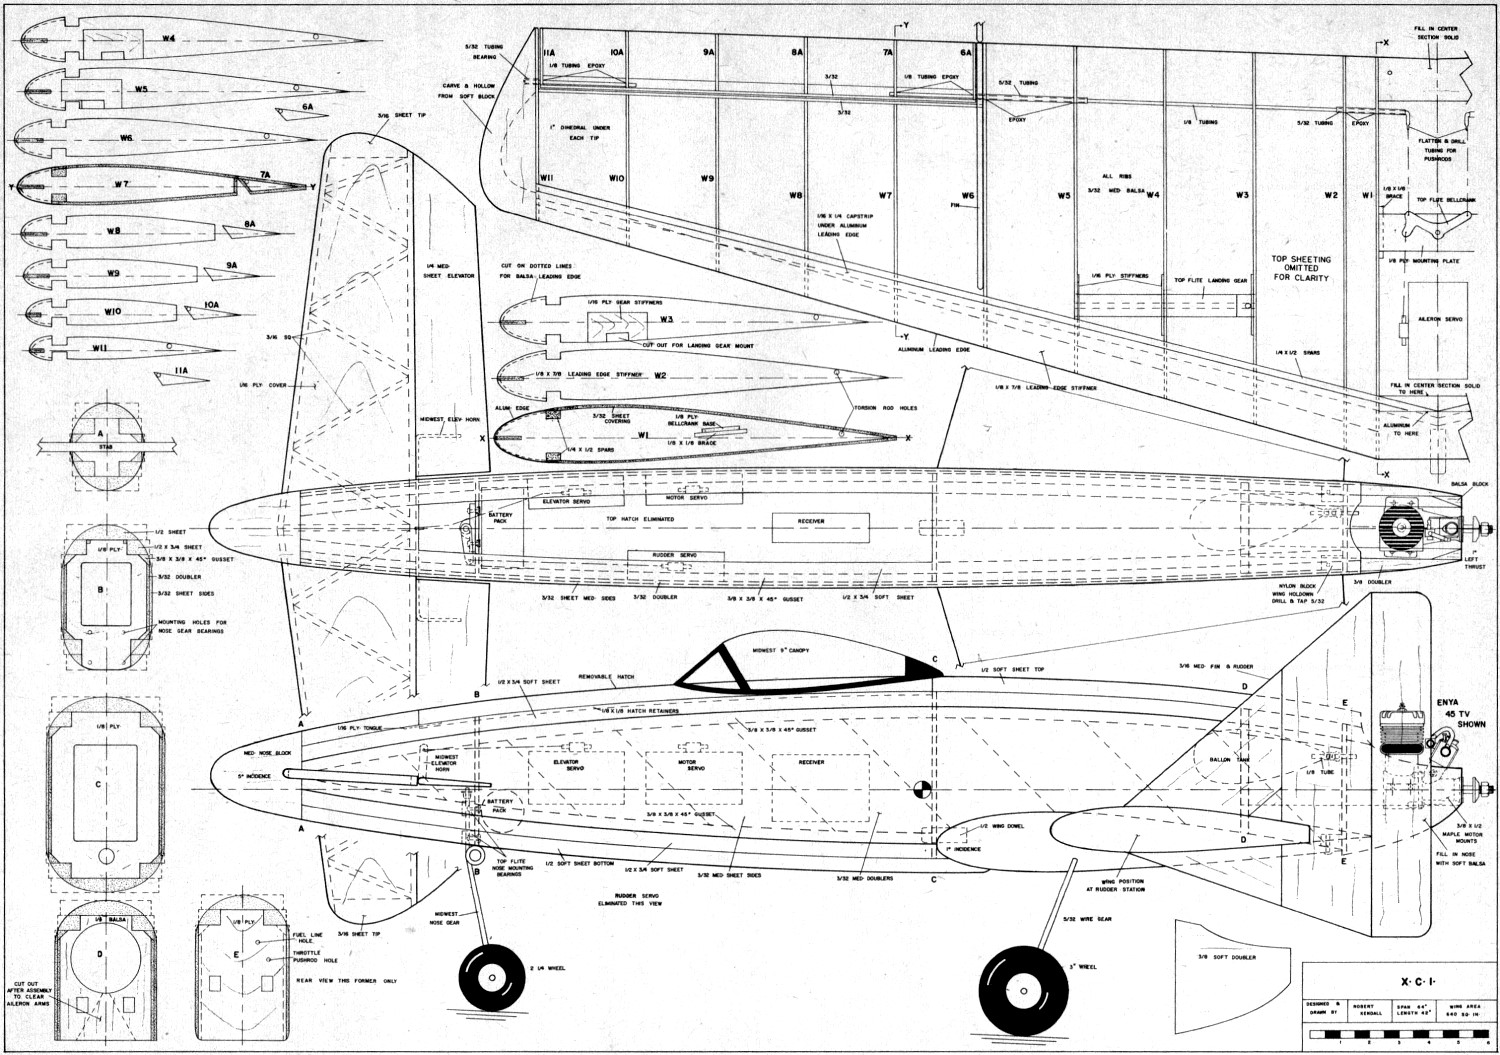
 Experimental Canard Plans
<click
for larger version>
Notice:
The AMA Plans Service offers a
full-size version of many of the plans show here at a very reasonable cost. They
will scale the plans any size for you. It is always best to buy printed plans because
my scanner versions often have distortions that can cause parts to fit poorly. Purchasing
plans also help to support the operation of the
Academy of Model Aeronautics - the #1
advocate for model aviation throughout the world. If the AMA no longer has this
plan on file, I will be glad to send you my higher resolution version.
Try my Scale Calculator for
Model Airplane Plans.
Posted May 12, 2013
|