|
Website visitor Iram O. wrote
to ask that this article and plans for the "Big Flapper" be scanned and posted. It appeared
in the February 1972 edition of American Aircraft Modeler. With a 70" wingspan, it was
considered a rather large plane in the day. Big Flapper was designed for lazy Sunday
flying. The original used a home-brew engine (big and heavy per the author) and sported
reeds for control actuation. "Reeds," for the uninitiated, were receivers that used
"resonant
reeds" - a type of electromechanical oscillatory device - to decode channel function.
They acted like narrowband tuned circuits (decoders) for responding to discrete commands
from the transmitter. Think of each reed as one of the fingers on the comb of a music
box mechanism that is resonant at a specific frequency, only instead of emitting a tone,
it vibrates in response to the unique frequency for which it is tuned. When stimulated
by the detected AM signal from the transmitter, it would close a switch for a particular
command, thereby signaling a servo or escapement to move the airplane's control surface.
Big Flapper
By Dave Boddington
 This airplane won't do the AMA or FAI pattern,
it won't take retracts, it isn't fast, and it is not quick to build. But, here is the
plane for the quiet Sunday flying craftsman who wants a big relaxing model for three
or four channels. This airplane won't do the AMA or FAI pattern,
it won't take retracts, it isn't fast, and it is not quick to build. But, here is the
plane for the quiet Sunday flying craftsman who wants a big relaxing model for three
or four channels.
Scene:
An Eight Air Force Bomber Group Airfield somewhere in the east of England.
Time: In the late afternoon of an early summer's day.
The air is full of a mixture of the musty, oily, rubbery smells only to be found on
service airfields, and the clean fresh smells of newly mown hay and wild flowers. In
the distance, silhouetted against the descending flaming orange sun, stand the metal
framework of the water tower and the sweeping curves of the huge blister hangars. A lark
sings sweetly overhead, its gentle bubbling song the only sound to be heard until, suddenly,
the peace is rent by the harsh crackle of a powerful engine's exhaust.
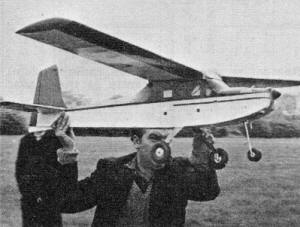 Launch of the first flight by hand because
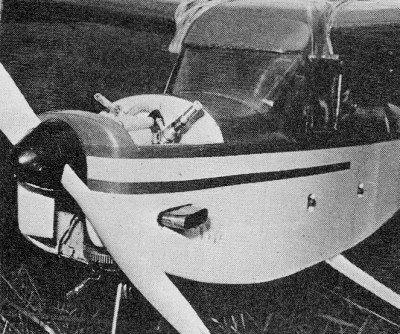
of tall grass field. Inverted engine unique and attractive in cabin jobs.
 With a big engine, use a large diameter but
low pitch prop, 12-5 or 13-4 would do fine. High pitch props would produce enough thrust
to keep this model flying at idle!
 Heavy homemade engine on prototype model.
Removable cowl not necessary with front rotor inverted engine installations if motor
mounts .are relocated.
|
In a far corner of the airfield a group of flying personnel are busying themselves
in preparation for the first flight of a newly-delivered aircraft. Despite the seemingly
lighthearted bantering among the pilot, his crew and engineers, there is a tension, a
nervousness that comes when the unknown has to be conquered and the unexpected can happen
at any time. Finally, the moment of truth arrives and, as the plane accelerates down
the runway, the spectators hold their breath.
A small correction with rudder to keep her tracking straight down the center of the
track and, with speed having built up, a gentle easing back of the stick - she is airborne.
Five minutes of flying around to get the feel of the ship and the controls is sufficient
for this first flight; then it is time to return for the circuit and landing. Nice and
easy does it on the final leg, long and flat, giving plenty of time for small corrections
to direction and the descent angle. Hold off until the speed drops and then firmly down
all the main wheels. A slight "curtsying" as she touches deck, but no bounce, and an
almost audible sigh of relief from the pilot. After the congratulations and inquest,
everyone retires for a celebration drink.
No, this is not a war story of the early 1940's, just the first flight of a new model
- the Big Flapper. The location is correct though - it is the U.S.A.F. base at Molesworth
in Huntingdonshire, England. Those evocative airfield smells were all there too, although
the airfield had not been fully operational for a number of years. I suppose I was ten
or eleven years old when I first visited an American airfield (through the woods and
fields of course, as the main entrance was guarded), but my most lasting memory of that
day will always be through the sense of smell.
The Big Flapper, as its name suggests, was developed from a smaller model called the
Flapper - a 48" span single-channel model that featured a novel form of aileron control
It was before the days of motorized servos and I mounted the rubber-driven escapement
in the center section of the wing with the rubber motor running down the span of the
port wing. The winding hook was let into the tip of the wing. Surprisingly, this method
of operating the narrow strip ailerons worked very well.
With the advent of multi-control or, more truthfully, when I could foresee the possibility
of purchasing this type of equipment, I set about designing and building a large version
of the Flapper for training purposes. The building went on fine until another project
interrupted the progress. I never seemed to get around to completing the model and eventually
let a friend,. Bob "Flacky" Brightwell, have it. Bob is a perfectionist and he not only
made a superb job of finishing the model, making me wish I had kept it, but also proceeded
to make his own engine and radio gear for it. He incorporated a number of his own modifications,
described in my notes on construction, as well. Because of these alternatives, please
read the instructions carefully, study the drawings and then decide exactly how you wish
to build the model.
Construction
The fuselage used is the old-fashioned "box" type using sheet sides at the front with
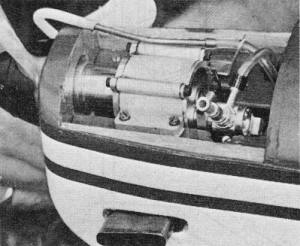
the rear end built-up from strip. The engine can be mounted either inverted or, if your
motor does not start happily in this position, upright. Should the latter mounting be
chosen, drop the engine bearers 3/16" to keep the propeller line correct.
Another alternative concerns the shape of the rear top of the fuselage. Originally
the fuselage featured the formers F6-F8 and the two 1/4 x 3/8" stringers; however, following
a mid-air collision causing considerable damage, the revised outline shown on the drawing
was used for the rebuilt fuselage. There appeared to be little difference in the flying
characteristics with either fuselage, so it is simply a matter of choosing the one whose
appearance you prefer.
Do not omit the 1/16" plywood cabin sides as these strengthen considerably what is
normally a weak area. The 1/4" sq. doublers on the top of the cabin area should be included.
With bolt-on wing fixings the dowels can be omitted. If you still prefer banded-on wings,
try using 3/16" dia. dural dowels instead of the more normal 1/4" dia. beech dowels.
Acetate sheet for the windscreen should be of a heavy gauge as this is another possible
weak spot.
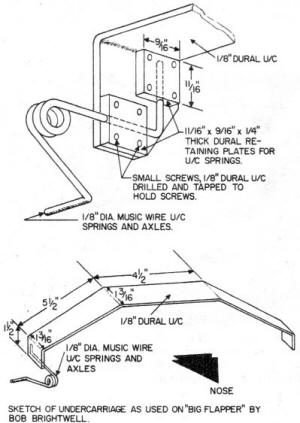 Sketch of undercarriage as used on "Big Flapper"
by Bob Brightwell
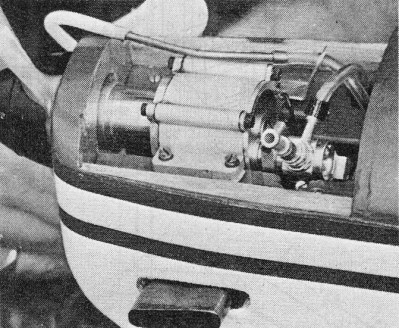
 Remember reeds (type of radio system)? They
were used as recently as the model's first flight last year. |
Admittedly this model is perfectly satisfactory as an ab anitio trainer, but I think
most real beginners will plump for an ultra-simple kit model or ARF model for their first
attempts.
A conventional bent wire torsion bar type undercarriage is shown in the drawings;
this will be quite adequate for most conditions. Bob Brightwell, however, designed an
advanced form of main undercarriage featuring individual sprung wheels.
The extra work involved in making "this unit will be amply repaid - the Big Flapper
can be thumped down really hard on landing without the slightest bounce. A. steerable
twin-wheel nose leg unit was used and this combined with the sprung main wheels proved
to be highly successful.
There is nothing unconventional in building the wings - just make sure that you do
not build in any warps. Ribs have to be slid onto the rear spar before they are pinned
into position over the plan. The leading edge is propped with 1/4" scrap balsa and the
lower 1/16" x 1-1/2" trailing edge with suitably shaped pieces.
Construct the wing in three sections; center, port and starboard. The 1/16" vertical
webbing is an essential part of the inherent strength of the wing, forming a box section
at the front and the rear or the wing. Cut the slots for the dihedral braces after the
wing sections are complete, except for capping strips. I usually glue in the dihedral
braces and the wing sections together at the same time, using copious quantities of pegs
and pins to keep everything together. Sheeting to the center section between the leading
edge and trailing edge is not essential unless ailerons are fitted and a servo installed.
The dihedral shown is intended to be used for wings without ailerons. Where ailerons
are fitted, whether of the inboard or strip type, the dihedral must be reduced to a maximum
of 2 percent. The reason for this reduction? Simple - the ailerons will not be effective
unless you do. Nylon tube and cable connections should be used between the aileron servo
and the center of the strip aileron, otherwise you may suffer from aileron flutter if
the horn connection is at the inboard end of the aileron.
The fin and rudder construction is self-explanatory. The rudder may look small, compared
with current aerobatic models, but was found to be quite adequate. Increase the area
if you want a really snappy response or if you have plenty of multi experience.
Commence construction of the tail plane with a simple framework of 1/4 x 3/4", 1/4
x 1/2" and 1/4" strip built over the plan. When this is dry, remove from plan and add
3/16 x 1/4" strips to all "rib" stations, both top and bottom. Note that the bottom of
the tailplane slots onto the top of the fuselage and that the fin slots into the top
of the tail plane. Sand the tailplane to a symmetrical airfoil section . The 1/4" sheet
elevators can be joined either by 3/32" dia. music wire or 1/4 x 3/8" spruce.
I much prefer covering this type of model with nylon as this adds tremendously to
the model's overall strength, yet retains a certain amount of flexibility to take up
the shock of hard landing (better known as a crash). It is surprising how strong an open
structure type fuselage, as used on the Big Flapper, can be due to this degree of shock
absorbing capability.
This model can cope with a very considerable payload so there is no need to skimp
on the decoration and fuelproofing for a change.
Why not assume that the model is going to last for a long time and really make a superb
job of the finish. However, it is no good making an assumption such as this unless you
make a first-rate job of the radio installation. The type of radio, linkages, hinges,
engine, etc. you use is up to you - just make sure they all operate efficiently.
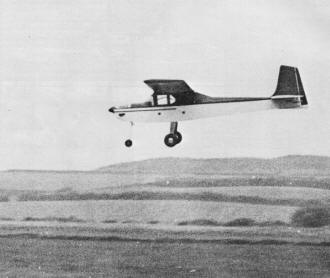
Flying
With the correct balance point - the further rearwards, the more tricky it will become
to fly - and a warp-free wing you are ready for that first trip. Hand the transmitter
to an experienced flier if this is your first model; it may hurt your pride but it will
save you a lot of extra work.
Either hand launching or a takeoff can be attempted for the first flight. You will
find it easy to handle and quite stable. The Big Flapper is not intended as a highly
aerobatic model, but it will cope with the basic maneuvers with varying degrees of efficiency
and style. Should you wish to do a lot of high "G" maneuvers, then it may be prudent
to add wing struts.
Dural tubing struts were experimented with on the prototype and, although it was never
proved that they were structurally necessary, they certainly looked quite attractive.
I sincerely hope you will enjoy building and flying the Big Flapper. It is not a unique
aircraft in any way - only an honest sports model designed to give the maximum of fun
and satisfaction.
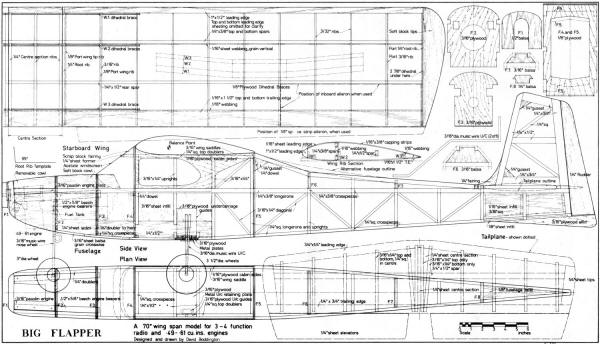 Big Flapper Plans
Notice:
The AMA Plans Service offers a
full-size version of many of the plans show here at a very reasonable cost. They
will scale the plans any size for you. It is always best to buy printed plans because
my scanner versions often have distortions that can cause parts to fit poorly. Purchasing
plans also help to support the operation of the
Academy of Model Aeronautics - the #1
advocate for model aviation throughout the world. If the AMA no longer has this
plan on file, I will be glad to send you my higher resolution version.
Try my Scale Calculator for
Model Airplane Plans.
Posted July 20, 2013
|