|
Not all that long ago, my interpretation
of radio-controlled (R/C) rudder-only (RO) flying was that the airplane operated
from a single channel controlling the rudder. That is the way it began, I suppose,
but as aerobatic competition entered the picture, it expanded to include throttle
control on the engine. Some models, I believe might have also had elevators and/or
aileron control, but during competition flights, only the engine throttle and rudder
were allowed to be manipulated. I have flown many R/C airplanes with just two channels
- rudder and elevator - but never with rudder and engine throttle. In fact, the
only airplane I have ever flown with only rudder control is an experimental rubber-powered
job with an electromagnet coil and a permanent magnet on the rudder. Many magazine
articles (like this 1964 R/C Modeler example) - and even books - on
RO flight have been published, and I have always intended to try building a rudder-only
model set up specifically for RO aerobatics. A notable feature of RO configuration
is quite a bit of up-thrust in the engine, which is necessary to initiate climbing
and looping maneuvers, as well as to keep the nose from falling in a turn (where
normally elevator would take care of it). With rubber-power and engine/motor-powered
airplane models with flat bottom airfoils, you need substantial down-thrust to prevent
the model from zooming under power, so I imaging using any amount of up-thrust really
amplifies the climb.
How to Stunt Rudder-Only
Former Class I Nat's Champ Outlines Blueprint for Successful
RO.
By Bernard Williams
The first step along the road to becoming a good Rudder-Only flyer is in selecting
the right airplane. A large ship with approximately 66" wingspan is recommended
as the larger craft with heavier wing loadings handle better in the wind and are
easier for both the pilot and the judges to see. I achieve a heavy wing loading
in my modified Live-Wire Cruiser by adding ballast in the form of extra batteries.
You will find that a heavy ship does not buffet around in the wind and settles quickly
on low engine speeds for faster touch-and-go landings, an important factor with
only nine minutes flight time. I also prefer a plane with a long tail moment (the
distance from wing to stab), and non-lifting type stabilizers such as utilized on
my Cruiser, for it is not only easier to trim for wind conditions, but makes smoother
turns and more precise loops.
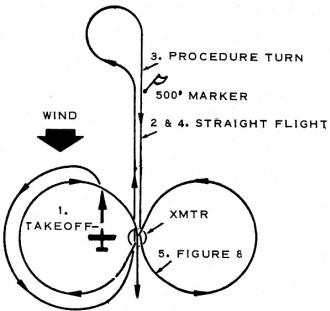
Precision AMA Pattern Includes 360° over Transmitter (Pattern
done on medium speed to maintain same altitude).
Bernie commences the Proto Taxi. Note engine upthrust and long
tail wheel gear.
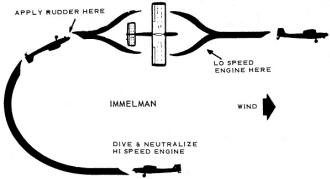
Immelmann.
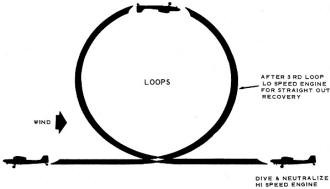
Loops.

Wingover.
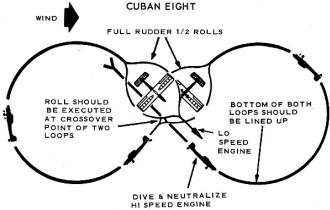
Cuban Eight.
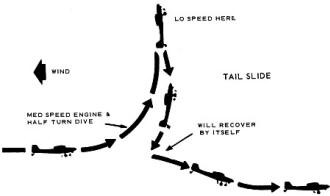
Tail Slide.
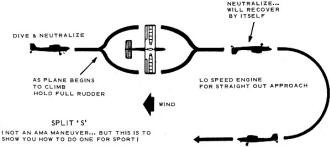
Split-S.
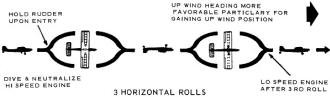
3 Horizontal Rolls.
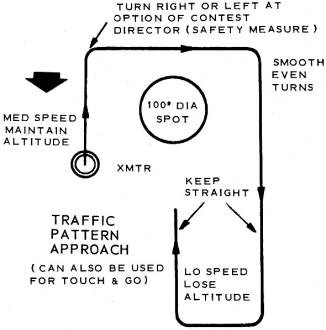
Traffic Pattern Approach.
Another important consideration in contest ships for Class I is their ground-handling
features. This is where the right kind of landing gear is important. I personally
prefer a two-wheel, wide-spaced, torsion-type gear over the more popular trike gear.
The wide-spaced undercarriage, in conjunction with the long tail moment, tends to
prevent the plane from ground looping. Along with this, I normally use a rubber
tired tailwheel which is permanently locked rather than free-wheeling, in order
to prevent unwanted turning tendencies. This assists in keeping the plane from ground
looping, as mentioned, but also helps the ship brake to a stop for Proto Taxi. I
let the air out of my Veco wheels so that they remain soft, preventing unwanted
bounces on landing.
I find, that for Class I, the flat-bottom airfoils are better than the semi-symmetrical
type, as the latter tends to hold the inverted position of a loop too long. The
flat bottom section allows the nose to drop instantly, making for rounder loops.
Two more important features of contest flying are good wind penetration, and
of course, good looping. The former can be achieved by trimming your heavy wing-loaded
airplane for a fast "dead-stick" glide. Good looping tendencies can be acquired
by using a K&B .35 R/C type engine with approximately 7 degrees upthrust - repeat,
upthrust, not downthrust!
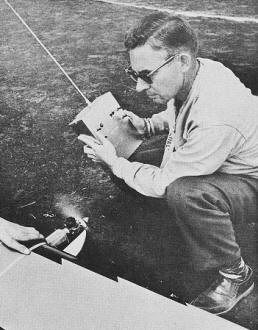
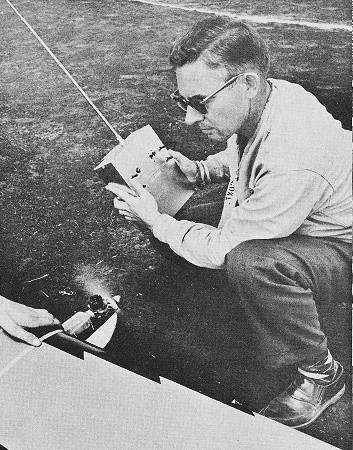
Author checks his modified Live Wire Cruiser prior to takeoff.
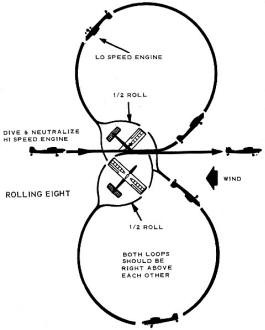
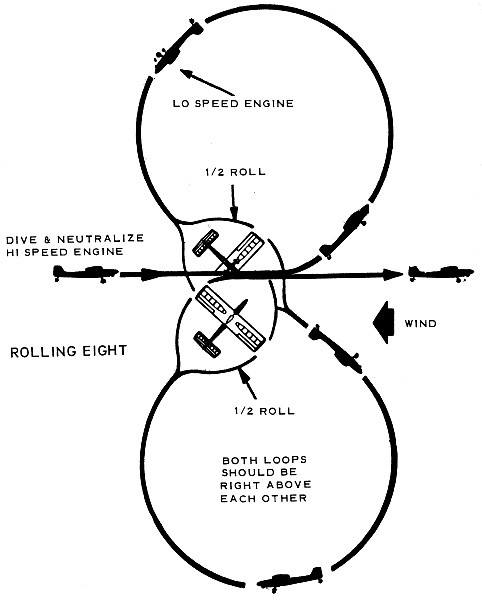
Rolling Eight.
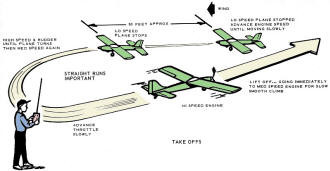
Now that your Class I ship has been built and properly trimmed, you are
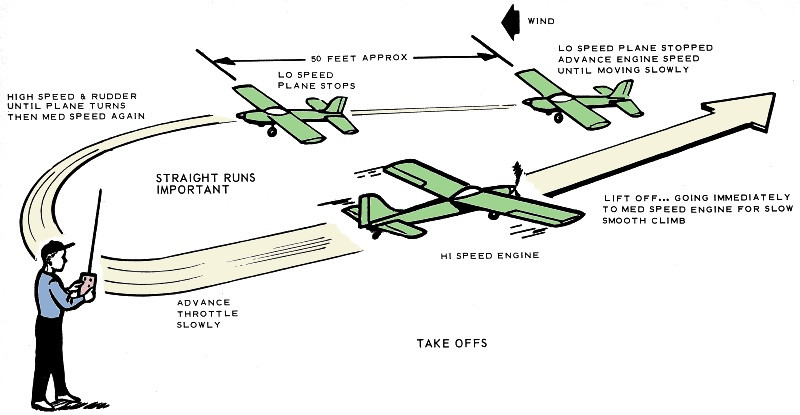
ready for the flight pattern. The first Rudder Only maneuver is the Proto Taxi.
Starting from a "braked" position, I slowly open the throttle until my plane is
moving slowly along the ground, bringing it to a stop at approximately fifty feet
by a combination of retarding the throttle and the braked tail wheel, as previously
mentioned. To effect the 180° turn, open your throttle and hold full right rudder
until the plane begins to turn. Immediately decrease the throttle to full idle to
stop the turn, bringing you into position for takeoff. Slowly advance the throttle
until the plane clears the ground, then decrease again to maintain long straight
climb. Bring your ship into position for the straight and level flight maneuver.
When it reaches a position approximately five hundred feet upwind, you are ready
for your Procedure Turn. This is achieved by a smooth even 90° turn to the left,
followed immediately by an equally smooth 270° turn to the right. Concentrate
on reaching the same point as when you started the procedure turn. Now, on your
straight flight back, concentrate on crossing exactly over the top of your transmitter.
This brings you into position for the Figure Eight. The most important part of this
maneuver is in keeping both halves of the Eight equal in size, while crossing directly
over the top of your transmitter, as shown in your AMA manual.
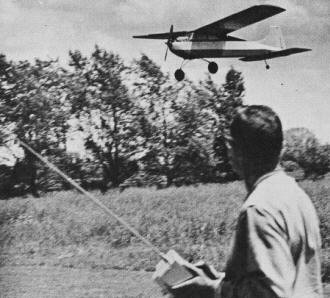
The end of a perfect flight - Bernie Williams brings the Cruiser
in for a dead stick landing.
Now for the Touch-And-Go landing. Whether or not you attempt this step should
be decided in advance and predicated on prevailing wind conditions. At best, it
is risky, for failing the Touch-and-Go cancels your flight entirely, and you must
decide whether the few extra points are worth the added risk. If you decide to attempt
it anyway, put your plane on the correct heading and decrease the throttle, judging
your descent so that the plane will land as near the center of the circle as possible.
When the wheels are about to touch down, decrease engine to full idle, allowing
the ship to touch and roll. After achieving this, increase your throttle slowly
to attain a smooth takeoff again.
You are now ready for your stunt maneuvers. It is important to maintain an easy
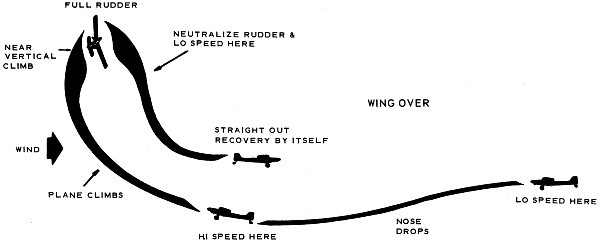
viewing position to aid the judges in their scoring. The first maneuver, the Wing
Over, is achieved by decreasing throttle to full idle, As soon as the nose begins
to drop, increase the throttle to full bore until the plane is climbing steeply.
When the ship reaches the top of the climb, or stall point, hit full right rudder,
turning 180°, followed immediately by decreasing the throttle to idle, allowing
the plane to recover on its own.
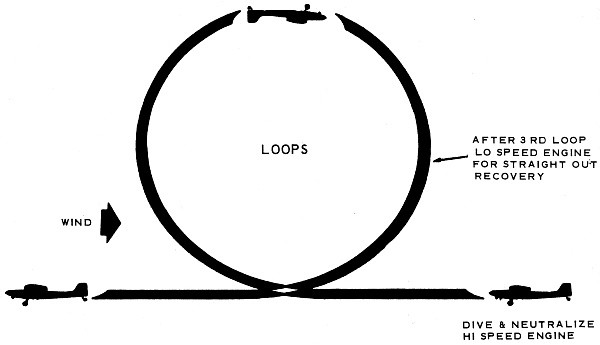
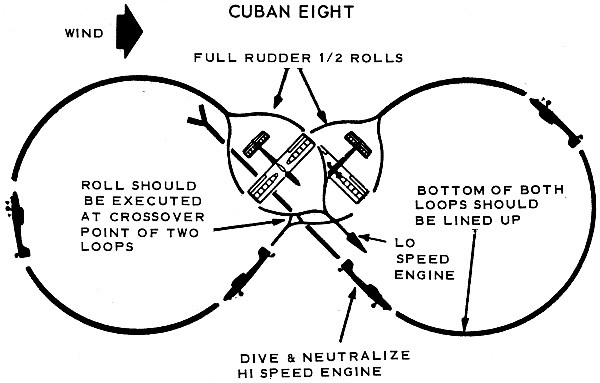
The next five maneuvers are: (l) Three Horizontal Rolls (2) Immelmann Turn (3)
Three Inside Loops ( 4) Cuban Eight (5) Rolling Eight, All five are done on high
speed engine. To start these maneuvers, hold full rudder until the plane spins down,
building up the proper speed, then letting the rudder neutralize. You will find
that with the proper amount of upthrust in your engine, your ship will do all of
these looping type maneuvers with complete ease.
A special note is in order for the three horizontal rolls. If the day is quite
windy, I always do my rolls upwind. The reason for this is to save time, as it takes
too long to work your plane the necessary upwind distance for doing all three rolls,
and you will find that by doing your three rolls into the wind, you will be in a
good position for the next maneuver.
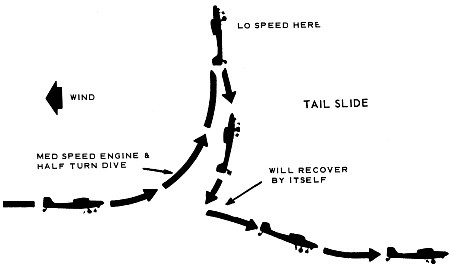
After the Rolling Eight, the next maneuver is the Tail Slide. This is accomplished
by heading the plane into the wind at medium throttle. Make one right turn to dive
and let, the plane recover on a down wind heading. If you have the right engine
speed, the plane will climb steeply, as in the wingover. When it reaches the top
of the climb, reduce the throttle to low - if you had enough climb, and you steered
your plane straight, it should slide. This is not a "luck" maneuver as most fliers
will try to tell you. Once you learn the proper engine speed and technique, you
will find that you can perform the Tail Slide quite consistently.
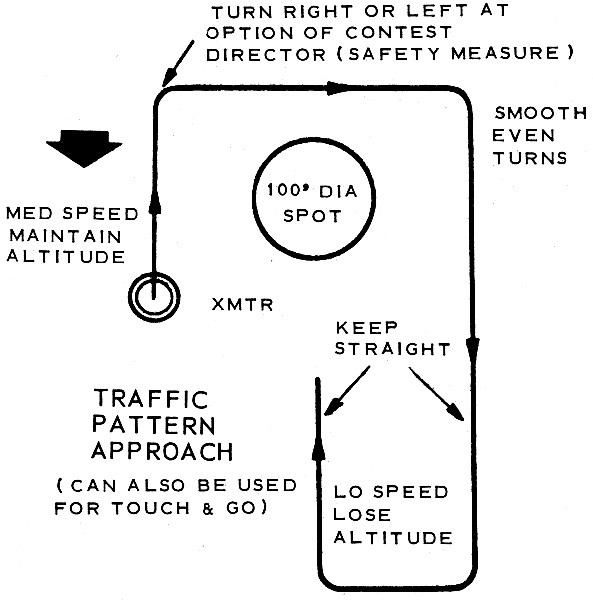
The next maneuver is the Traffic Pattern Approach. This one is passed off too
lightly by most flyers, and consequently, they do it poorly, getting fewer points.
To rack up the maximum points for this maneuver, it is very important to know your
glide angle on low speed engine. After you have determined this, get your plane
to the proper altitude so that when you are on the landing approach, the craft will
land in the 100 foot circle. Make sure that you maintain your starting altitude
through all your turns, keeping these turns as smooth as possible. After the turn
to the approach, keep the descent smooth and free from corrections in your attempt
to hit the circle. If you see you are going to miss it, let it go, for it is far
more important to make a perfect landing and not hit the spot, as so many fliers
fail to do in making that last minute turn. Don't forget - if you hit the prop,
you are finished as far as the taxi return is concerned, as with today's rules the
taxi return is worth just as many points as three loops or any other maneuver. If
you have a plane with a long tail moment like the Cruiser, and with the tail wheel
locked as previously mentioned, the taxi, or Proto Return should he quite easy and
a good "point-maker." To taxi your plane, try to keep the ground speed as low as
you can to aid you in keeping the plane under full control. I always speed the engine
upwind just a little if I need to turn the plane, but as soon as you have your heading
to the spot, slow the motor down once again.
This concludes the maneuvers. You probably noticed that I omitted the three spins.
My reason for this is lack of time in the maneuvers, combined with the fact that
my plane with its long tail moment and trimmed to fly a smooth pattern, will not
spin anyway! In closing, let me remind you that articles, diagrams, and words of
advice are only the beginning, and that conscientious practice is, after all, the
flyers greatest asset.
|