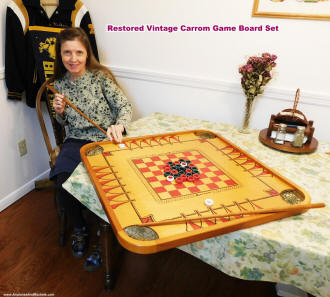
Original Carrom Game Board set after
cleaning and treating with Liquid Gold (right).

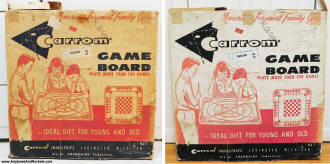
Original discolored Carrom set box (left) and after spraying
with bleach solution (right).

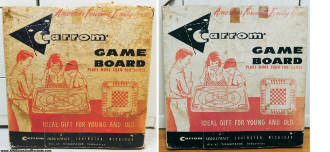
Original discolored Carrom set box (left) and after spraying
with bleach solution (right).
For the last dozen years or so, I have been working to re-acquire some of the
items I remember having as a kid and teenager back in the 1960s and 1970s.
Dittos for Melanie's stuff. Very
few of the original articles survived my handling, but fortunately many other people
took better care of their stuff (or their parents did), so much of it is available
on eBay. Back in the early days of eBay, a lot of the vintage gears could be purchased
at a decent price, but nowadays the costs have skyrocketed. For instance, some of
the Estes rocket kits I bought in 2005 for $15 or so, are now selling for north
of $100. It's pretty ridiculous.
This 1960s era Carrom (aka Carom) Game Board came from our daughter, who found
it in a Goodwill store for just a couple bucks. Even Goodwill and Salvation Army
store prices have gone through the roof, but she got this at one of the specialty
"Bins" outlets. It was in fairly decent condition, with only a few scratches and
streaks of paint on the edges. There was also an area in one corner where one of
the plies had delaminated and needed to be glued. The box was with it, as well as
all the game pieces except two of the red rings.
The paint lines scraped off easily, and some 409 took care of the dirt layer.
No attempt was made to sand or refinish, since it was in generally good condition.
A heavy coat of Liquid Gold was applied over the entire board and was left to soak
in overnight. It was then wiped dry the next day, and it looked great! All the wooden
parts - cue sticks, bowling pins, etc. - which were unfinished, were lightly sanded
and then coated with Liquid Gold.
The game box was discolored to a yellow tone, as is typical with old cardboard
boxes. I developed a very successful (thus far) method for restoring the original
whiteness that has worked well on many boxes for model airplane kits and other vintage
items. It is described below.
Method of Restoring Whiteness to Faded Cardboard Boxes
Disclaimer: This procedure carries no guarantee of success for you. If you try
it and have bad results, do not blame me. I'm just telling you what has worked
for me. It is always best to test a small area first.
Mix a solution of about 25% Clorox bleach with tap water and put it in a spray
bottle. Try to get one that creates a very fine spray. Lay the item to be whitened
down on a level surface that will not be harmed by the bleach (e.g., a basement
floor or driveway). Spray an even coating of the solution on the box, being careful
not to soak it too much lest the paper start wrinkling. The first application will
almost certainly produce a speckled, mottled look from where the spray droplets
did not contact the entire area (see bottom photo at right). Let it dry overnight
and then spray again and let sit overnight to dry. It usually takes three or four
iterations to produce an even whiteness. Just as with clothes, it does a good job
of whitening white areas without dulling the colors.
The two sets of photos of the box restoration show the marked difference before
and after treatment. You're welcome ;-)
Posted January 4, 2021
|
