|
In 1960 when
this article appeared in American Modeler magazine, radio control (R/C)
was still in its infancy and was a rich man's sport (mostly). R/C also required
an amateur radio operator's license in order to use the transmitters. Control line
and free flight constituted the purview of the vast majority of aeromodelers. Towline
gliders were very popular in areas where enough open area was available - and back
then there was a whole lot more open area than there is today. Take a look at the
backgrounds of photos and movies in the 60's and before and notice how relatively
undeveloped the land was, even around larger metro regions. Anyway, this article
offers sage advice to modelers considering getting into towline gliders. Many kits
were available in the day.
Ready to Try Towline Gliding?
The graceful soaring flight of gulls and hawks has long been the inspiration
for model glider and people-sized sailplane flyers the world over. Towline glider
flying comes closer than any other phase of modeling to duplicating the grace and
beauty of nature's sky creatures. A good model glider is really one of the simplest
types of model to build and fly. There is no noisy engine and messy fuel to contend
with, no flying wires to get tangled, no radio to get out of tune. The model is
reduced to its bare essentials, wing, tails, simple fuselage, nose weight to balance
properly and a tow hook for launching ... that's all.
Flying, too, is in its purest form; the glider is towed aloft on a length of
string, released and then glides slowly back to the ground. Because of light and
efficient design, a good glider will soar and gain altitude on the slightest rising
air current. Out-of-sight flights are not unusual on a warm summer day when thermals
(rising air currents) are popping over the landscape.
Towline glider flying is one of the best ways for a model fan to learn the basic
techniques of flying and proper adjustment. Initial cost is low, construction is
simple and the inevitable crash hazard is reduced because of light weight and slow
flying speeds. The one requirement for glider flying that can be a handicap for
city dwellers is space. Towline glider flying needs large open fields to give the
model room to circle and drift downward. Even an area the size of a football field
could be considered on the small side. Today's model glider competition is conducted
in the "Nordic" class, but don't let the name scare you off. Nordic model designs
are simple and serve equally well for just plain Sunday afternoon fun flying. Nordic
class glider regulations are international and there are two divisions, A-1 and
A-2. The A-1 class is for smaller gliders and specifications require: maximum surface
area 279 sq. in. and minimum total weight 5.08 oz. There are no restrictions on
design, towing must be done from the ground with an inextensible line (although
15% stretch is permitted) with maximum length of 164 feet. The larger A-2 gliders
are permitted a surface area of 495.9 to 526.9 sq. in. and minimum weight of 14.46
oz. Complete regulations governing Nordic glider competition can be found in the
A.M.A. official rule book.
The glider described here is designed to fit the Nordic A-1 specifications. Due
to its simple construction it can be easily and quickly built. It will turn in fine
flights and show you all the tricks encountered with the larger A-2 designs. Since
full size plans are not absolutely necessary for this model dimensions are given
on the plan for easy enlarging. Full size patterns are presented for the tricky
parts such as wing and stab ribs.
Begin by drawing full size wing and stab outlines and rib positions on sheet
of shelf or wrapping paper. The most important part of any glider is the wing, so
let's tackle it first. Select medium stock rather than soft or very hard. Balsa
that is a bit on the hard side can be used since it is better to have a little extra
weight and strength rather than too weak a structure because of soft wood.
Ribs should be cut from quarter-grained stock if available. This type stock gives
the ribs rigidity and helps prevent warping of wing structure. Cut all the ribs,
stack them together, pin or clamp and sand so that they all have same contour. With
ribs still stacked cut the spar notches using two hacksaw blades held together.
Set rib stack aside and when building wing use ribs as they come off the stack so
that any notch misalignment will not twist or bend the spars.
Pin down the main wing panel leading and trailing edges over the plan and cement
ribs in place. Next cement top spars only into the rib notches. Assemble tip panels
in the same way, flat over plan drawings, but omit top spars. When dry, take up
tip panels and cut leading and trailing edge ends at an angle for dihedral. Join
tip panels to main panel, block up to proper dihedral angle and then add top spars
to tip panels.
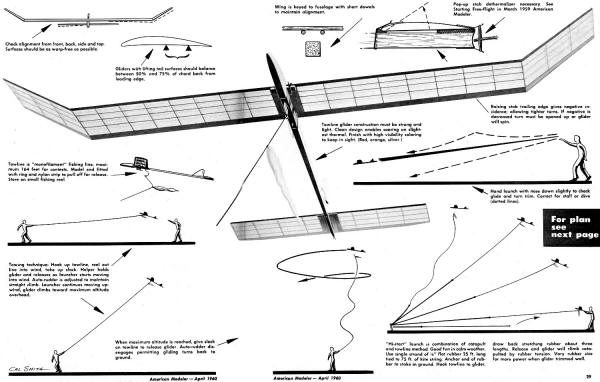
Check alignment from front, back, side and top. Surfaces should be as warp-free
as possible.
Gliders with lifting tail surfaces should balance between 50% and 75% of chord
back from leading edge.
Towline is "monofilament" fishing line, maximum 164 feet for contests. Model
end fitted with ring and nylon strip to pull off for release. Store on small fishing
reel.
Towing technique: Hook up towline, reel out line into wind, take up slack. Helper
holds glider and releases as launcher starts moving into wind. Auto-rudder is adjusted
to maintain straight climb. Launcher continues moving up-wind, glider climbs toward
maximum altitude overhead.
When maximum altitude is reached, give slack on towline to release glider. Auto-rudder
disengages permitting gliding turns back to ground.
When dry, take up wing assembly from plan and add bottom spars first to main
panel and then to tips. Coat dihedral breaks with three or four layers of cement
to strengthen. Cement 1/16" sheet to bottom of wing at center to form mount.
Short dowel "keys" are cemented under trailing edge to position wing on fuselage.
Add these after covering wing and space to match fuselage width. Cut away tissue
covering where keys are located so that good strong cement joint can be made. If
keys are cemented onto tissue the first hard landing bump will peel tissue and keys
off wing bottom.
The stabilizer is built flat over the plan in the same manner as the wing. Select
lighter wood stock than used for wing for the stab. A lightweight stab will require
less weight in nose to balance model properly. Add sheet planking to stab center
section, note that both top and bottom planking is set into structure flush with
rib outlines. Bend wire parts to shape and double cement in place.
Sand exposed surfaces of wing and stab smooth before covering. Apply light weight
tissue dry and then wet to shrink tight. Apply about four or five coats of dope
to wing and two or three coats to stabilizer. Thin dope 50% and add 10 drops of
castor oil per ounce of dope to plasticize. This keeps covering from drying out
and prevents excessive shrinking that causes warps.
The glider fuselage is made from a single piece of 1/2" sq. tapered on sides
only towards rear. Select very hard stock for fuselage. Piece should be as warp
free and straight as possible with grain running parallel to sides along greatest
length possible. Obtain a piece of flat lead sheet from plumber supply shop, cut
to nose top view shape and cement to bottom of fuselage nose. Add piece of 1/2"
sq. to top of fuselage nose. Carve and sand to shape shown on full size parts drawing.
Wing is keyed to fuselage with short dowels to maintain alignment
Pop-up stab de-thermalizer necessary. See Starting Free-Flight in March 1959
American Modeler
Towline glider construction must be strong and light. Clean design enables soaring
on slightest thermal. Finish with high visibility coloring to keep in sight. (Red,
orange, silver.)
Raising stab trailing edge gives negative incidence; allowing tighter turns.
If negative is decreased turn must be opened up or glider will spin.
Hand launch with nose down slightly to check glide and turn trim. Correct for
stall or dive (dotted lines).
"Hi-start" launch is combination of catapult and towline method. Good fun in
calm weather. Use single strand of 1/2" flat rubber 25 ft. long tied to 75 ft. of
kite string. Anchor end of rubber ta stake in ground. Hook towline to glider, draw
back stretching rubber about three lengths. Release and glider will climb catapulted
by rubber tension. Vary rubber size for more power when glider trimmed well.
Cut out plywood wing and stab mount pieces and cement in place. Double cement
because a strong joint is needed here to support wing and stab. Cut out fin and
rudder, cement to fuselage top. When dry, sand edges round. Cement wire hinge to
front edge of rudder. Bend eye to hold hinge to fin top. Push hinge wire into fuselage
top at rear of fin then cement eye to top of fin over hinge wire on rudder. Next
bend wire rudder horn to shape and cement in place over trailing edge of rudder.
Bend hook for rubber band and cement to fin near leading edge. Cement triangular
balsa horn stops to sides of fin level with wire horn ends on rudder. These triangular
blocks will be trimmed later to make rudder travel adjustments for trim on tow and
in glide. Sand fuselage smooth and apply three or four coats of dope.
Bend tow hook to shape and cement to bottom of fuselage. Bind with thread and
double cement since the tow hook takes a lot of strain. Cut balsa strip and cement
into open part of tow hook. The rear end of this balsa strip is trimmed to change
location of tow ring to achieve best towing position. Bend other wire parts to shape
and cement in place. These include wing hold down, auto rudder line guide eye at
fuselage center, auto rudder release pin guide and lower de-thermalizer hook at
tail.
The auto rudder linkage is a simple push-pull affair. Left turn rudder trim for
glide is held by rubber band on left side of rudder horn. Nylon thread and rubber
band connects the right rudder horn to release pin under fuselage behind tow hook.
The tow line has length of slack behind tow ring connected to release pin. In operation
the thread to right rudder horn is held by the release pin at the eyelet. This swings
rudder to right while glider is on tow. When tow rig drops off tow hook, the release
pin is also pulled letting rudder swing over to left turn glide position.
As shown on the drawings the end of the towline connects to the tow hook with
a 3/8" dia. ring or loop. An additional 4" length of line connects the tow ring
to the auto rudder release pin. Tie a 6" x 6" piece of nylon onto the towline about
a foot ahead of the tow ring. The nylon will drag the tow-ring off the tow hook
when tow pressure is released. The tow-line can be stored on a small inexpensive
fishing reel for ease of handling in the field. Monofilament fish line can be used
for towline.
With glider completed and towline prepared we are ready for test gliding and
practice towing. Try and pick calm weather for your first test hops. A wide open
site with high grass and few obstacles is desirable. To test glide properly hold
the model above your head and run slowly into any breeze that may be blowing. Hold
glider slightly nose down. When enough speed is gained the glider will lift out
of your hand and glide back to the ground. Do not throw hard with nose up or wings
banked. Resulting stall or steep turn will not give a true indication of glider
trim.
Make repeated hand-launched test glides noting tendencies to stall or dive and
degree of turn. With small amount of left rudder as set up by horn and triangular
block stop shown on plans, glider should turn to the left. Too steep a turn can
be corrected by reducing left rudder angle or increasing negative stab incidence.
If the model stalls, correct by steepening turn or by reducing negative stab incidence.
A bit of modeling clay may also be added to the nose. Turn trim both in glide and
on tow is adjusted by trimming stop blocks and bending rudder horns to get desired
turn in glide and straight tow.
When glide trim looks good it's time to try a tow. Reel out about 25 or 35 feet
of line for first tows. Put tow ring on tow hook and engage auto rudder. Have your
helper hold the model lightly with nose up about 30° at shoulder height. Model
and towline should make a straight line directly into any breeze blowing. Take up
slack in towline then start to move slowly directly into wind watching model over
your shoulder.
A bit of teamwork is required here between you and your helper. He must release
model just as you start moving and as he feels a firm tug on the model. He may find
it is helpful to move a few steps forward holding glider when you do. Your launching
helper should never throw glider because towline will go slack and tow ring will
drop off, releasing model too low.
It is a good idea to work out hand signals between launcher and towline handler.
You can't always hear each other clearly when wind is blowing. Procedure can go
something like this:
Reel out towline, launcher connects tow ring, checks hook-up and signals when
he has glider ready in position. Towline handler then takes up towline slack and
checks alignment into wind. When he is ready he raises arm to let launcher get set,
then drops arm and starts moving upwind. Launcher can take few steps and release
model. As model starts climb towline handler must watch model and continue moving
upwind. If glider swerves sharply, stop and release tow immediately. Model should
recover to normal glide. Note turn tendency and make rudder adjustment to correct.
Then try another tow. Repeat procedure until glider climbs straightaway on tow.
With good towing technique the model can climb almost directly overhead. At this
point stop moving, give slack to pull towline of tow hook. Now you can try tows
with longer line. Increase length about 20' on each successive tow until maximum
length of 164' is reached. You will probably have to continue adjusting rudder for
straight tow as you increase line length since short line tows are easier than those
with long line.
One important point that should not be overlooked is the use of the de-thermalizer
even on test flights. Towline gliders have been known to catch a thermal from 50'
tows and soar out of sight. The de-thermalizer is not a fancy word we use to impress
you, but rather a tried and true gadget to bring your model gently back to earth
if it should encounter a thermal. The type used on our A-1 design is the pop-up
stab. When the de-thermalizer releases, the stab tilts up "spoiling" the fore and
aft trim of the model. Forward speed is arrested and the model sinks in a level
attitude.
The stab is held down on the tail by rubber bands over fuselage and hook at leading
edge. Another rubber band holds the trailing edge down by passing over wire at trailing
edge and wire on fuselage bottom at rear. A short length of untreated (not waxed)
venetian blind cord is inserted between rubber band strands at trailing edge. Just
before launching the cord is lit and burns slowly until it burns through rubber
band. Stab tilts up from tension of rubber bands at leading edge. Stab is provided
with string or wire on underside to limit tilt angle to about 35° or 45°.
Cord burning rate should be checked before using on model. Use one minute or less
length cord for test flights and three minutes for contest flights.
Practice your towing technique until you can get maximum altitude before release.
The higher the model climbs the longer the glide duration which after all is the
main idea in towline glider flying. As you become more proficient you will be able
to "play" the glider like a kite on tow, releasing when you feel a thermal. This
is what wins contests. With a good working de-thermalizer you will have your glider
back at end of 3 minute flight limit ready for a repeat performance. Try to get
in the required number of flights when thermal conditions are good. Don't waste
a lot of time with with practice hops at a contest, come prepared with model adjusted
and come to win.
Even if you never enter a contest you will find towline glider flying one of
the most satisfying phases of modeling. So get out the balsa and cement and tackle
the bird accompanying this article. Happy cross-country running!
Kits recommended to start out with include Sinbad, Towline-Terror, Thermic Series,
Jetco Nordic.
Posted May 29, 2021
|