|
Here is a clever
control line airplane carrier deck design that derives it lightness from sparse
construction and its compactness from making the modular components stowable within
each other sort of like the familiar Russian
matryoshka nesting dolls.
Appearing in the March 1962 issue of American Modeler magazine, it is designed
to accommodate a 60' circle, but slight modifications to the deck components can
be easily made
 for other radii. Not shown in the plans but
likely possible without sacrificing strength and rigidity would be to drill lightening
holed in the 1"x6" and 1"x8" frame members. for other radii. Not shown in the plans but
likely possible without sacrificing strength and rigidity would be to drill lightening
holed in the 1"x6" and 1"x8" frame members.
See "Portable
Control Line Aircraft Carrier Deck" (March 1962 American Modeler), "Livingston
(NJ) Club Builds Carrier Deck" (September 1967 American Modeler), and "Flying
the Carrier Event" (July 1951 Air Trails).
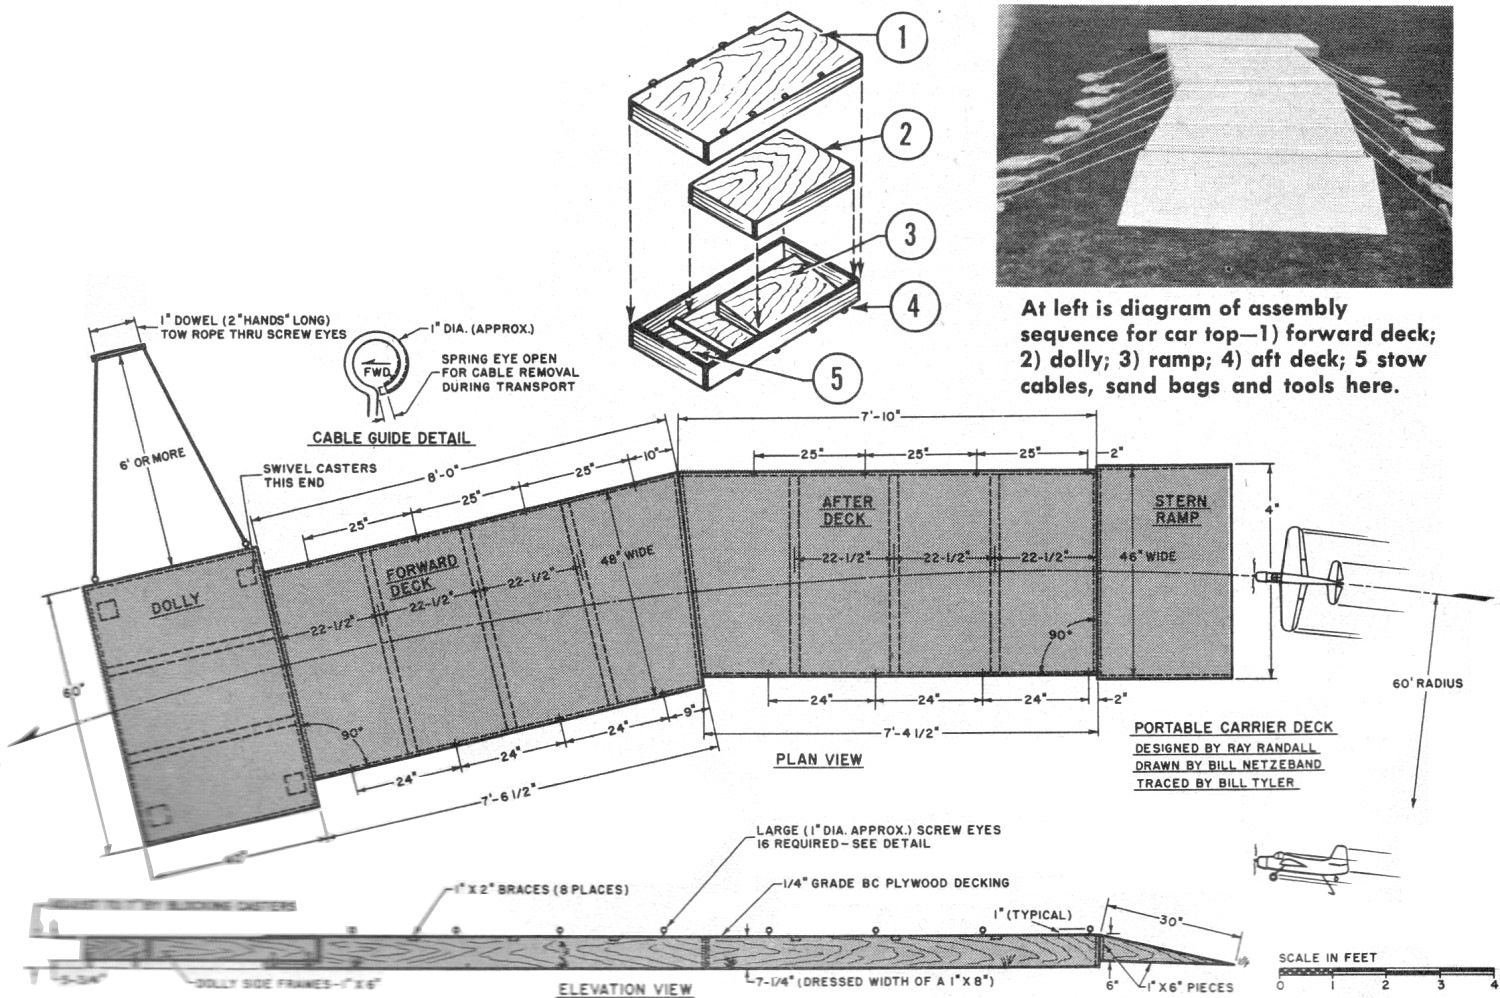
Portable Carrier Deck
This device could be the biggest boost control line carrier flying ever received!
|
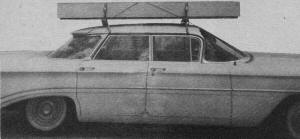
Portable carrier deck atop car.
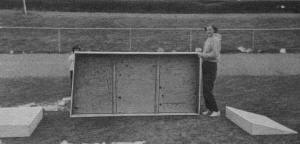
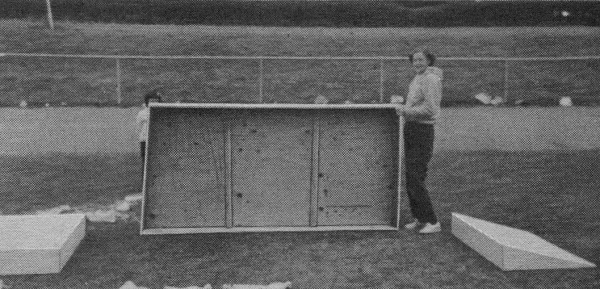
Portable carrier deck bottom side.
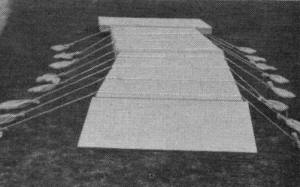
Assembled portable carrier deck.
|
Usually a man's dedication to an activity is indicated by the lengths to which
he will go to become proficient in that category. This practice deck is a good indication
of Ray Randall's dedication to the Navy Carrier Event. We found out about it at
the Nats where most flyers were having trouble getting on ye old deck while buffeting
the breezes. Ray got on first pass, two times. Since a standard contest-type full
deck is fairly expensive, most people are forced to practice on flush decks. This
just ain't the same as landing on a regular deck.
So we offer construction data on this portable practice deck to enable you and
your club to get good with carrier landings. The arresting area, a bit shorter than
standard, will sharpen your procedure. Take-offs are from the ground, or if you
can get off the forward section, fine! The deck, transportable by automobile, sports
its own dolly system for maneuvering on the field. Arresting cables and sand bags
are according to the AMA rules book. We offer two types of material list - one if
you need the wood cut to length by your lumber dealer, the other for standard lengths
of wood. Grade BC plywood finished on one side is cheaper than AB. A table saw will
greatly ease the labor. We strongly recommend screws for frame assembly and glue
for decking assembly, but nails will suffice.
After cutting all lumber, construction entails fairly conventional carpentry.
Side frames are assembled using the deck pieces to align them. Be careful to build
Forward and Aft decks so their beveled ends face each other. You'll note from the
plans that the aft deck must fit inside of the forward deck for traveling. Check
this fit before you get too far along to change it if need be.
The 1/4" plywood decking should be glued with white glue or Weldwood and nailed
at 6" intervals. The stern ramp uses a 1 x 6 brace across the front end; rear end
is not reinforced. So don't walk on it! Let's not forget the 1 x 2 cross members
under the decking. Although they stiffen the plywood, we don't recommend that you
climb on the deck. It has been kept light so you can move it around. Remember...
it's for models, not people.
The dolly has four 4" casters, 2 swiveled and 2 fixed. The swiveled casters are
on the two-rope end for maneuverability. Adjust these with spacer blocks to raise
the dolly's deck 7" off the ground. Tow handle should be wide enough to fit two
hands. You doll this up as you wish.
Ray finished his deck with gray Latex paint. After painting, install cable guides,
spacing as per plans, driving screw eyes into side frames. Center of the eye should
be 1" above the deck. Too high and you'll trip your airplane on landing.
For transport on car top carriers, the assembly is in this order: (1) Aft deck
on carrier is upside down. (2) Ramp in center of aft deck. (3) Dolly on top of ramp
right side up. (4) Sandbags, cables, tools in ends. Chock dolly wheels with sand
bags. (5) Forward deck over all as a cover. (6) Tie the deck package on securely,
also use fore and aft restraining rope tied to the bumpers of the car.
For transport on the flying field assembly is like so: (1) Dolly next to ground
(wheels down, please). (2) Rest of assembly - just as atop car.
The deck approximates a 60' radius at the center-line. When locating your center
marker, check at both ends of the deck with your airplane. That's about it. The
rest is up to the amount of practice you do. For maximum fun, float the deck in
a lake and use Real Water. - Happy Dunking!

Portable Aircraft Carrier Deck Plans
Portable Deck Bill of Materials
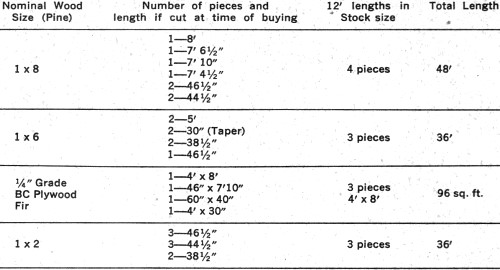
Miscellaneous: 18 ea. 1" Screw Eyes; 160 ft. of 200# Test Nylon Cord (8 pieces
20' long); 16 Canvas Bags to each hold 5# of sand; 12" length of 1" Birch Dowel
(Handle); 15 feet of 1/4" Manila Rope (Tow Rope);2 ea. 4" Dia. Swivel Casters; 2
ea. 4" Dia. Fixed Casters; Approx. 42 #10 Wood Screws (Flat Head), 1 1/2" long;
Nails; white or Weld wood glue; gray Latex paint or Outdoor Enamel; 2 Buckets #36
ELBOW GREASE!
Posted June 16, 2021
(updated from original post on 9/2/2013)
|