|
There are not too many control
line float planes around for good reason. Unless you have an amphibious plane
that can take off and land on water or a hard surface, it is hard to find a
place where you can stand in the water far enough from shore to ensure a compete
flight circumference of water. In most cases the water would be pretty deep.
Even waist depth water can make turning difficult. A sandbar would be ideal,
or maybe you are fortunate enough to have access to a shallow pond (natural
or manmade). This Macchi-Castoldia Schneider Cup Racer C/L model fits the bill
as an amphibious plane if you build the wheeled dolly included on the plans
by Paul Palanek. the article and plans appeared in the Air Trails 1958
Annual edition.
Macchi-Castoldia Control Line Flying Scale Schneider Cup Racer
 Designed and drawn by Paul Palanek Designed and drawn by Paul Palanek
Still well-remembered, the Schneider Cup Races brought forth many excellent
designs, innovations in construction and use of new materials. The Macchi-Castoldia
is one good example. It was built after many years of careful planning by the
Italian Air Force.
On June 2, 1933, an Italian pilot, Warrant Officer Francesco Angelo flew
the MC-72 seaplane four times over 3 km course on Lake Garda, averaging a breathtaking
440 mph. An official mark of 440.7 mph in 1934 was not exceeded for 6 years
and then by a land plane. This Italian machine still holds the speed record
for seaplanes using reciprocating engines.
Angelos' was one of several Macchi-Castoldia low-wing monoplanes in the Italian
Air Force's high-speed flight program conducted at Lake Garda over several years.
Two Fiat V-12 engines were set in tandem; the rear engine drove a shaft between
the V banks of the forward engine. Each operated independently; the props revolved
in opposite directions which eliminated torque problems. The engines turned
up 3,200 rpm to deliver a then fantastic total of 3,000 hp.
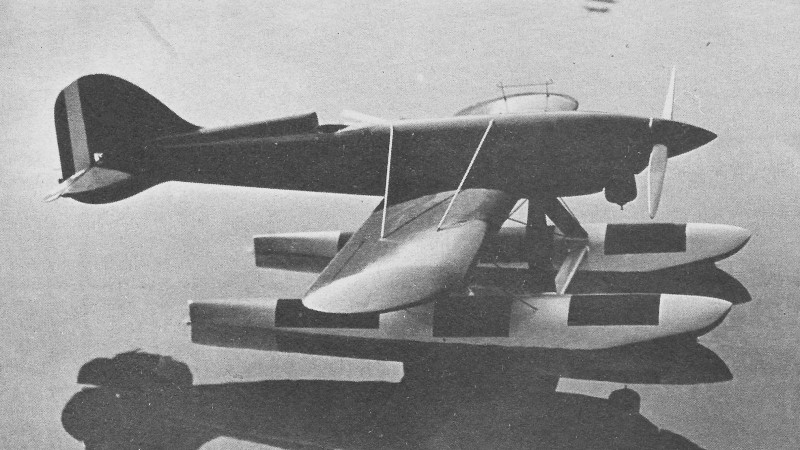
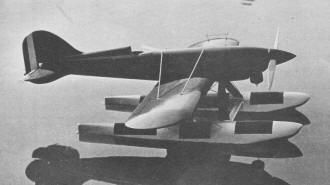
Macchi Castoldia floating on pontoons.
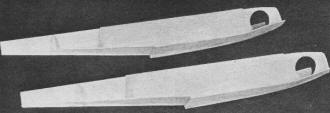
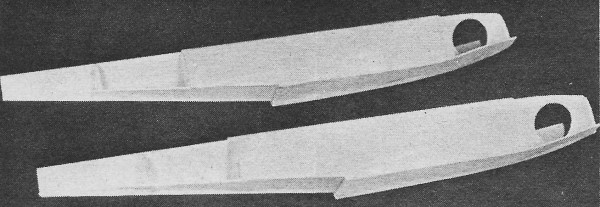
Pontoon shells.
Cooling radiators for both the engine and oil systems covered the wings,
forward portions of the floats, float struts and sections of the fuselage. Two
fuel tanks, one in each float with separate circuits for each, fed two gravity
tanks located in the fuselage. The oil tank was carried in the fuselage nose;
there were oil coolers on the center and .aft deck portions of the floats.
Rumors were that a number of engines burned out before the cooling systems
were debugged. Literally, the machine was a flying radiator.
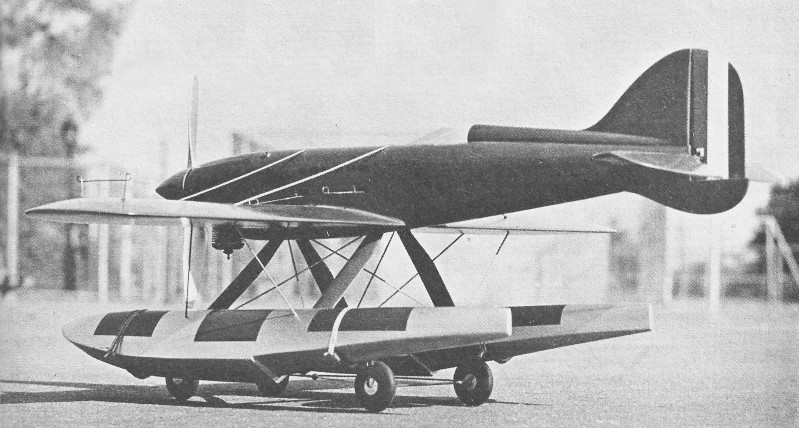
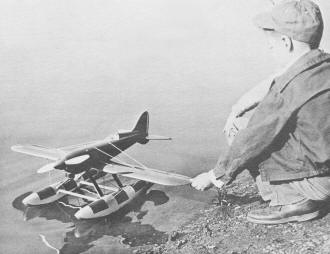
Our model representation is close to scale except for the contra-rotating
prop. We devised a "non-scale" land cradle to permit terra firma flights, but
the plane is basically a water flyer, Our test model housed a Foster "29" inverted.
The beefy structure is such that a "35" could be employed with no fear of over-powering.
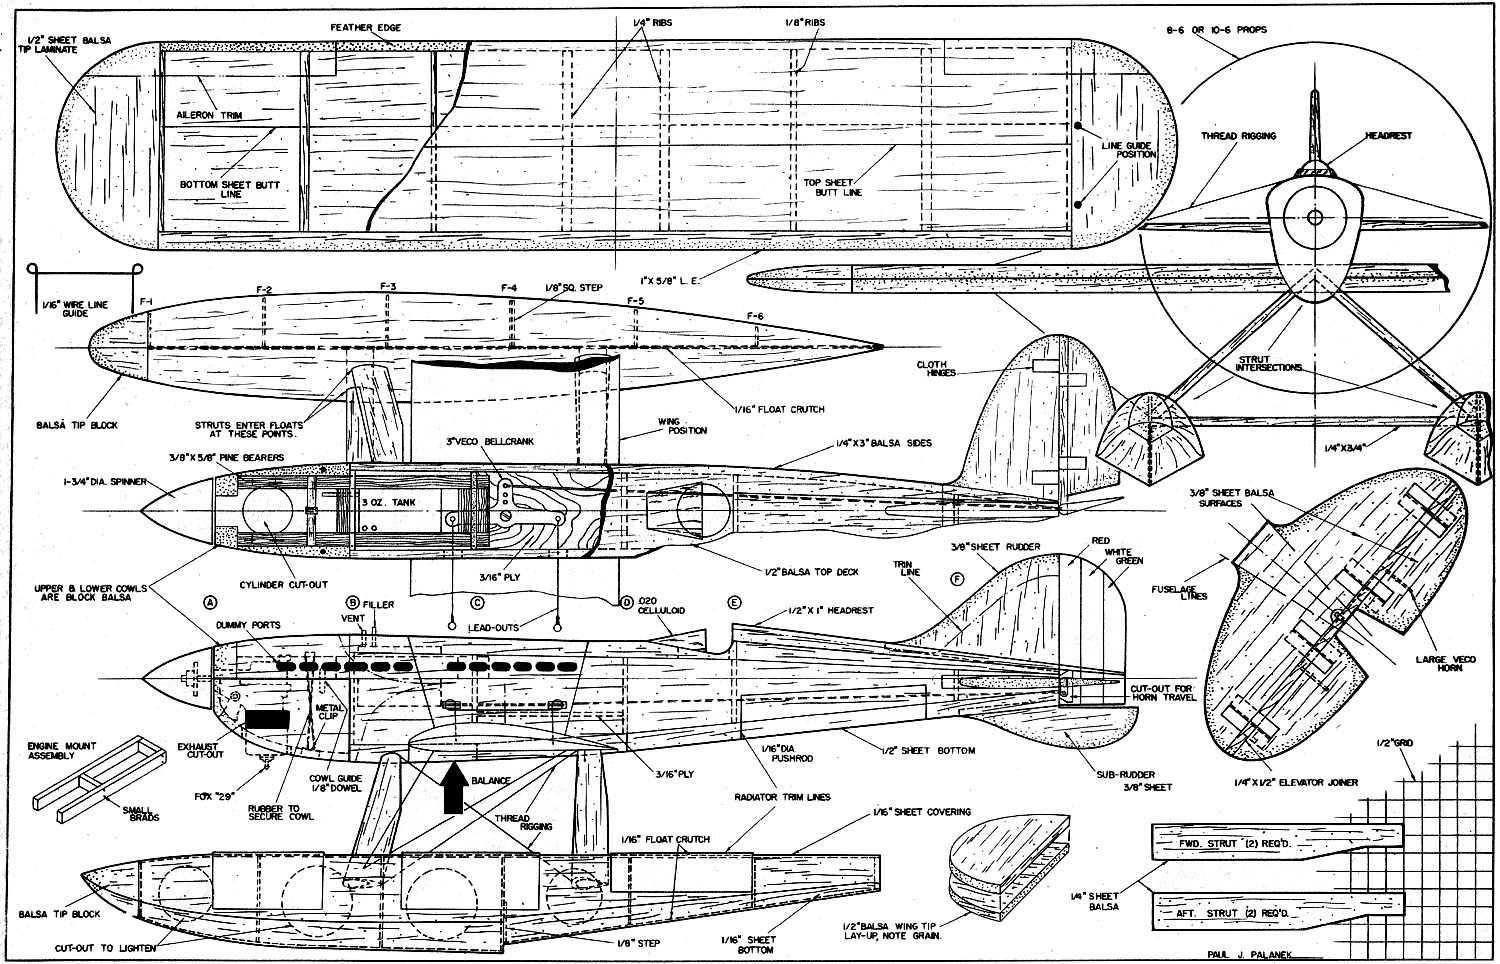
Construction is basically simple, with a little more time required than usual
because of the two floats. Since floats are a novel item, let us proceed with
these (start from the water up!). Check the bill of material and procure the
items needed.
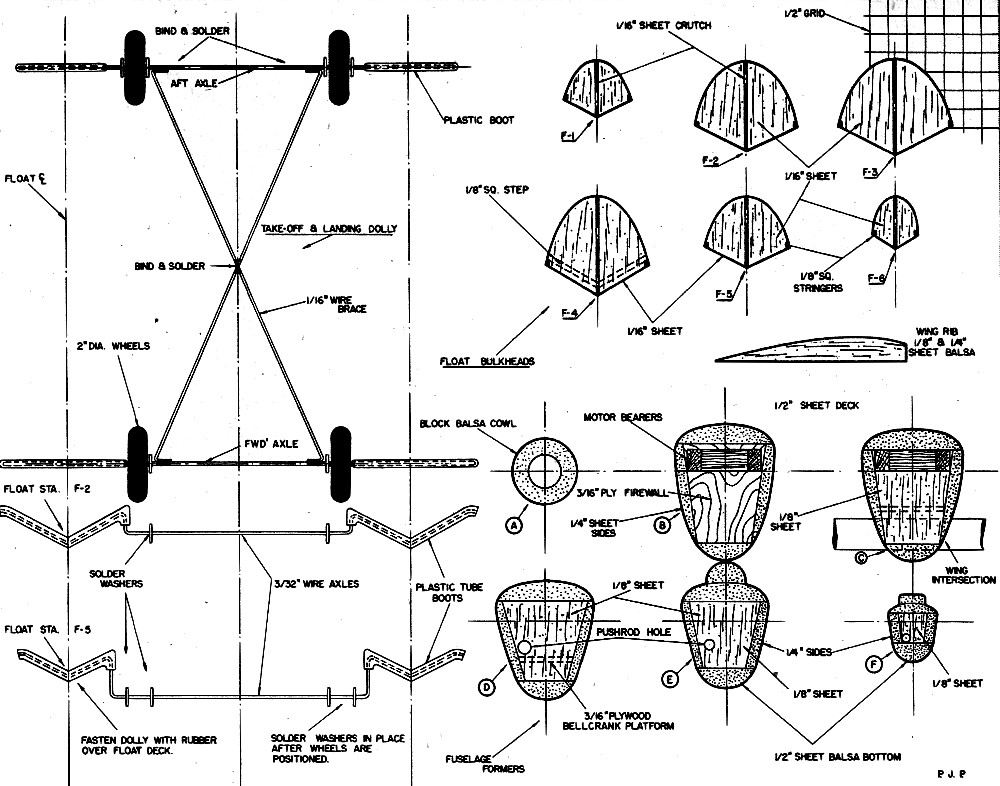
Both pontoons (as they are so called) use 1/16" x 3" medium grade balsa throughout
except for the balsa nose tip blocks. A crutch system simplifies assembly. Shape
profile; with a pencil mark off bulkhead stations on both sides. Cut to shape
bulkhead halves - note grain direction. Cement these to the crutch on proper
station lines; be liberal with cement since the floats take the landing loads.
When bulkheads dry in place fasten the 1/16" sheet balsa bottom. Trim extended
edges by following top-view of float pattern.
The only touchy part on the float will be the curved deck. Soak the sheet
stock in very warm water, then while dripping wet wrap in place over the fore
and aft float deck. Hold with rubber bands until dry. Trim the curved sheets,
then cement 'em in place; hold with pins until cement is set. Sand nose bulkhead
flat; cement nose block in place. When all is dry, trim and sand to indicated
shape. In making the floats, build both at the same time, thus what applies
to one applies to the other.
The fuselage is conventional control-line design and construction through-out.
Sides are 1/4" x 3" sheet; bottom and top deck, 1/2" x 2". Shape the formers,
using 1/8" sheet stock; firewall is 1/8" plywood. Motor mount is from 3/8" x
1/2" hardwood. Assemble it using both model cement and small brads, then secure
it to the firewall and the following bulkhead.
Fasten the bellcrank to a sheet of 1/8" ply between the fuselage sides and
bulkheads where indicated. A 1/16" steel wire pushrod soldered to the bell-crank
extends well beyond aft end of fuselage. Use 1/32" wire for lead-outs. Just
aft of firewall between motor bearers fasten 3 oz. Froom fuel tank with filler
and vent lines extending well above the fuselage (to be trimmed later).
Fasten the balance of the fuselage structure, 1/2" sheet for top and bottom,
block balsa for forward top and lower removable cowl. When dry, shape fuselage
to outlined cross sections. Fasten 1/2" x 1" balsa headrest deck, blend into
fuselage. Set structure aside, proceed with tail surfaces.

Macchi Castoldia sitting on dolly.
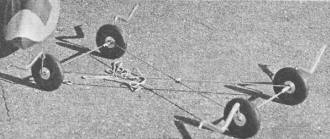
Land flight dolly
Select medium hard balsa sheet 3/8" x 3" x 36". Run pencil outlines of all
surfaces, then trim to size. Cement elevator halves to hinge joiner balsa strip.
A large horn is fastened to the completed elevator. Bind at the center with
medium grade black thread. Four cloth hinges fasten the elevator to the stabilizer.
Notch fuselage as indicated and cement in place stab and elevator assembly.
Run fillet of cement around joint using finger to smoothen. Use same technique
on fin and sub rudder assembly. In setting vertical fin, cement 3 degree right
off-set.
Remaining structure is the wing. Two sheets of 1/16" x 3" butt cement to
form 6" wide upper and lower covering. A strip 5/8" x 1" x 36" medium balsa
for leading edge butt cements to lower wing covering. When dry, mark off rib
spacing, then cement in place the ribs shaped from 1/8" or 1/4" sheet balsa.
Top wing covering is added; cement from leading edge toward trailing edge. Cement
laminated wing tips to leading edge and end ribs, allowing ample time for cement
to set securely.
Trim and shape completed wing panel to required contour; a "Clark Y" is employed.
Bring trailing edge to a near point then sand a slight radius to prevent fraying.
Mark off on the fuselage where wing will pass through. Make the cut-out, cement
wing in this notch with zero degree incidence set-ting. Fair fuselage to bottom
covering with block balsa.
As for finishing the balsa surfaces, it is best to work on the assembled
model rather than each component. Before doping seal all construction imperfections
with balsa wood filler and blend into the contour. Four coats of clear dope
are brushed on the covering of all surfaces including the floats.
Sand the doped surfaces after each brushing with #0-0 sandpaper. After doping,
apply four coats of balsa sanding sealer followed with a light sanding after
each application.
Join floats with 1/4" x 3/4"spreaders; pour on the cement, a strong joint
is imperative! When dry, fasten forward and aft struts to the fuselage and floats
at the same time. Note that the struts and spreaders form a triangle with struts
meeting at each angle. Be liberal with that cement. Finish struts with dope
and sealer as with the model.
Cover entire model except floats with four brushings of bright red dope,
with a gentle sanding after each application. Floats and prop are doped aluminum.
Mask around radiator areas and paint them olive drab or chocolate brown. Nose
of fuselage and upper aft deck is dark green. Add the balance of the trim such
as exhaust ports, aileron outlines and all rigging wire. If hot proof dopes
were not used, fuel proof the entire model with two brushings.
Install the power plant, prop spinner and 8-6 prop (found ideal for average
flying). Check balance point and add necessary trim weight.
This model can fly anywhere there is water, the beach, pool, lake or pond.
We used 50 ft. lines and she flew right off.
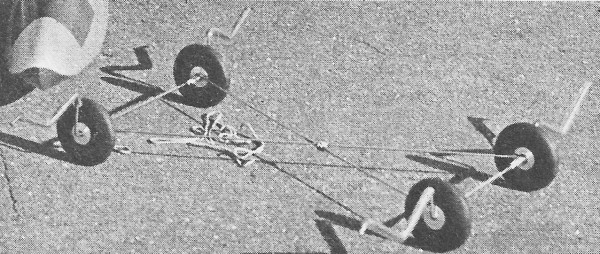
Plans show a 4-wheel take off and landing cradle of 1/16" and 3/32" dia.
steel wire. This fits under the float bulkheads; "boots" of plastic tubing slip
over the wire. Rubber bands secure this unit to the floats. Then you can fly
your float plane as a land job.

Macchi Castoldia Plans Sheet #1
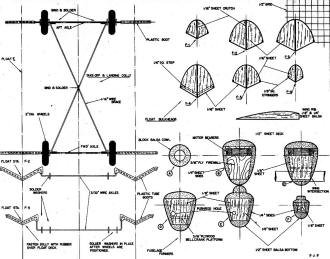
Macchi Castoldia Plans Sheet #2
Bill of Material
(Medium balsa and "inches" unless otherwise noted)
One piece 1/2 x 4 x36 for wing tip sandwich; (8) 1/16 x 3 x 36 for wing covering,
pontoon structure and covering; (1) 1/4 x 3 x 36 for fuselage sides, formers
and fill, wing ribs; (1) 3/8 x 3 x 36 for tall surfaces; (1) 1/2 x 2 x 36 for
fuselage top and bottom; (1) 1/2 x 1 x 18 for headrest deck; (2) 1/4 x 1 x 36
Hard grade for pontoon spreaders, struts; (1) 1/8 x 2 x 18 for wing ribs; (1)
1 x 5/8 x 36 for wing leading edge; (1) 3/16 x 4 x 18 Plywood for firewall,
bellcrank platform; (1) 1/2 x 1/4 x 18 for elevator joiner; (1) 3/8 x 1/2 x
24 Hardwood for engine mounts; (1) 2 1/2 x 2 1/2 x 5 for lower engine cowl;
(1) 1 2 1/2 x 5 for upper engine cowl.
Cement; 3" Veco bellcrank; large Veco horn; balsa sanding sealer; clear and
colored dopes; balsa filler; pre-cut elevator hinges; solder and paste; 1 1/2"
dia. Froom or Banner spinner; 8-6 prop; 3 oz. Froom fuel tank; assorted grits
of sandpaper; (4) 2" dia. Veco semi-pneumatic wheels; copper binding wire; 1/16"
steel wire; masking tape; 0.020 celluloid; 3/32" steel wire; plastic tubing.
Posted March 6, 2021
|