|
Given the "Hydro Hints"
title of this article from the September 1949 issue of Air Trails
magazine, I though it would be about model hydroplanes, but it turned out to be
about designing and building floats (pontoons) for free flight and control line
airplanes. Rise Off Water (ROW)
has been a popular sport flying and contest event for about as long as model
airplanes have been around. Unlike with R/C water flying, these floats needed
only to function as launching devices since unless you are flying off a large
body of water, it is unlikely that the model would also be landing on water. In
fact, many ROW flights are initiated from a make-shift "puddle" consisting of a
child's plastic wading pool or a small area in the ground that has been filled
with water specifically for the event. Take-off run distances are extremely
short unless the model runs into trouble or the floats and/or airplane are
poorly designed.
Hydro Hints
 The NACA Brain Busters Club members give you
the lowdown on rise-off-water flying. Years of ROW experience are wrapped up in
this report. The NACA Brain Busters Club members give you
the lowdown on rise-off-water flying. Years of ROW experience are wrapped up in
this report.
Hydro flying has long been a phase of modeling regularly engaged in by the BrainBusters
Model Club of Hampton, Virginia. Through the club's sponsorship of hydro contests
it has encouraged similar activities on the east coast and in other areas. As evidence
of their particular interest in this field, club members prepared and published
a booklet of hydro hints which has been and still is being distributed free in answer
to a series of requests for hydro data from all sections of the country and Alaska,
Canada, and England. Along similar lines but much more detailed, this article is
also the product of the club's efforts to popularize the sport.
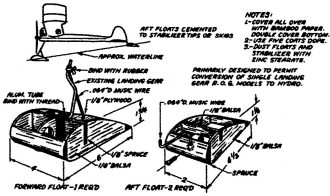
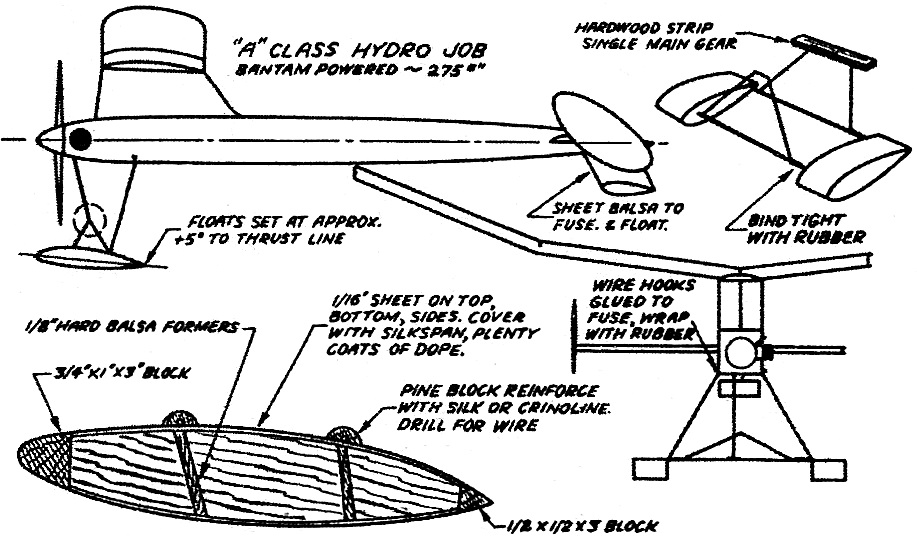
Fig. 1 - Single forward float for Class A gas models; maximum
weight of model not to exceed 18 oz.

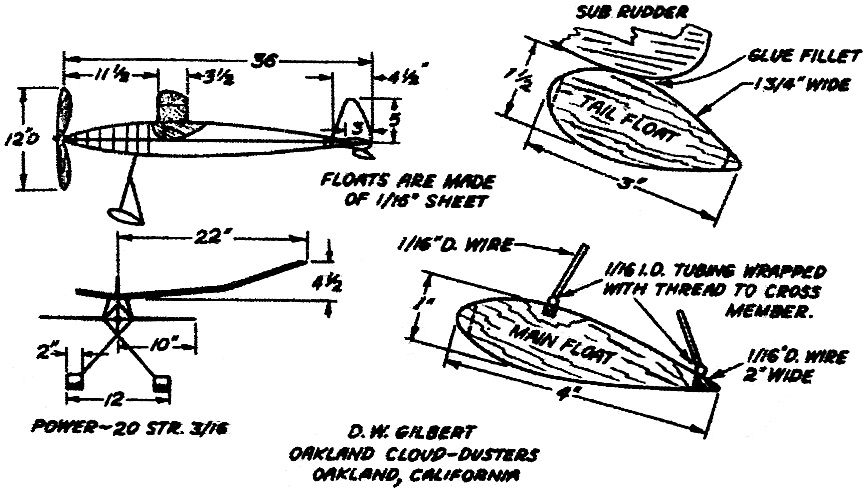
Fig. 2 - (left) Class D float used by Dick Everett for national
record in open stick (average time, 6:21); (right) Class D floats used by Joe Dodson
on stick and fuselage designs adaptable to most any type rubber model.

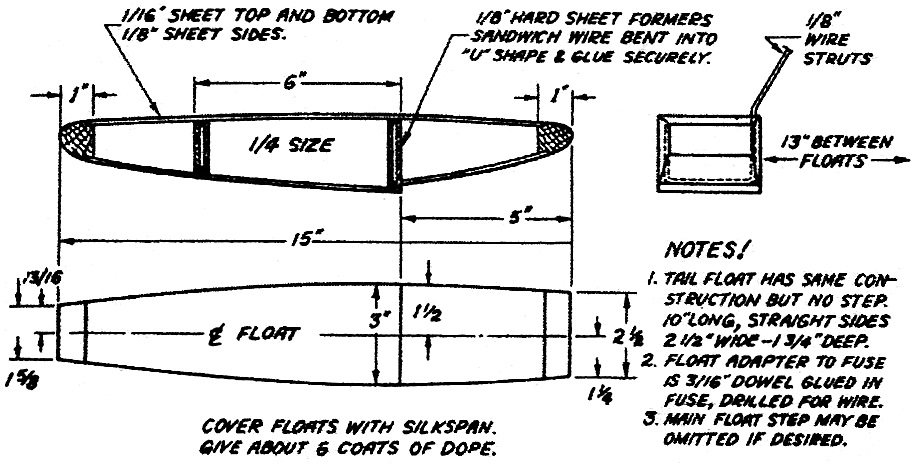
Fig. 3 - Typical float construction.

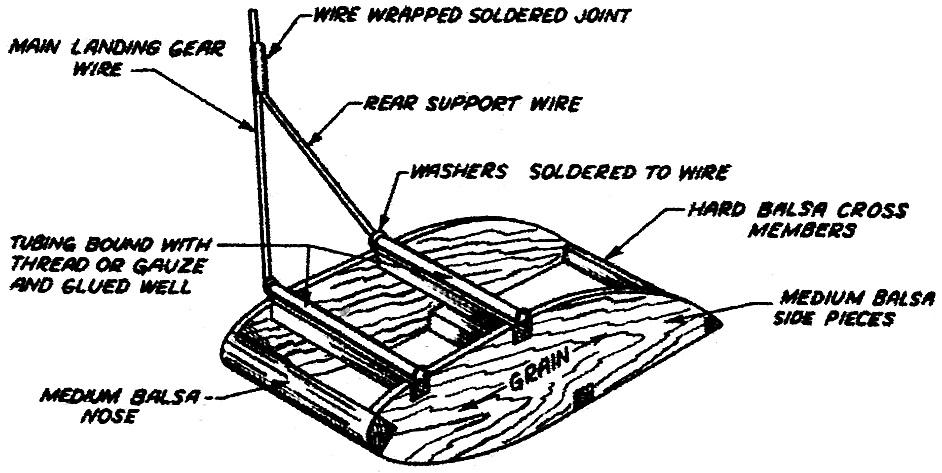
Fig. 4 - Adaptation of floats to one-wheeler free-flight gassie
by John Worth; hardwood strip wrapped and glued thoroughly to aft brace.

Fig. 5 - This Class C fuselage model was national ROW open class
record holder.
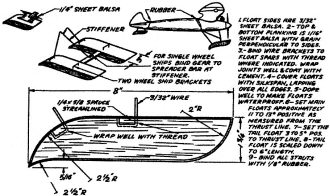
Fig. 6 - Class B gas floats for models of 20 to 26 oz. designed
by Charles ("Climax") Folk.
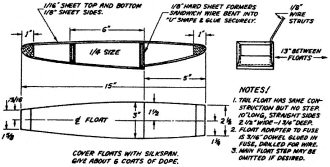
Fig. 7 - Floats for Control Line C models weighing 3 1/2 lbs.
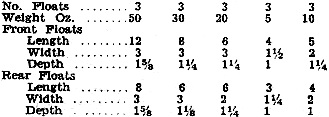
Table 1 - Typical Float Designs Using a Rectangular Cross-Section.
A situation puzzling to hydro enthusiasts is that such a well developed phase
of modeling has been enjoyed by so few. Usually, references to the sport have an
air of mystery about them that seems completely out of keeping with the facts. Prompted
by this, the following collection of hydro data has been assembled to correct many
of the erroneous impressions left by what little published information has been
available. Past accounts of individual hydro experiences have apparently been responsible
for the popular misconception that huge bodies of water; special techniques, and
different type models are required.
In those areas where lakes or other large natural waterways predominate, hydro
flying is of a different sort than is covered herein and is a separate art in itself.
Modelers in such localities seldom have satisfactory R.O.G. sites so their building
concentrates on types stressing utility rather than performance. It's reasonable
that such ships capable of withstanding repeated water landings cannot be expected
to compete with landplanes since they must be more completely waterproofed and rugged.
True hydro flying, therefore, is not our primary concern, because only a relatively
small group of builders is in a position to try it. For the majority of "landlubbers"
the thrills of hydro flying may be realized, however, and the process involved is
practically painless.
Conventional ships with adapted float installations, flown from normal free-flight
sites, supply all the thrills and satisfaction characteristic of the sport with
few of its drawbacks. For the average flyer, landings on terra firma eliminate the
need for redesigning of models, as well as the need for boots or boats for retrieving.
Landing on water has been found to be hardly worth the trouble it takes for the
slight additional kick it gives. Converted landplanes hold the majority of AMA hydro
records and are the most popular at meets, especially those with "dry" and "wet"
events, since rapid conversion for R.O.W. flying can be accomplished.
A set of floats properly built and installed is all that's necessary for hydro
conversion and the accompanying drawings and photos indicate the proven types in
current use. One set generally outlasts many models so that several seasons of active
life may be expected. It is to be noted that the principal float arrangement used
by the veteran hydro contestants embodies three units to support the model. The
three-float setup has proved to be the simplest, lightest, and least troublesome
of all configurations. This is not to imply, however, that others are not capable
of good performance. Flying boats and single-float designs have excellent possibilities.
That these have not gained in popularity is due to the added complications involved
and a lack of definite design data.
Twin floats seem to be in a class by themselves in that they have been used in
contest work with only moderate success. It appears that model builders are prone
to copy from full scale aircraft in their use of twin floats and the results have
not been conclusive. Sport flyers apparently prefer this float installation, but
contest goers discover that penalties of extra weight and drag are incurred because
of the added length of floats required for adequate water stability. Long floats
also require very careful alignment and are more vulnerable to crash damage.
Two arrangements of three floats have been used and either is adaptable to conventional
model designs. For single-gear ships it is sometimes desirable to mount one large
float forward with two smaller units supporting the tail at the stab tips. It is
advised, however, that this setup be used only on ships possessing "hot" takeoff
performance since the planing characteristics of the single float have not been
too promising.
For practically all adaptations, the "normal" use of two main floats forward
plus a smaller tail float has been the most successful and is highly recommended
for novices and old timers alike, The stubby forward floats with a wide tread mounted
well forward of the C.G. are assisted by a rear float just large enough to support
the tail at rest.
Designing floats has become a fairly simple procedure as a result of combining
past experience with a knowledge of physics. The system outlined here assures floats
of the correct proportions on the first try. No longer is it necessary to go through
the "cut and try" process.
With the weight of a model known, the required float displacement is found as
follows: 1.8 cubic inches of water weigh one ounce, which means that at least 1.8
cubic inches of float volume is needed to support each ounce of the model's weight.
This, however, is the bare minimum and it has been learned that a safety factor
of 3.00 takes care of all conditions. Therefore, if a model weighs 50 ounces it,
should have a float displacement of 150 cubic inches.
With two floats, each would contain 75 cubic inches - for three floats, 3/4 of
the required volume is allotted forward and the remaining 1/4 used to support the
tail. The main floats would carry 66 cubic inches and the tail unit 38 cubic inches.
Analysis of this chart will provide approximate dimensions:
Typical Float Designs Using a Rectangular Cross Section
Slight variations in any direction will not greatly affect results, especially
since the actual time a model is on the water during take-off is too short for critical
designing to be of much importance.
Proper float angle, however, is a fine point not to be neglected. In general,
the leading edge of the main floats should be out of the water with the model at
rest. Too high an angle, on the other hand, causes terrific drag during take-off
and while in flight. Approximately ten degrees has been found to be a good average,
with minor variations for final trim. By using a reflex trailing edge float, the
effect of a higher angle is achieved, without the penalty of setting the whole unit
at that angle and increasing drag. The need for steps, chines, or other features
carried over from twin float design has not been apparent as stepless floats have
shown no performance deficiencies and are simpler to build. Various profile shapes,
including thickened airfoil sections either upright or inverted, with flat bottoms
and sides, have performed well.
Float mounting should also be carefully considered in order that the proper angle
of attack be maintained and floats kept aligned. Rigidity with flexibility is the
compromise to reach and the different examples illustrated are well designed.
A few words describing the action of a hydro take-off may help to explain the
basic requirements of successful installations. Power thrust at the launch acting
above the initial resistance of the floats causes a nosing-over tendency. By placing
the floats well-forward of the C. G. this effect is reduced and the thrust acts
to propel the model forward. Inclining the floats at a positive angle reduces their
resistance and acts against the model's weight as motion begins because the resultant
force tends to push the floats above the surface of the water. As the tail lifts
with forward motion the wing's lift also comes into effect and lightens the load
on the floats, so that as speed increases they skim the water in the manner of an
aquaplane. The model becomes airborne when adequate air speed develops enough lift
to support the model's weight. A proper balance of forces acts so rapidly that the
sequence is accomplished as one smooth motion with the take-off almost instantaneous
after launching. Long, flat, and supposedly graceful take-offs are actually inefficient
and any delay during the take-off period is an invitation to a dunking.
Hydro take-offs should not be attempted until the model is fully flight-tested
with the floats installed. In other words, the ship should be tested with normal
power and glide adjustments made until final trim is obtained. Fear of float damage
may be discounted; in fact, in most cases it will be found that floats do a better
job of shock absorbing than regular gears. Idling or taxi runs are not advised since
they prove little and invite trouble. Rather, the initial ROW flight should be attempted
with plenty of power applied to carry through the take-off period. Dusting the floats
and stabilizer with Zinc Stearate "baby" powder just prior to launching acts to
repel the water's tendency to cling and we recommend it for general practice.
Perhaps the most important rule to observe at all times when launching is that
any assistance given the model will be cause for regret. In plainer language, Do
not push! Pushing is probably the greatest single cause of ill-fated take-offs,
and the necessity for unassisted ROW flights cannot be too strongly emphasized.
The field selected for hydro activities should have the same features as any
free-flight site, plus a body of water at least several inches deep. The ideal size
for this body is one just large enough for take-off with as small an area as possible
so that it does not present an obstacle to retrieving dunked models. Natural lakes
and rainwater ponds are excellent hydro sites. The length available for take-off
need be only a few feet if no interfering scenery projects above the ground within
the immediate launching vicinity.
A very practical artificial site for contests may be easily constructed as a
club project, such as those used at the last two BrainBuster meets: The most difficult
item to obtain, a large waterproof tarpaulin, may be borrowed or rented from trucking
companies, contractors, or industrial firms. A twenty-foot square is about right
even for fairly large events. After selecting a level clearing, scrap 2" x 6" lumber
is set on edge to form a frame a few feet smaller than the overall dimensions of
the tarpaulin and is held in position by pegs driven into the ground every few feet
around the circumference. The "tarp" is draped over the frame so that the edges
overhang and these are secured by rocks or weights (don't use nails and avoid leaks).
Filling with fresh water within an inch or so of the top completes the job. However,
this may pose a problem if there is no nearby source of water supply. The services
of the local fire department may be requested to solve this, especially if the contest
sponsorship is tied in with civic activities or organizations.
One of the many advantages of using a tank is that it may be placed in the most
desirable location, a worthy point of consideration since natural areas are generally
swampy. That the tank may be stored for future occasions assures a constantly available
hydro site without the dependence upon the weather that flying from the rain water
ponds necessitates. Finally, in areas where only salt water facilities prevail,
the tank provides a less deteriorating fresh water launching area, so it's a good
idea.
Any type model may be adapted for hydro; successful rubber, CO2 and
gas-powered types in all classes have been flown by the BrainBusters. They all react
similarly, and variations according to type are so minor in nature that the broad
coverage of these instructions is applicable to all. However, the design of a model
affects its dunking characteristics, and pylon jobs have an inherent advantage over
cabin types in this respect. A ship with the wing mounted close to the prop's plane
of rotation rarely soaks the operating equipment. But even the best hydro designs
can be expected to experience dunkings sooner or later.
Water that has collected on surfaces can be blown or wiped off, but penetration
beneath the covering soaks the balsa which becomes heavier and weaker. Even after
draining, by puncturing the covering and sucking out all visible drops, the structure
remains so saturated that the model's performance is greatly reduced. The application
of at least two more coats of dope than normal is an obvious insurance policy for
the hydro flyer to observe. The extra weight eventually pays off because less generously
treated ships soak up many ounces of water in short order. At contests, this reversal
of relative weights is all in favor of the well doped ship. Another penalty is caused
by the slow process of final drying which is usually accompanied by the development
of warps.
Engines and accessories as well as the structure should be protected against
moisture effects, for metal surfaces are particularly susceptible to corrosion.
Dunking in fresh water is relatively safe, but salt water does an especially efficient
job of deterioration, if no immediate remedial action is taken to minimize corrosive
damage.
However, this need never be en-countered if a few elementary corrective measures
are performed without delay after a dip in the drink. Cleaning externally and flushing
alcohol or fuel mixture through intake and exhaust ports and then running the engine
quickly usually relieves the headaches of fresh water dunking. But failure to start
within a few minutes demands further action. The most effective procedure, and practically
a "must" after a salt water plunge, calls for removal of the engine followed by
a thorough cleaning in alcohol. Placing the engine in the fluid with the plug out
and spinning the crankshaft removes all traces of water and makes complete disassembly
unnecessary. When removal is impractical, the engine should at least be dismantled
as completely as possible and sprayed generously with fuel mixture, if no alcohol
is available.
Accessories are best moisture-proofed by sealing within the fuselage. If ignition
is used, it should he a compact and carefully wired installation sealed by doping.
Flight timers, if mounted close to the C. G., are not likely to become jammed since
the C. G. seldom gets under water regardless of the model's position when it dunks.
Dunking often becomes exasperating, but seldom is it a serious problem. At the
Fifth Annual Hydro Championships one entrant was the most consistent dunker of the
day as time after time his attempted take-offs ended in spectacular splashes. But
eventually patience and perseverance paid off, for at the close of the contest it
was the same entrant, Paul Salake, who walked off with Meet Champion honors and
a new Class A Open Hydro record.
[Contributions to this article were by: Joe Blanco, Jim Chacamaty, Joe Dodson,
Charles Folk, Reid Hull, Paul Marchal, Bill Poythress, Paul Salake, Jesse Shepherd,
and Phil Weatherwax. Compiled and edited by John Worth.]
Posted February 12, 2022
|