|
This "Starting Control Line Flying Scale"
article in the 1960 Annual Edition of Air Trails magazine is still
a good primer on how to go about getting into scale flying model
competition. Some of the contest rules have changed over the decades since,
but the basics are the same. The table of model sizes and engines might need
to be adjusted for electric powered models, but in the scale world there are
still many modelers who use internal combustion engines - especially in the
large airplanes. A quietly humming motor does not give quite the same
real-world affect as a screaming engine. Even with all the research going
into full-scale electric aircraft, we're still many moons away from have a
viable military fighter, transport, or commercial commuter. The drawing is
by the famous Cal Smith (as is the cover image), but the text of the article
is not attributed to any named author. BTW, this 1960 Annual edition has a
few other "Starting" themed articles on other realms of modeling.
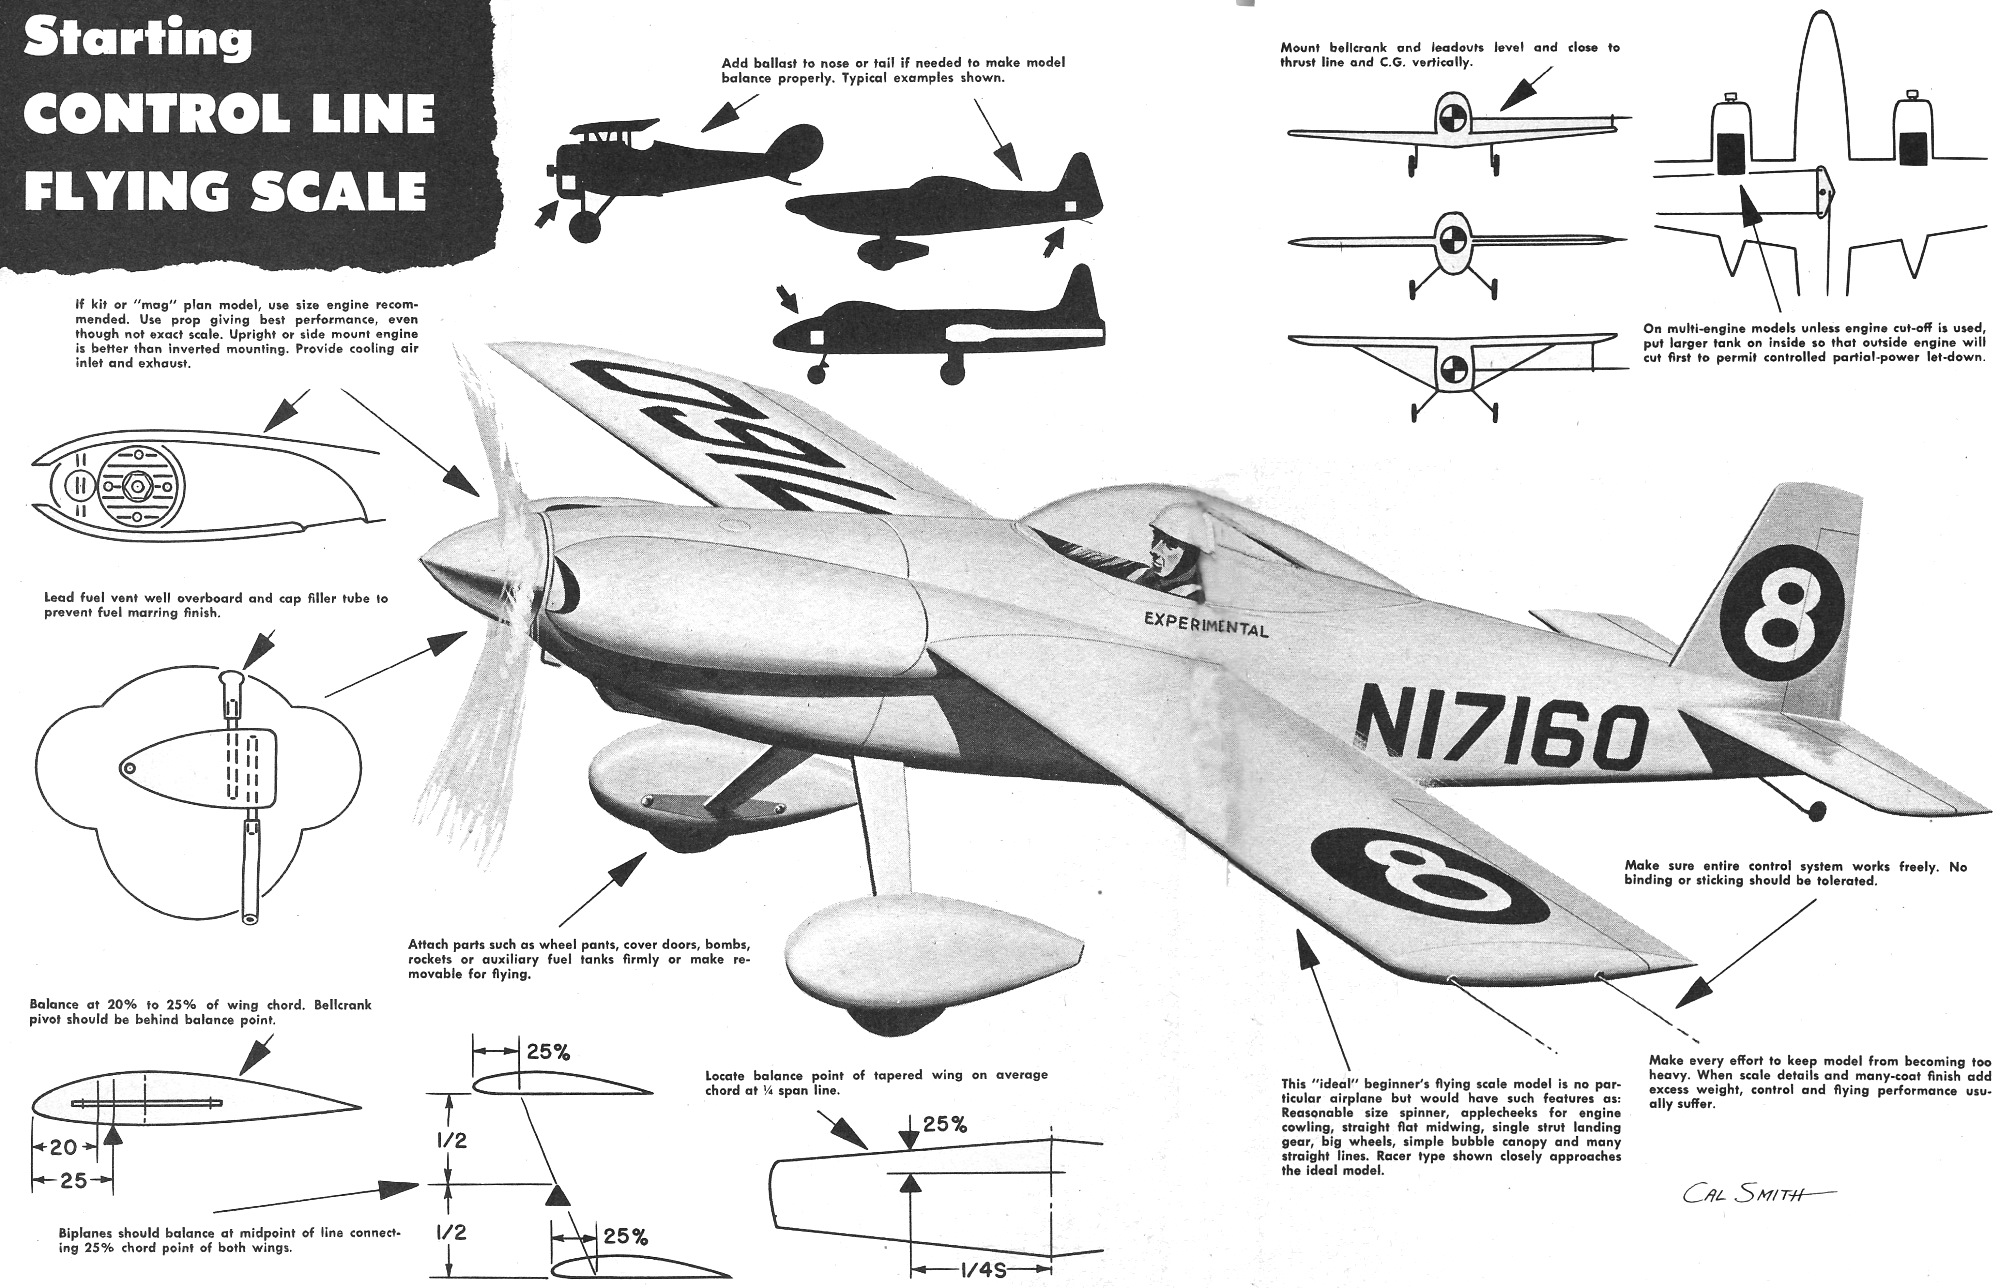
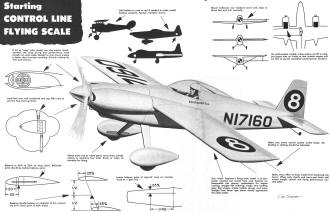
Starting Control Line Flying Scale
 If
kit or "mag" plan model, use size engine recommended. Use prop giving best performance,
even though not exact scale. Upright or side mount engine is better than inverted
mounting. Provide cooling air inlet and exhaust. If
kit or "mag" plan model, use size engine recommended. Use prop giving best performance,
even though not exact scale. Upright or side mount engine is better than inverted
mounting. Provide cooling air inlet and exhaust.
Lead fuel vent well overboard and cap filler tube to prevent fuel marring finish.
Balance at 20% to 25% of wing chord. Bellcrank pivot should be behind balance
point.
Biplanes should balance at midpoint of line connecting 25% chord point of both
wings.
Add ballast to nose or tail if needed to make model balance properly. Typical
examples shown.
Attach parts such as wheel pants, cover doors, bombs, rockets or auxiliary fuel
tanks firmly or make removable for flying.
Flying scale models have long been the top favorites in air-modeling. There are
more kits manufactured and sold and more magazine plans presented for scale models
than any other type. In competition, while other phases of flying such as free-flight
attract more contestants, everyone turns out to see the scale event.
Here is where more careful attention to craftsmanship and time consuming patience
is lavished than anywhere else. All too often the beginner attracted to flying scale
modeling is scared off by the sight of a beautiful model plowing up the macadam.
Sure, some crackups are inevitable, but many are preventable. Too often so much
attention is paid to the "scale" that the "flying" suffers.
Locate balance point of tapered wing on average chord at 1/4 span line.
So let's start at the prop and work our way back and discuss the most important
ingredients for successful flying scale modeling. First of all it must be remembered
that every scale model presents its own particular set of problems. There is no
really perfect scale model but control line flying minimizes most of the risks resulting
from a design that is not readily adaptable to scale flying. Some aircraft when
scaled down have wheels that are too small, tails too long or noses too short. but
the basic requirements of control line design must be incorporated into the model
or it will not fly correctly. Proper power for given size and weight model and proper
balance and trim make the difference between crack-up and good flying.
Choose a model of reasonable size to start with. Tiny Half-A (.049 cu. in. disp.)
powered scale jobs may be real cuties but are difficult to fly off anything rougher
than a ballroom floor. A ship with about 30" wingspan and a .19 engine is a good
workable size. Leave the 10' giants alone until you gain plenty of experience. If
you are building from a kit or mag plan the size engine will be specified. Use that
size! The designer has done the necessary test work for you already, so take his
advice.
Mount bellcrank and leadouts level and close to thrust line and C.G. vertically.
 On multi-engine models unless engine cut-off
is used, put larger tank on inside so that outside engine will cut first to permit
controlled partial-power let-down. On multi-engine models unless engine cut-off
is used, put larger tank on inside so that outside engine will cut first to permit
controlled partial-power let-down.
This "ideal" beginner's flying scale model is no particular airplane but would
have such features as: Reasonable size spinner, apple cheeks for engine cowling,
straight flat midwing, single strut landing gear, big wheels, simple bubble canopy
and many straight lines. Racer type shown closely approaches the ideal model.
Make sure entire control system works freely. No binding or sticking should be
tolerated.
Make every effort to keep model from becoming too heavy. When scale details and
many-coat finish add excess weight, control and flying performance usually suffer.
Use the size prop recommended by engine manufacturer. This may not work out to
exact scale size, but appearance will suffer only slightly while power will not
be impaired. Avoid mounting engine inverted to prevent flooding, making starting
difficult. Use sidewinder and upright mounting whenever possible. Since engines
in scale jobs may be buried in a cowling be sure there is adequate space for cooling
air to get into and out of cowling to prevent over-heating. Provide plenty of room
for attaching booster clips to glow plugs. If you wish to cover over glow plug install
a small booster clip permanently on plug and lead wires out of cowling at some convenient
place.
Install the fuel tank as close to engine as possible and be sure fuel line is
free from kinks and sharp bends. Mount tank as in a stunt model if wedge type is
used, with center of tank level with needle valve. If a rectangular tank is used,
top should be level with needle valve. Extend overflow tube through bottom of model
so raw fuel will not mar finish. If possible provide a cap for filler tube so that
fuel won't slop out in flight. A short length of plastic tubing melted and squeezed
together at one end makes a simple cap. You may wish to use a balloon tank for your
scale model. Since this type tank has no overflow vents raw fuel won't spill on
model.
All too often the scale fan becomes so engrossed in crowding scale details onto
his pet that he ignores the basic requirements of balance, trim and control. These
factors cannot be ignored or that first flight may result in a beautiful wingover
with no pullout - splat! Don't hesitate to add a bit of lead ballast to nose or
tail to make model balance properly. C.G. should be located at 20% to 25% of wing
chord. On tapered wings locate this point on the average chord taken at 1/4 span
location on wing.
Biplanes should balance at mid-point of line connecting 25% chord point of both
wings. This applies to wings of equal chord. Unequal chord wings require a more
complicated method to locate C.G. correctly. But make such a model a bit on the
nose heavy side to be safe. The bellcrank pivot and line leads should be located
slightly behind the C.G. and lead outs can be angled back slightly to help keep
lines tight.
Another important factor concerning bellcrank location frequently overlooked
is its vertical location. Because scale models come in high, low and mid-wing types
a good rule to follow is: keep bellcrank and leadouts level and as near thrust line
and center of gravity as possible. Even if this means having leadouts exposed rather
than buried in wing. A typical example of incorrect location is in a cabin type
where lead-outs are run through wing. This suspends the model well above its Center
of Gravity point causing it to bank inward when under way and maybe to fly into
circle with loss of control.
The entire control system should be free from any binding or sticking because
stiff controls cause loss of control. Pay particular attention to leaving room for
elevator horn travel in buried installations. Lead out guides should be clear of
cement and dope.
Finding the right size wheels to fit any scale model may be tough. It is best
to use nearest size larger than scale so the mode) will roll well during takeoffs
and landings. Even smooth concrete may have expansion joints swelled by heat that
can trip up a model with small wheels.
To wear pants or not to wear pants? If your scale design has wheel pants they
should have adequate clearance inside around wheels. The pants should be attached
firmly so that they cannot be knocked off during rough landings. This requires a
knotty bit of building, but a little extra effort here will make a more durable
model. Other external details such as wheel cover doors, bombs, rockets and auxiliary
fuel tanks should be either "nailed on" tight or made removable for flying. A model
shedding parts in flight is an unnerving sight and can even cause a flyer to get
so excited he loses control of model.
Probably one of the greatest problems encountered with scale models is weight.
They just naturally seem to wind up being overweight. So make every effort to keep
weight of model within reasonable limits. Avoid hard wood and brass details, use
balsa and aluminum wherever possible. That contest winning finish can also be the
source of considerable excess weight.
Some builders use auto primer as undercoating for dope finish. Auto primer contains
lead and should be well sanded to lighten load. Use talc-dope filler for a good
lightweight undercoating. Cover planked areas with tissue rather than silk or nylon
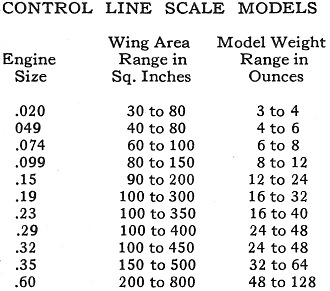
to help save weight. Since model weight and wing area govern the amount of power
needed to fly properly, the following table will serve as a guide to determine the
correct engine size. The table can only serve as a "rule of thumb" since individual
scale models vary greatly and exceptions may be necessary.
For multi-engine models: Select engine indicated by weight and range and divide
disp. by number of engines required. An example: A five foot span B-24 model weighs
Sibs. (80 oz.). This weight falls into the 48 to 128 oz. range, therefore .60 is
engine size indicated, .60 divided by 4 equals .15, or .60 divided by 2 equals .30.
The model can be flown with four .15's or two .29's. In actual practice this B-24
model (weight 72 oz.) was flown with two .19's because of propeller clearance problems.
With the recent upturn of interest in multi-engine models the flying scale modeler
has found his problems increase in direct proportion to the number of engines involved.
There are several factors that require particular attention to get a big B-25 or
B-17 flying successfully. Because it is practically impossible to tune all engines
to exactly the same RPM, a "beat" occurs that sets up some pretty unusual vibrations
throughout model. Engine mounts and nacelles must be extra strong and tied into
wing structure adequately or they will crack loose causing all kinds of ruddy ned
. Excess vibration may cause fuel flow problems because of foaming in tanks. Baffles
and shockproof mounting may be required .
Fuel tank size should be large enough so that when one engine is started it will
not drain its tank before the other engine is started. A helper standing by topping
off the tanks can solve this problem. Unless some sort of engine cut-off is used
it is a good idea to have inside engine tank larger than outside engine tank. Then
the outside engine will cut first and inside engine will keep the model pulling
on lines. On many multi-engine models an inside engine cutting first can cause disaster.
The best provision is for cut-off of all engines at the same time so that glide
to landing can be made rather than partial power let down. A third line or bellcrank-operated
fuel cut-off similar to that used on team racers does the job nicely.
Adequate propeller clearance on multi-engine models is always a problem. Frequently
it is necessary to use cut-down "clubs" to clear fuselage side or ground. These
are difficult to start and engines really scream causing unnecessary vibration.
If possible avoid cut down props and three or four-bladers since they are difficult
to balance and are real knuckle-busters. Fit the correct size prop to the engine
wherever practical (based on maker's say-so).
There are scale kits of every size and type available, no particular one can
be recommended in preference to any other, but to start with, pick a simple-engine
type. Lay in a large supply of patience and elbow grease and join the flying scale
fans. Great sport ... if you remember to thoroughly test fly your model before you
go to a contest!
Posted June 26, 2021
|