|
Radio controlled
(R/C) model boating has been around since the 1940s, but prior to about when
this "Starting R/C Model Boating" article appeared in the 1960 Annual issue of
Air Trails magazine, the electronic gear required for operation was
primarily in the realm of those who were adept enough at electronics to design
and/or build their own equipment. Commercial rigs were available on the open
market, but they were expensive. Most craft built in the early days of R/C model
boating were scale models of leisure craft or of military ships. High speed
racing boats, although they could be found, came later as equipment got smaller
in size and weight. Unlike today where ready-to-run radio controlled boats can
be purchased for a relatively low price, in 1960 the boating enthusiast had to
build most of the running hardware himself using tubing, wire, and sheet metal.
Producing something like this electric motor powered cabin cruiser was a
monumental project that took a lot of time. Of course most people had more time
and will to devote to constructive hobbies before the era of 500 television
channels to zombie out on, or Internet access from computers or cellphones.
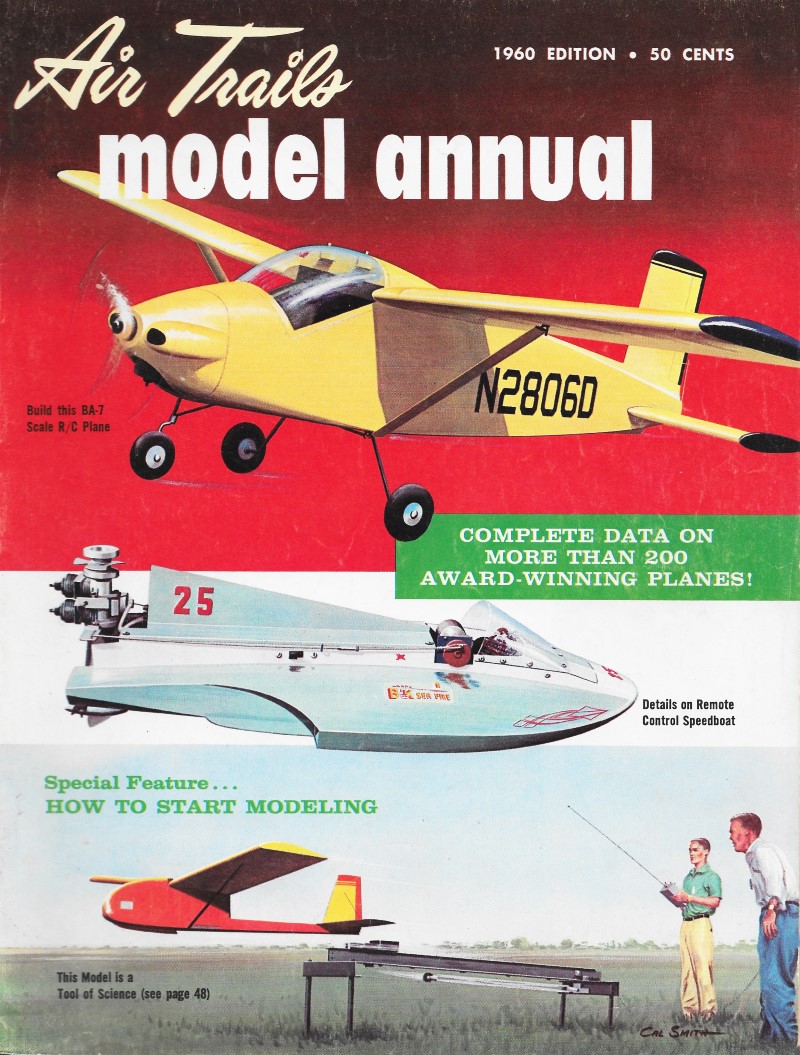
Starting R/C Model Boating
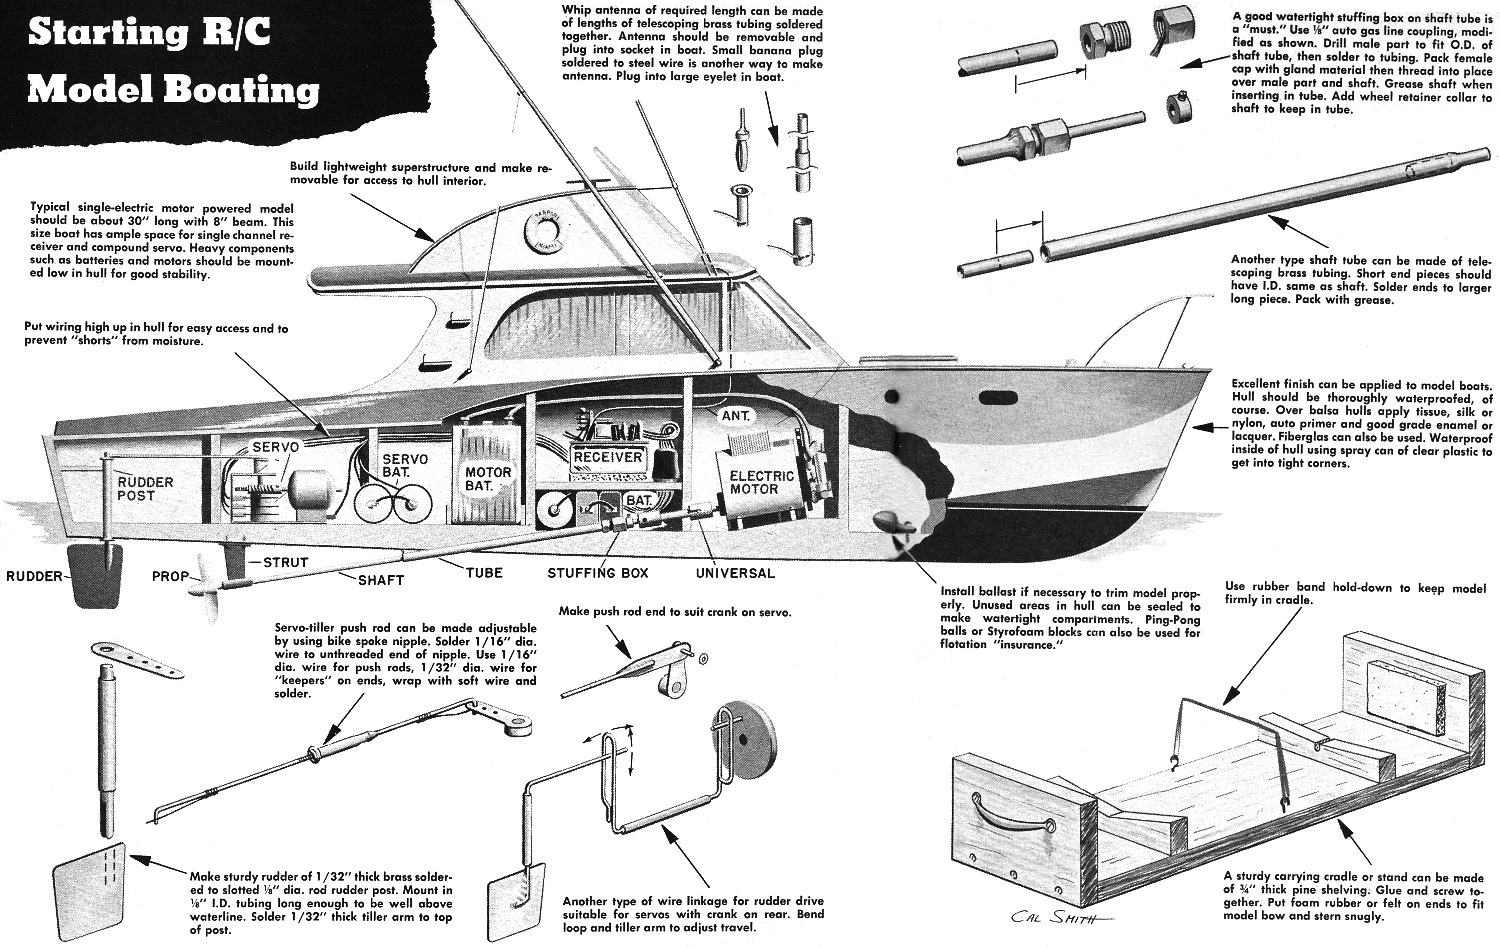
Cut-away view of R/C model boat with
radio gear, motor, and hardware. Cal Smith
About the most painless and rewarding way to embark on radio control modeling
is via the water route. There's this about model boats: out-of-control operation
doesn't mean a heart breaking crash with radio equipment useless and model demolished.
The very worst that can happen to a model boat may be a bad leak requiring a fast
swim for the modeler. A passing motorboat wake might swamp you, pride and joy but
ordinarily you can find a quiet lake or pond in which to run your boat without interference
from passing water skiers.
Model boats, yachts or ships give the modeler plenty of opportunity to develop
his craftsmanship to a high degree. He can lavish his skill and patience on finish
and detail work whether he prefers cabin cruisers, battlewagons or freighters. This
coupled with equipment available today for building, operating and controlling model
boats will give the boat fan many enjoyable hours of modeling experience.
If you've ever looked at an old hand's R/C boat down at the pond of a Sunday
afternoon you've probably been baffled by the clutter of batteries, wires, motors
and "black boxes" below decks. To the beginner, this must be quite a puzzle. But
it isn't all that difficult. True, you have to "crawl before you walk" as in most
other phases of modeling. Don't tackle a nine-foot battleship with rotating turrets
and quick firing guns for your first model boat effort. Rather you should choose
something simpler from the many fine kits and mag plans available.
Size is important because too small a hull will not be able to carry the required
payload and still perform decently. There have been 12" boats operated with radio
control but these were efforts by advanced modelers able to custom-build miniature
equipment.
Your first R/C model boat should be about 30" long with 8" beam or larger.
This size boat can accommodate off-the-shelf hardware and will turn in good performance
using a single large electric motor such as the Pittman 9002 Panther. You'll need
a 6-volt wet battery to power your motor. Dry cells can be used but quantity needed
for good performance is excessive and current drain means a very short life. There
are still available (getting scarce) surplus Willard N-T-6 and ER-4-6 wet batteries.
New batteries such as Aristo Craft No. 64 are readily available and are equal
in size and performance to older Willards. A battery charger will also be needed
to recharge the storage battery.
An afternoon's running will usually discharge your battery enough to require
recharging for next week's fun. Storing model and battery for periods of weeks or
months will also require recharging periodically and before reuse.
The small storage battery must be treated like a car battery, but it will require
somewhat more attention. Auto supply stores can usually supply battery electrolyte
for initial filling and charging. Distilled water only is added periodically as
electrolyte level drops. Slow "trickle charge" is better than fast hot-shot recharge.
Now to get that battery juice and motor power to the water. The drive line from
motor to prop seems to be one of the main problems encountered by boat fans. Prop
shaft must rotate freely, have good alignment and be watertight since most installations
have inboard end below the waterline. Pittman makes an excellent universal coupling
for connecting motor shaft to propeller shaft. For 1/8" dia. shafts this is easily
installed with set screws. Sterling makes 1/8" shaft and tubing combinations. This
size is adequate for use with Pittman Panther motors.
Keeping the water from running up the shaft tube requires a stuffing box. A.
J. Fisher makes a good ready-to-use tube and stuffing box combination. You can make
your own by adapting an auto gas line coupling to the shaft tube. Obtain a 1/8"
gas line coupling and drill male part to fit outside diameter of the shaft tube.
Solder this part to tube end. The female part (threaded cap) should be packed with
greased flax or graphited steam gland packing. Thread female part onto male part
with shaft in place. Grease shaft when inserting in shaft tube with model train
lubricant. Add wheel retainer collar to shaft between universal and stuffing box
to keep shaft in shaft tube.
Another method for making a stuffing box and shaft tube is to use Perfect's telescoping
brass tubing. Short lengths having inside diameter (I.D.) to fit shaft are soldered
into larger tube. Inside of large tube is filled with grease or model train lubricant.
Outside diameter (O.D.) of small tube ends should fit I.D. of large tube. A mount
plate can be soldered to center of large tube if desired.
Long shafts should have end near propeller supported by a strut to hull bottom.
This will prevent whip, vibration and bending from an accidental bump. There are
ready-made struts available or you can solder up your own from a length of tubing
(I.D. to fit shaft) and strip of brass. Fasten to hull with small woodscrews. On
some scale boat models twin shaft positions may not match spacing of available gear
boxes so it is best to convert to single shaft using larger prop.
Sterling nylon propellers are recommended since they are drilled to fit on their
threaded 1/8" shaft. For best performance use 1 3/8" dia. for direct drive from
Pittman motor. If reduction gears are used install larger 1 7/8" dia. nylon prop.
When installing the prop shaft and tube in the hull make every effort to align carefully
with the motor shaft. Poor alignment means undue friction which will lower performance.
Easiest way to align shaft and motor is to cut hole through hull a bit oversize
so that adjustments can be made with thin wedges. Then pack hole around tube inside
and out with Plastic Wood. Inside area can be covered liberally for added support.
Check for leaks in the bath tub and add Plastic Wood and cement as required.
Next important item to be installed in the hull is the rudder assembly. All too
frequently this turns out to be flimsy, easily bent or binds and sticks after a
few times in the water. Think of the rudder post as being similar to prop shaft
only smaller. Rudder post stock should be a minimum of 1/16" dia., larger preferably.
A good rudder assembly can be made using 1/8" dia. shaft stock mounted in tubing
having 1/8" I.D. Slot lower end of rudder post with a hacksaw to fit over 1/32"
thick brass rudder. Make balanced rudder by locating post about 25% of rudder width
back from front edge.
Solder post over rudder on both sides, make a smooth solder fillet. The post
tube should be long enough to extend well above waterline in hull. Solder a flat
washer to lower end of tube or on tube the hull thickness above lower end. This
washer will serve as a flange for cement to hold tube firmly in hull. Drill hole
in hull for tube slightly undersize for good snug fit. Mount tube in hull, grease
inside, then put rudder post and rudder in place. Position a flat brass washer on
post between tube lower end and rudder top. A 1/32" thick brass tiller arm is then
soldered to top of rudder post at right angles to rudder.
Tiller arm should be drilled with several 1/16" dia. holes spaced 1/8" apart
for push rod end. These holes permit adjustment of rudder travel for tight or large
circles. Locating push rod end close to rudder post gives more rudder travel. Moving
rod end to outer holes reduces rudder travel. Support top of rudder post to frame
or transom with strip or sheet wood.
We've seen some real Rube Goldberg linkages running from servo to tiller in some
boats. As usual the simplest is the best. The various servos have crank pins in
many different locations, side, top and back. Try to make a simple direct connection
for tiller linkage. A fool-proof push-rod utilizes bike spoke and nipple with "keeper"
wires on ends to hold rod in tiller and servo crank. One end of push-rod should
be bent from cut down bike spoke. Solder 1/32" wire keeper to end. Other end of
push-rod can be 1/16" dia. wire soldered into unthreaded end of bike spoke nipple.
Keep solder out of threaded area. Bend this push-rod end to shape and solder keeper
to end. Connect rod ends to servo crank and tiller, make adjustments to center rudder
by disconnecting one end of rod and turning into or out of bike spoke nipple.
Another type servo-rudder linkage can be made using 1/16" dia. wire pivoted in
brass tubing. This linkage is similar to that used in R/C airplanes. Rudder post
and tiller are one-piece. Tiller part is bent forward at top of rudder post. A U-shaped
link connects tiller and servo crank. Vertical parts of U are formed into shallow
loops. Tiller wire and rear loop can be bent for adjustment.
A simple R/C installation consists of a single channel receiver, rudder servo
and batteries. With single channel receiver and compound servo you will be able
to turn, start and stop. With simpler two-position servo, you will only be able
to steer boat right and left. Servos and receivers are available that can perform
many additional operations, however they should be tackled only after gaining some
experience with simple equipment first.
Some popular boating receivers and servos are Babcock, Bonner, deBolt, Citizen-Ship
and Aristo. Follow manufacturers instructions for installing your R/C equipment.
Enlist the aid of a more experienced R/C boat modeler if possible. Here are some
hints that may prove helpful. Receiver should be mounted well up in hull to reduce
possibility of its get-ting wet should leaks or spray get into hull. Some modelers
like to completely enclose receiver in a box of sheet balsa or plywood. Another
good trick is to put receiver in a small plastic bag closed around wiring leads
with a rubber band. Receiver and batteries can be held down in hull with rubber
bands. Some like to put receiver on foam rubber pad to minimize vibration trouble.
It is a good idea to terminate receiver wiring in a 5 or 7-prong plug so that
it can be moved from one model to another. Wiring to batteries and servo can be
made a permanent part of each boat. Install wiring along sides of hull just under
deck to keep it from cluttering hull and to prevent any possible wetting. A neat
harness can be made using color coded wire starting at receiver socket, running
the bundle along side then branching off for connections to batteries, servo and
switches.
For best efficiency a vertical whip antenna should be used on model boats. Since
these usually are 18" to 24" long, they should be plug-in type. Make of telescoping
brass tubing or steel wire, mount socket well up on superstructure. Connect socket
inside to antenna lead on receiver. When running your model boat in cold weather,
water temperatures of 32° to 40° reduce dry battery efficiency. A hand warmer
put next to batteries will give needed warmth.
Most kit and mag plan boats have provision for removable superstructure for access
to hull interior. This is very necessary so that adjustments, equipment changes
and cleaning can be easily accomplished. If hatches must be used try to make them
large enough to get your hand through.
The inside of the hull should be thoroughly waterproofed. Painting with a brush
can be difficult, so try using a spray can of clear plastic such as Krylon for getting
into the tight corners. Make every effort to keep heavy components such as batteries
and motors low in hull to prevent excess roll. Superstructure should be lightweight
construction to prevent top heaviness. Unused space in hull, usually the bow area,
can be sealed up to make watertight compartments to insure flotation in case of
accidental swamping. Styrofoam blocks or Ping-Pong balls can also be used for flotation.
To achieve a smooth running boat model it must be balanced properly. Avoid locating
heavy batteries off-center in hull. The model at rest should trim fore and aft on
waterline shown in plans. This trim should be carefully adjusted by shifting heavier
components in hull. If necessary, ballast may be needed at bow or stern. Use lead
sinkers, bird shot or lead bars. Center and fasten ballast down firmly to prevent
shifting. Nearly all boats will run well when trimmed to waterline at rest but prop
shaft angle and hull shape may cause bow-down or stern-down condition when under
way. This can usually be corrected by shifting weight slightly in hull.
A good heavy cradle or stand makes transporting your model boat easier. Too often
a sudden stop while driving the car to the local lake will flip your pride and joy
off the back seat onto the floor or rattle it around in the trunk. Build a cradle
of pine shelving, make provision for anchoring model to cradle. Put door or cabinet
handles on ends.
Good kits for beginners include many by Ideal; Sterling's are usually more detailed;
Dumas' generally require more advanced building experience.
Notes from Drawing
Whip antenna of required length can be made of lengths of telescoping brass tubing
soldered together. Antenna should be removable and plug into socket in boat. Small
banana plug soldered to steel wire is another way to make antenna. Plug into large
eyelet in boat.
Build lightweight superstructure and movable for access to hull interior.
Typical single-electric motor powered model should be about 30" long with 8"
beam. This size boat has ample space for single channel receiver and compound servo.
Heavy components such as batteries and motors should be mounted low in hull for
good stability.
Put wiring high up in hull for easy access and to prevent "shorts" from moisture.
Servo-tiller push rod can be made adjustable by using bike spoke nipple. Solder
1/16" dia. wire to unthreaded end of nipple. Use 1/16" dia. wire for push rods,
1/32" dia. wire for "keepers" on ends, wrap with soft wire and solder.
Make push rod end to suit crank on servo.
Make sturdy rudder of 1/32" thick brass soldered to slotted 1/8" dia. rod rudder
post. Mount in 1/8" I.D. tubing long enough to be well above waterline. Solder 1/32"
thick tiller arm to top of post.
Another type of wire linkage for rudder drive suitable for servos with crank
on rear. Bend loop and tiller arm to adjust travel.
A good watertight stuffing box on shaft tube is a "must." Use 1/8" auto gas line
coupling, modified as shown. Drill male part to fit O.D. of shaft tube, then solder
to tubing. Pack female cap with gland material then thread into place over male
part and shaft. Grease shaft when inserting. in tube. Add wheel retainer collar
to shaft to keep in tube.
Another type shaft tube can be made of telescoping brass tubing. Short end pieces
should have I.D. same as shaft. Solder ends to larger long piece. Pack with grease.
Excellent finish can be applied to model boats. Hull should be thoroughly waterproofed,
of course. Over balsa hulls apply tissue, silk or nylon, auto primer and good grade
enamel or lacquer. Fiberglas can also be used. Waterproof inside of hull using spray
can of clear plastic to get into tight corners.
Use rubber band hold-down to keep model firmly in cradle.
Install ballast if necessary to trim model properly. Unused areas in hull can
be sealed to make watertight compartments. Ping-Pong balls or Styrofoam blocks can
also be used for flotation "insurance."
A sturdy carrying cradle or stand can be made of 3/4" thick pine shelving. Glue
and screw together. Put foam rubber or felt on ends to fit model bow and stern snugly.
Posted July 23, 2022
|