|
Less than two years before this issue of American Modeler went to
print, the Russkies launched the first
Sputnik orbiting satellite. The Space Race was on, and America
was scurrying to show the Commies that we could out-do them. It
wasn't until August of 1960 that NASA finally launched
Echo, but after that the rest, as they say, is history. That
bit of background is needed to understand the creation of the name
'Propnik' by Bill Baughman for his air boat. This is a free running
or tethered model that uses a Cox Babe Bee .049 for power. I've
always liked air boats, and in fact my very first radio controlled
model was a crudely built
air boat using an
.049 engine and rudder-only control. The Propnik is a much nice
boat than my hunk of foam.
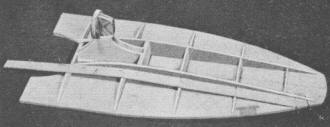
"So What's a Propnik?"
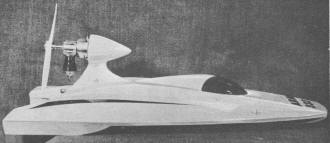
It's a high performance air-prop hydro by Bill Baughman
First we were startled by "Sputnik," then along came "Muttnik,"
now we come up with a sea-going satellite dubbed "Propnik!" Laugh
if you will, something like this full size could be developed into
an efficient high-speed commuter vehicle. Definitely something different
in model boats, this reverse sponson air-prop hydroplane features
top performance at small cost. A Cox Babe Bee or similar small bore
engine that can be set up to push will give you all the speed you
can safely handle in a boat this size.
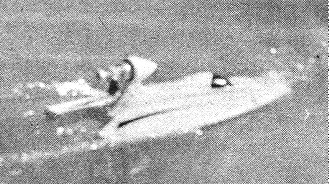
If you have the room, by all means run "PN" free, using rudder
to control turns. Should your boating site be small or have concrete
walls, better use a tether pole and light Nylon fishing line to
keep 'er in one place and in one piece. Provisions for either mode
of operation are contained in the design.
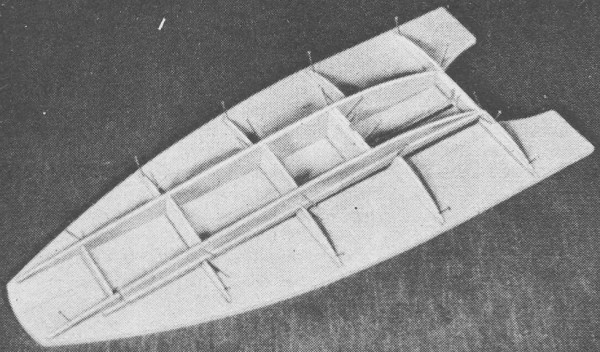
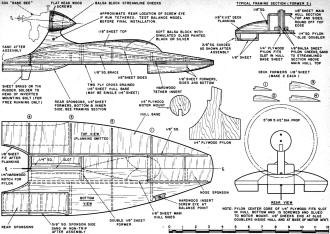
If you are ever going to have the fun of running the thing, you
must first build it, so let's get started. As all com-ponents attach
to the hull base sheet, prepare the balsa for that part first by
edge-gluing 1/4" sheet, or double 1/8" sheet cross-grained, of sufficient
length and width to take the pattern. Trace lines to assembled sheet
and cut out over-all shape and pylon slot, sand all edges smooth
and true.
Using the plan deck view, a ruler and pencil or pen, layout positions
of all ribs and formers on hull base sheet. Cut out the side deck
formers, main hull sides, ply pylon, balsa pylon cheek pieces, braces,
and transom. Make sure hull base sheet lies flat. If any warp is
noted, pin float to building board until most deck forming is completed.
Cement the two main hull sides in position, cutting and fitting
the 1/8" balsa formers where shown. No patterns for these are given
as they are all 1 3/4" wide, a flush fit at top of .side pieces.
Install hardwood transom, 1/4" square pylon braces, and 1/8" balsa
sheet doublers in position around pylon slot, making sure slot is
clear at all points.
While assembling the pylon, motor mount, and pylon cheeks as
a unit, you can be cementing the eight side deck formers and 1/8"
square deck braces in position. As to the pylon, the ply pieces
fasten with Elmer's or Weldwood glue and two flat head screws. The
balsa cheeks are rough-cut to shape, finished with sandpaper after
gluing to pylon sides. If engine other than designated Babe Bee
is to be used, be sure engine mounting holes will fit motor mount
shown. If necessary to use larger diameter mount unit, provide for
that change now.
Try the pylon unit for fit in slot, glue when fit is secured.
You will note all slot cuts are 1/4" wide so pylon cheek pieces
must trim to slot edges. Check for true vertical alignment of pylon
and hold with Scotch Tape if necessary; let dry over night. Install
front tether insert, if desired, and proceed with planking. Using
1/2" strips of 1/8" sheet for side decking and doing both sides
at once, this will go quickly. You will find some edge trimming
necessary due to deck crowning. The main hull decking is best done
with two pieces of 1/8" sheet, fitting each around pylon. All decking
strips must be feathered at angle with sandpaper at point of contact
with hull base sheet. As decking progresses, you will note that
the stern area between the two rear sponsons will be unfinished
and have an open space on either side. From scrap balsa, fit the
stern cheek pieces, cement, and then trim decking to curve of hull
base sheet. An over-all finish sanding to designed shape completes
this operation.

Things can now start to wind up fairly fast as you can work on
several parts simultaneously. Glue up some of the 1/8" sheet to
make the forward sponson and after sanding to shape, cement to underside
of hull. Cut rear sponson sides per plan outline, cement in position
making sure the 3/8" square parts are located at outside edge of
hull. These are also made of the 1/4 " and 1/8" scrap. Insert the
1/8" sponson formers and when set up, plank each sponson. This is
best done with grain running across sponson. You may find two courses
of 1/16" sheet easier than the one 1/8" covering. Forward edge must
be sandpaper feathered for neat fit at hull bottom. To complete
rear sponsons, sand covering smooth and flat, mark off a line 1/4"
in from outside edge and with sandpaper on a block, sand in the
non-trip bevel shown in typical framing section.
In the meantime, gather up more scrap 1/4" and 1/8" and glue
up the rough blank for shaping engine streamline pod. Sand shape
bottom area to fit pylon cheeks, rough sand remainder to shape and
glue to ply motor mount. Sand pylon area above deck to streamline
section, finish sanding motor pod to shape. After gluing up additional
1/4" stock, rough-cut driver compartment pod, sand to finish shape,
hollow interior for lightness and cement to main decking.
If you plan to let your boat run free, drill rudder post hole
in transom, cut out rudder, solder in head slot of mounting bolt,
install in hole when painting is completed. If .you must use tether,
place small screw-eye in front hardwood location, drill holes and
temporarily mount motor unit in position. Tie light string to front
screw-eye, make large loop in other end, place loop around pylon.
Hang boat up on this temporary bridle, move rear loop along pylon
until boat hangs level in all directions. Mark position on pylon
and insert other screw-eye at that point. Motor unit should be removed
for final work of sanding and painting.
Getting back to just the boat once more, sand and paint to your
satisfaction. Using Aero Gloss sanding sealer for a smooth base,
followed by their spray can fuel proof dope can get you on the water
in no time. Just be sure to use a fuel proof material and put on
enough coats. Decals and other trim may be added if you want to
doll it up. Now make final motor installation, attach rudder or
tether line, and be prepared for some spectacular action. As a word
of caution, better start with engine running rich until you get
used to this job, leaned out it has a rather rapid "orbit".
Materials List: 3 sheets, 1/4" balsa sheet, 3" wide for Hull
base sheet, pylon braces, driver compartment, rear sponson side
formers, motor pod. Three sheets, 1/8" balsa sheet, 3" wide for
main hull sides and formers, side deck formers, all decking and
decking braces, pylon cheeks, Nose and rear sponson side formers
and covering, motor pod, rear cheeks. One piece 1/4" plywood, 5"
x 6" for Pylon, motor mount, forward tether insert, transom.
Fuel proof cement; Elmer's or Weldwood Glue; Pins; Scotch Tape;
Sandpaper; two 1/2" F.H. Wood Screws; Knife; Saw; 1" x 1 1/2" piece
Brass or Tin for Rudder; 2 small Screw-eyes, one 1 1/2" Perfect
Mounting Bolt, Nut and Washers; Cox Babe Bee .049 Engine; 5 1/2"
propeller; Engine Mounting Screws; Sanding Sealer; Fuel Proof Finishing
Material.
Full size Propnik plans are on Group Plan #359
from Hobby Helpers, 770 Hunts Pt. Ave., New York 59, N.Y. ($1.10)
Posted January 2, 2015
|