|
Airplanes and Rockets visitor Kevin
B. requested that I scan and post this article on the "Big Twin" R/C outboard motorboat
model. It appeared in the May 1957 edition of American Modeler magazine.
American Modeler was one of the forerunners of today's Model Aviation
(the official AMA publication), and was more all-encompassing in regards to modeling
as it included model boats, cars, rockets, and trains. It also was known to occasionally
have articles on full-size aircraft. Anyway, the Big Twin is 32" long and is built
of traditional model boating materials like mahogany plywood and spruce. This model's
claim to fame is the use of balsa planking on the hull - which is much easier to
form than spruce - and then a layer of fiberglass is laid over it for strength and
waterproofing. An Allyn Twin outboard motor
is specified for power. Big Twin R/C Outboard Motorboat
Bill Baughman"A.M.'s" West Coast Boating Whiz Gives You an Honest-to-Goodness
Man-Sized R/C for K&B-Allyn's Outboard Twin; Overall Length, 32"
 With the advent of large displacement motors
and remote controls there has been an increase in the number and types of full-size
outboard-cruisers, This new form of safe, economical family boating has proven very
popular in recent years. With the advent of large displacement motors
and remote controls there has been an increase in the number and types of full-size
outboard-cruisers, This new form of safe, economical family boating has proven very
popular in recent years.
Now that the Allyn Twin miniature outboard motors are on the model market, it
is only natural that model builders try their hand at this type craft; the ease
of power installation and the running cleanliness make it ideal for model use.
Ours is a composite model in that it uses features found in many different full-size
cruisers adapted to model operation. If you will take a closer look at the plans,
you will note Big Twin" is designed primarily for radio-controlled operation. However,
if you are not an R/C bug yet, don't let this throw you, "Big Twin" can be built
as is and operated as a free-running craft very nicely. Too, if you would rather
have inboard power, the simple matter of closing in the outboard motor rear deck
and transom cut-outs and the installation of motor mounts at Frame #4 will make
for an easy conversion.
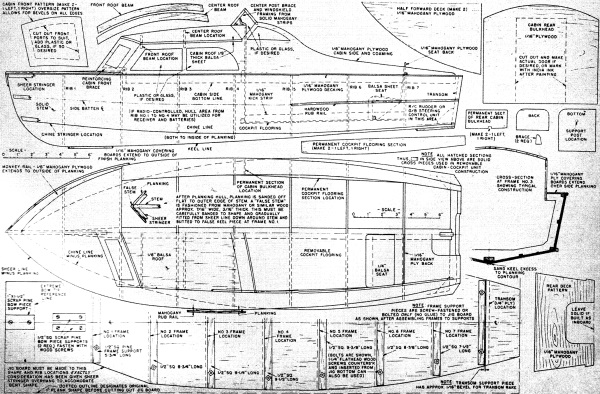
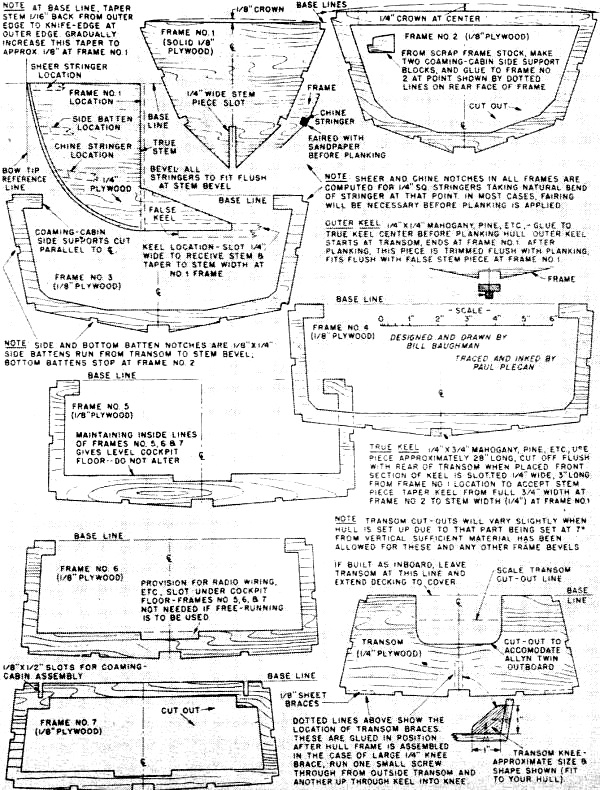
With the preliminaries out of the way, let's get to building. To assure a true
hull of this size when completed, the removable jig shown in plans is used; take
care in its construction and adhere absolutely to the measurements given as the
jig will determine the final result of your building.
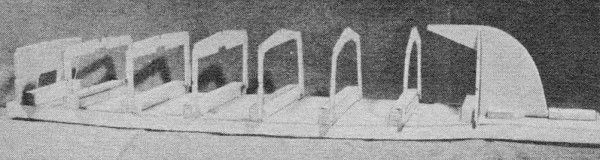
After cutting out all ribs, transom and stem from the designated plywood, these
are screw-fastened to jib-board blocks, blocks in turn screw-fastened to jig-board
(see photo #1). Now spring in all sheer and chine stringers, bottom and side battens,
fastening with Weldwood, Elmer's, or similar hardwood glue. It is good practice
to fasten to chine and sheer pieces to stem with a miniature screw at each stringer
if these fastenings are available locally (photo #2 shows construction at this stage).
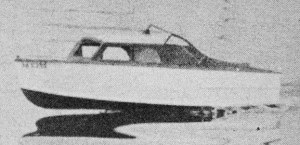
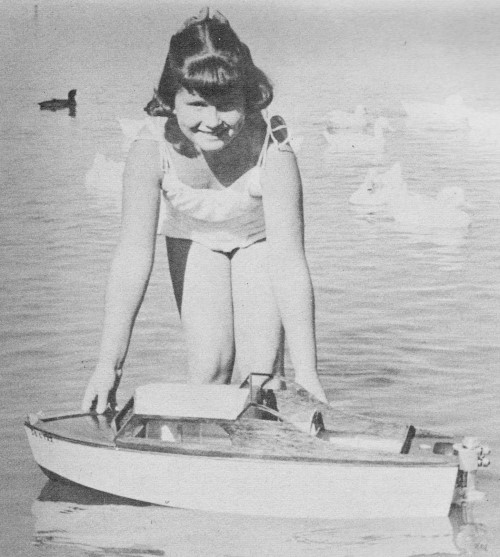
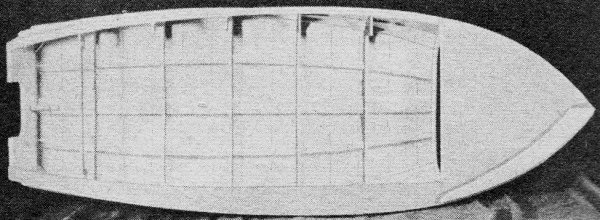
Big Twin underway.
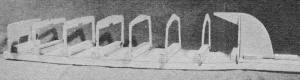
Photo #1 - With all ribs, transom and stem piece cut out and
set in place on jib-board, actual hull construction gets started.
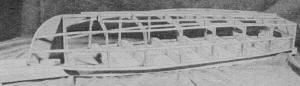
Photo #2 - Horizontal stringers in place, hull frame sanded and
faired, ready for planking. Keep careful check on rib spacing.
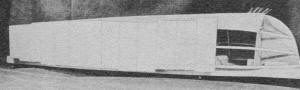
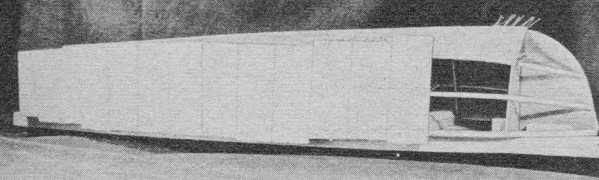
Photo #3 - Ease of applying sheet balsa planking obvious here.
Although Bill applied both sides and bottom at same time, better practice is to
follow article and apply sides, true up, then the bottom. Pins and Scotch Tape hold
everything while glue dries.
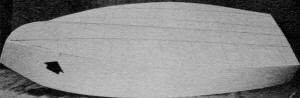
Photo #4 - Finishing final bottom planking "course," note penciled
marking along forward part of chine. As you apply bottom planking at this point,
change from over-lap to butt joint between bottom and side planking due to increasing
"V."

Photo #5 - Other than one last covering board and monkey rail
for port side, hull is complete. Monkey rail is placed flush with outside edge of
planking, sheer rub rail extends beyond.
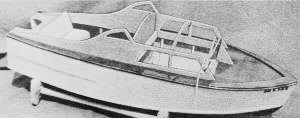
Photo #6 - Using rough-cut parts, removable cabin unit is built
in completed boat hull to assure accurate fit. Cord keeps lines correct as roof
beams are glued in place.
Using sandpaper fastened to a flat board approximately 12" long, carefully fair
up hull framework by sanding each side and bottom section full width at one time.
Working in this manner will give you the necessary bevels on the frames, at the
chine and other necessary fitting spots, will take out all humps and hollows and
allow the planking to lie flat on the framework.
Having a large quantity of pins and Scotch Tape handy and using the 1/16" sheet
balsa, start the planking procedure by gluing random lengths with grain running
vertical along each side, working both sides simultaneously. You will find this
will go very quickly and when completed and with glue dry it is a simple matter
to sand the side planking to conform to the bottom contour.
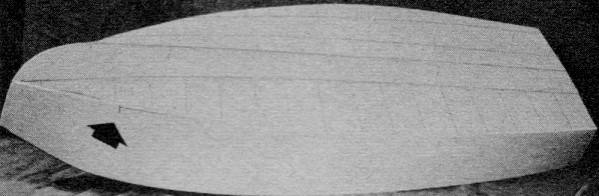
After gluing exterior keel in place, the first course of bottom planking can
now be fastened down, working both halves at same time as with the sides (see photo
#3). Sand off random bottom lengths to side contour and give entire hull a solid
sanding with a medium paper to secure a good, true base for the final course. This
is applied in the same manner as the first, laying the balsa strips with grain running
lengthwise with the hull, however (see photo #4). As all ribs have a straight bottom
configuration rather than a developable curve, it will be necessary to use fairly
narrow strips to plank the forward one-quarter of the hull bottom. Now a final dressing
down of the planking, sanding the exterior keel piece flush with planking, and hardwood
false stem piece installation completes this portion of construction.
When placing the false stem, you may find it necessary to steam the wood or make
numerous small saw-cuts on inside edge to obtain required bend. If you will take
the time and effort at this point to fibre-glass your hull from chine to chine with
Berkeley "Fib-Res" and model weight glass cloth supplied by this concern, applying
same according to their directions, you will have a boat that should be as strong
as any hardwood job and many times lighter.
The hull may now be removed from the jig by the simple process of loosening all
screws. This is a good time to build a supporting cradle to hold boat while completing
construction and later when running and storing it. Anything will do, the one shown
in the photos was made from scrap ply and an old round handle; supporting surfaces
well padded with heavy wool material.
With hull right side up in the cradle, it is apparent that sheer line is automatically
determined by designed rib tops and sheer stringers; a careful trim sanding down
to the sheer stringer line will bring the extended edges of side planking down to
a nice straight sheer. Before applying the front deck and covering boards, it will
be necessary to fashion and glue the front deck beams to Frames #1 and #2. The outlines
for these two parts are shown at top of these two frame patterns in plan.
Cut out the two half sections of front deck and glue into position; these will
be slightly oversize to allow trimming to your hull when in place. Small clamps,
nails or miniature screws will undoubtedly be needed in this fastening operation.
As the monkey rails will cover the section of the deck at sheer edge where application
of temporary fastenings will be necessary, the removal of these fastenings after
glue has dried will not mar the final result.
The side covering boards come next and cardboard patterns can be taken roughly
from the plans. As all hulls will vary slightly in construction, check pattern thus
made to your hull before cutting the wood. Glue on covering boards, sand outside
edges of these and front deck to angle of side planking and then apply the mahogany
sheer rub rail at this point flush with top edge of deck and covering boards. The
center rub rails can now be installed where shown and the chine splash rails along
the chine line.
If you have fibre-glassed the hull, use the resin as glue in this operation,
otherwise regular glues are okay. The making and installation of the two monkey
rails on forward deck completes actual hull construction (photo # 5 shows this stage).
So that the R/C hound will have room enough to work with both hands on the control
gear, the entire rear deck, cockpit area and cabin are built into one removable
unit. While patterns are given for the parts of this unit, to assure a perfect fit
it is best to build the unit in your hull. Cut out the cabin sides, rear deck, seat
and seat back, removable section of cockpit flooring and rear cabin bulkhead as
a start. Test fit these main parts and the reinforcing pieces of hardwood used at
bulkhead, rear of front deck section, and rear seat area. Glue up these parts, being
careful not to glue to hull. You will undoubtedly find use of light cord necessary
to hold side sections in position while drying (see photo #6).
The two cabin roof beams come next and before gluing in permanently, lay a straight
edge across the bulkhead top and the two roof beams to check proper height. The
cabin front supporting brace is glued to reinforcing hardwood piece at rear of front
deck, after which the two cabin front sections can be fitted and glued. You will
find it necessary to bevel all four edges of these two parts if a proper fit is
to be secured - the patterns provide enough extra material to do this.
The cabin front patterns show the front ports per the pilot model; should you
not want ports at this location, or perhaps something different, now is the time
to decide and make your cut-outs before gluing these parts in place. The 1/8" balsa
roof can be applied by gluing on strips approximately 3/4" wide. Use sandpaper to
trim the front, side and rear bulkhead contours.
From mahogany scrap pieces, make up the flying bridge windshield brace and cross
pieces and glue in place. If desired, plastic or light-weight glass can be attached
to rear side of windshield frame as well as all cabin port openings later. Use of
blue-tinged material helps create large-boat illusion and hide radio gear placed
in cabin.
Before finishing the detail on the cabin unit, it is best to install the two
permanent cockpit flooring pieces and the two permanent rear bulkhead pieces. These
must be fitted to the hull and removable unit while in place and then glued to hull.
Small scrap gluing pieces may be utilized where necessary in this step. Build the
pilot seat, cut out steering wheel or rustle one up, make kick strips, but do not
install until boat is painted.
You should now be able to separate the cabin unit and hull and be ready for the
painting. A boat of this size, type and use is best treated as a full-size craft
when finishing.
Stain and fill all parts to have a natural wood finish with a good grade of mahogany
filler-stain and follow the directions on the can explicitly. If you have used the
woods designated, the complete decking, cabin sides and front, seat back, windshield
framework, and covering boards can receive this treatment. Using a good spar varnish,
give this stained wood at least five thinned coats, sanding with fine paper or cutting
with fine steel wool between coats.
When the varnish has reached a glass-like finish and has set up - and be sure
this is the case - mask it all off with masking tape and newspaper and start with
the paint. If a little of the stain and varnish has run over onto the area to be
painted, don't worry as the paint will cover. Now if the hull has been fibre-glassed,
get the special fibre-glass primer-sander available at all boat shops; if you are
using the wood hull only, regular auto primer-sander for auto synthetic enamel is
fine. Use a spray gun if at all possible.
On hull exterior, with the first application of the primer-sander, it is sanded
with wet-or-dry sandpaper of fine grade and the alternating painting - sanding process
continued until a perfectly smooth base is obtained. The finish glossy auto synthetic
enamel coats are next applied, two with very light sanding between should do fine.
Please note that the paint referred to is auto synthetic enamel, not ordinary house
enamels. The hull interior does not need the sanding but be sure enough material
is applied to protect against fuel, oil, etc. Painted portions of the cabin unit
receive same treatment as hull exterior, giving a glossy finish when completed.
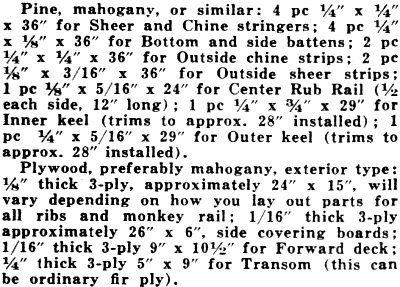
MATERIALS LIST FOR HULL
Miscellaneous small fastenings called for in plan, Weldwood or Elmer's Glue,
etc. If hull is double-planked with sheet balsa, some 1590 square inches of 1/16"
material will be needed, single planking would call for approximately 1/2 that amount.
To fibre-glass this hull, secure the regular Berkeley Model. glassing kit consisting
of 1 square yard of glass cloth and sealed can of enough resin and hardener to process
that quantity of cloth.
As to color scheme, let your conscience be your guide; the pilot model has white
hull inside and out, red bottom to chine line, buff cockpit flooring, blue seats
and cabin roof, red steering wheel. Naturally masking tape should be utilized for
any color change.
To complete the model, the mahogany kick strips, pilot seat, and steering wheel
are glued in position. Commercial fittings such as bow lite, flag pole socket, bits
and cleats as well as numbering decals can be obtained from your hobby dealer, if
desired.
 Other than providing for the radio installation
in the design, it is futile to attempt to cover that in detail here. The R/C builder
will have his own ideas anyway! It should be pointed out, though, that the arrangement
of this boat contemplates the placement of radio gear and batteries inside cabin
area of hull, with either a servo unit or escapement placed in rear deck area to
turn rudders or motor itself. With the rib cut-outs, the servo can be installed
up with receiver, operating a torsion bar arrangement leading under cockpit flooring
to motor area under rear deck, turning motor itself. Other than providing for the radio installation
in the design, it is futile to attempt to cover that in detail here. The R/C builder
will have his own ideas anyway! It should be pointed out, though, that the arrangement
of this boat contemplates the placement of radio gear and batteries inside cabin
area of hull, with either a servo unit or escapement placed in rear deck area to
turn rudders or motor itself. With the rib cut-outs, the servo can be installed
up with receiver, operating a torsion bar arrangement leading under cockpit flooring
to motor area under rear deck, turning motor itself.
Materials List for Removable Cabin Unit
Material for Jig board, together with screw-fastenings for same, usual pins,
Scotch Tape, glue, knife, finishing materials (preferably auto synthetic enamel
paint), mahogany wood filler-stain, spar varnish, decals, trim hardware, race car
steering wheel approximately 2" in diameter, material for boat stand.
Big Twin R/C Outboard Motorboat
Plans Sheet #1

Big Twin R/C Outboard Motorboat
Plans Sheet #2
Full size plans for "Big Twin" are on Group Plan #557 from Hobby Helpers, 770
Hunts Pt. Ave., New York 59, N. Y. ($1). {Note: These are no longer
available}
Posted January 19, 2022
(updated from original post on 1/23/2013)
|