|
Airplanes and Rockets website visitor Mike C.
wrote to ask that I post this article on Ken Willard's pair of pseudo-WWI biplane fighters - the Fokker
Heinschmitt and the Bristol Spadport. Mike built the Spadsport (after a CA glue
incident with the foam wings changed his initial plan to build the Heinschmitt)
back in 1974 when the article first appeared in American Aircraft Modeler, and means
to build the both of them this time - four decades later now that funds are flowing a
bit more freely. A vintage OS Max FP engine will provide power - just like on the
originals. Hopefully, he'll send a photo or two of his completed models for posting
here. The foam wings came from Ace RC and had a 35" span with a chord of 5.5". The
airfoil was semi-symmetrical. Both tapered and constant chord types were available;
these use the constant chord variety.
The eBay store that once sold
Ace RC foam wings seems to be out of business now. Fortunately,
visitor Mike C. let me know of a laser-cut
Ace RC balsa
rib kit (w/dihedral brace) being sold by the Balsa Workbench folks. You still
need to supply the spars and sheeting. At the time of this posting the price is a
mere $10 + shipping.
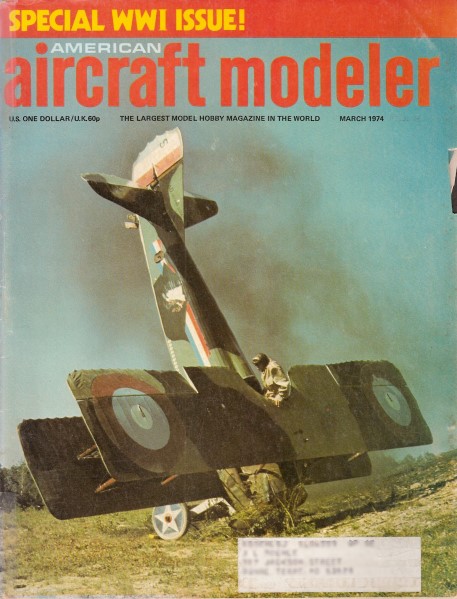
Sunday Fighters
Ken Willard
 During the summer of 1973 I was trying to think of something different
and exciting for the second annual WWI Western Front Jamboree, sponsored jointly by American Aircraft
Modeler and the Pioneers RC Club of Sunnyvale. The year before, I'd made a hit with a little 24-in.
S.E. 5 powered with an 020. Tough act to follow. During the summer of 1973 I was trying to think of something different
and exciting for the second annual WWI Western Front Jamboree, sponsored jointly by American Aircraft
Modeler and the Pioneers RC Club of Sunnyvale. The year before, I'd made a hit with a little 24-in.
S.E. 5 powered with an 020. Tough act to follow.
 Curiously enough, I had been experimenting with Ace foam wings
while trying to develop a Sunday Glider. It turned out successfully and Ed Sweeney bought it for publication
in AAM. So I built another one, taking a little more care than I do when I'm testing initially. In the
process, I used four untapered Ace wings - two for the left wing and two for the right wing-and had
polyhedral with 3 1/2° both at the center and tip panels. Curiously enough, I had been experimenting with Ace foam wings
while trying to develop a Sunday Glider. It turned out successfully and Ed Sweeney bought it for publication
in AAM. So I built another one, taking a little more care than I do when I'm testing initially. In the
process, I used four untapered Ace wings - two for the left wing and two for the right wing-and had
polyhedral with 3 1/2° both at the center and tip panels.
Well, I had the left wing put together, then the right wing and was about to join them at the center
section. As I did, for one brief moment I put one above the other. Instant biplane! Looked like a set
of S.E. 5 wings all ready for rudder, elevator and motor control. Just the right amount of dihedral
to give good rudder turns.
That was it. Why not make a Max 10 powered Semi-scale S.E. 5 for the Jamboree? No, that wouldn't
quite do the trick. Gotta do better. Got it! Make two Semi-scale models using the same wings, but gussy
one up with balanced ailerons (fake), elevator and rudder, with a scalloped trailing edge on the wings.
Paint it red and make some German crosses out of MonoKote. Then, on the other, paint and decorate it
a la RAF, and make the wing tips and tail surface look a bit like the Bristol.
As a final touch, change the landing gear slightly, with both struts forward of the wing for the
German versions, and one strut extending back to the trailing edge of the lower wing for the English
type. Also, make some fake engine heads and exhaust collectors or louvres, just to change the front
end appearance. The rest of the design is common to both, except for cutting off a couple of inches
from the lower wing tips of the German version to give it the Fokker D. VII touch.
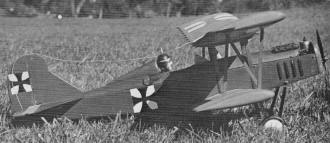
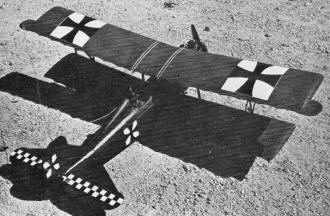
The Fokker Heinschmitt built to Sunday Scale. Louvres, dummy cylinder banks, pilot
(with scarf, natch) create the illusion of the great air war.
And thus the "Sunday Fighters" came to be. Now. what should I call them-individually? Well, the German
version looked a bit like a Fokker, or a Heinkel, or maybe an early Messerschmitt. So, let's call it
the Fokker Heinschmitt scale model. Absolute scale-one to one on the original. And the English job?
Well, there's a bit of Bristol, and maybe some Spad, and for good measure you might detect some Nieuport.
So, let's name this one the Bristol Spadport. Keep everybody happy.
Achtung! Come fight mit me!
In my Fokker Heinschmitt!
And what fighters they turned out to be! Fast, but not too fast. Maneuverable, but not tricky. Surprisingly
rugged, and a snap to repair compared to most. I know - in the Balloon Busting event, I missed the balloon
but hit the supporting string; it wound around the prop shaft and pulled the model over on its back
and into a dive into the ground. Snapped the cabane structure loose and broke a wing. With some five-minute
epoxy and 15 min. of work, it was back in the air for the next event.

The Heinschmitt attacks! Balloon Burst is the mission. Bomb drop (via cup strapped
to wing) has already been completed. Model offers the maneuverability needed for these fun events.
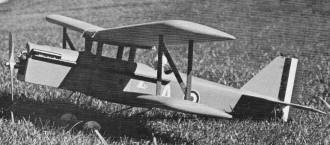
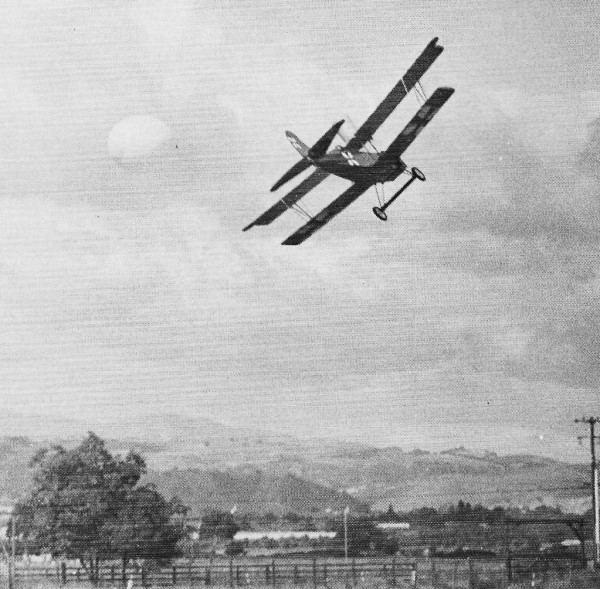
The Bristol Spadport has simple geometry which makes for easy building and finishing.
A natural for front line action on a Sunday afternoon.

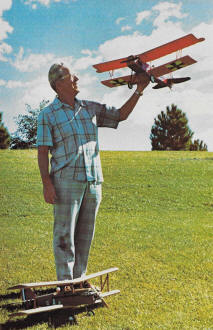
Willard's wonderful bi-winged thing (above) makes the metamorphosis to ... the Heinschmltt
(below).
You should see them take evasive maneuvers in Dog Fighting. Snap rolls into spins, even inverted
spins. And if you roll inverted and keep the speed up, you can even maintain inverted flight. Sure,
it will roll out if you let the speed drop too much. But I have to tell you! These Sunday Fighters are
the most fun I've had with power planes in a long time.
I say, old chap, let's have a go!
In my Bristol Spadport!
A word of caution. For best performance, keep the construction light. Use medium grade balsa throughout;
these are not big planes, and don't need the rock hard stuff. And don't go for the super finish - adds
too much weight. To paint the wings, I recommend that after you've sanded off the molding flashes (and
the scalloped balsa trailing edges on the German version), simply spray the surface with Testor's Spray
Pla Enamel. Hold the can about a foot away when spraying; if you get too close, it could "eat" the foam
slightly. And just apply enough to coat the foam with a uniform color. You can use the same spray for
the balsa surfaces, or use a similar color of Aero-Gloss fuel proof spray if you prefer. Don't undercoat
the balsa; it won't matter if the grain shows.
Now that I've given you the preliminary warning about keeping things light, let's talk about some
of the details of construction. There's not much to tell that isn't already apparent from looking over
the plans carefully. Just a couple of building hints is all you'll need.
Wings: For the Bristol Spadport, you hardly have to do anything. Paul Runge has
stocked a special set of "Sunday Wings" which have the dihedral pre-cut to give 3 1/2° in each panel.
Order a set (Catalog No. 13L6S) and when they arrive, simply butt join. them together at the center
and epoxy. If they don't match exactly, due to slight variations in the mold, make sure the bottom surfaces
match and let the to p be slightly out of alignment. It wont be more than a 1/16" at the most. But it
is important that the bottoms match to assure uniform incidence in both wings. Epoxy the 3/16" dowel
in at the TE.
Cut the wing tips and give them the slanted shape as shown; then round them to a smooth contour.
Presto! That's it-except for painting.
The Fokker Heinschmitt wings require more work due to the addition of the scalloped trailing edge
and the aileron overhang. But its easy. Sand the trailing edges flat and vertical, and they'll come
out about 3/16" high. Shape a strip of 3/16 x 1/2" to the scallop form; attach it to the trailing edge
with Titebond and, when dry, sand it to conform to the airfoil. The fake aileron balanced surface is
just fitted in place with Titebond after the 1/4" strip is added to the wing tip and shaped.
Tail Surfaces: These are cut from 1/8" flat stock to the shape shown depending on
which version you are building. Round off the edges and that's all there is to it.
Fuselage: This is a standard "box" construction with a hatch and "turtledeck" added on top. The plans
are self-explanatory, but there is a variation you can use if you prefer as I did on the first prototype.
The plans show a built-up hatch and turtledeck with formers and stringers. Since I was in a hurry, I
went a simpler although slightly more expensive route. I used a 1 x 3" block of very light grade balsa
and carved it to the shape of the hatch and turtledeck. Then I hollowed it out to accommodate the tank
and also to reduce weight. The turtledeck was glued on permanently with the hatch held in place by running
a small rubber band over it from one side to the other. Simple and quick.
Up forward in the engine compartment, 3/16" doublers are added to the sides and bottom between the
longerons for strength. Nose-overs are common with all WWI fighter type models because of the high landing
gear.
Note the down thrust and side thrust which is built into the firewall. The amount shown is a good
average, but you may find it varies slightly with individual models. That's always true.
The nose block is shaped and hollowed to fit your engine. Although it can be permanently glued in
place, I preferred to make mine removable for ready access to the engine and to ease the cleaning of
the compartment. To keep it on in flight, a couple of small screws can be inserted in the two sides,
and a rubber band stretched between the screws and in front of the nose block. Align the block simply
by pinning it in place with a couple of T-pins - or if you prefer, use a couple of short 1/8" dowels
which fit into aligning holes.
Engine mounting is also a matter of choice. I used a Tatone mount that I've had around for years;
that makes it easy to vary the thrust line as needed. In my prototype, I installed the firewall with
no down thrust or side thrust, and through flight tests added the necessary number of washers behind
the Tatone mount to get what was needed. It turned out to be approximately as shown on the plans; so
rather than make you go through all that, the down and right thrust is built-in.
The cabane structure is simple, but you must be careful to assure that it is properly aligned. You
must not only have the right incidence, but it must be the same on both sides. Best way I know to do
that is to epoxy the vertical members in place; then lay the fuselage on its side over the plans and
carefully epoxy the right-hand wing cradle to the uprights, making sure it is lined up. Then epoxy the
left-hand cradle in place to match. Double check the alignment by measuring the distances from the top
longeron to be sure they are uniform.
The plans show short lengths of paperclip wire epoxied to the wing cradles to retain the wing rubbers.
Here again, if you prefer, cut the wing cradle out of the 3/32" plywood with a little knob on it, rather
than adding the wire. Frankly, I didn't think of that until after I had mine assembled.
Although it is not necessary, I did add strips of 1/4 x 1/16" wing seating tape to the top of the
wing cradle and to the bottom of the fuselage where the lower wing fits. Helps to keep the wood from
cutting into the foam wings when the rubber bands are tight.
Back at the tail, note that a piece of 1/16" plywood is glued to the bottom, to provide a stronger
surface for the tail-skid mounting. Be fairly generous with the epoxy when attaching the skid - it gets
some pretty rough side loads at times.
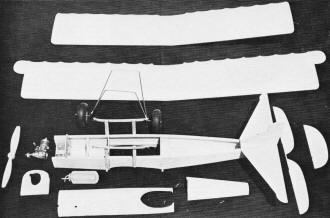
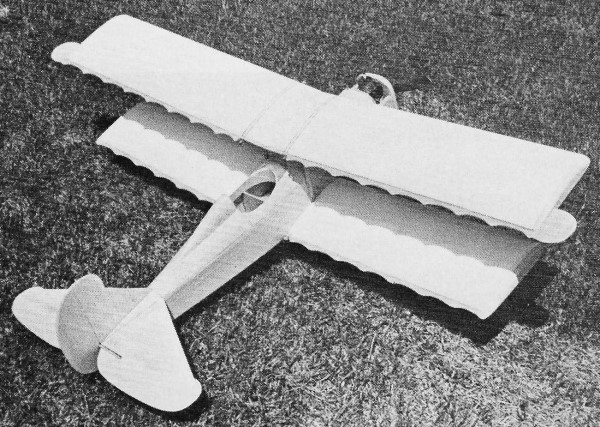
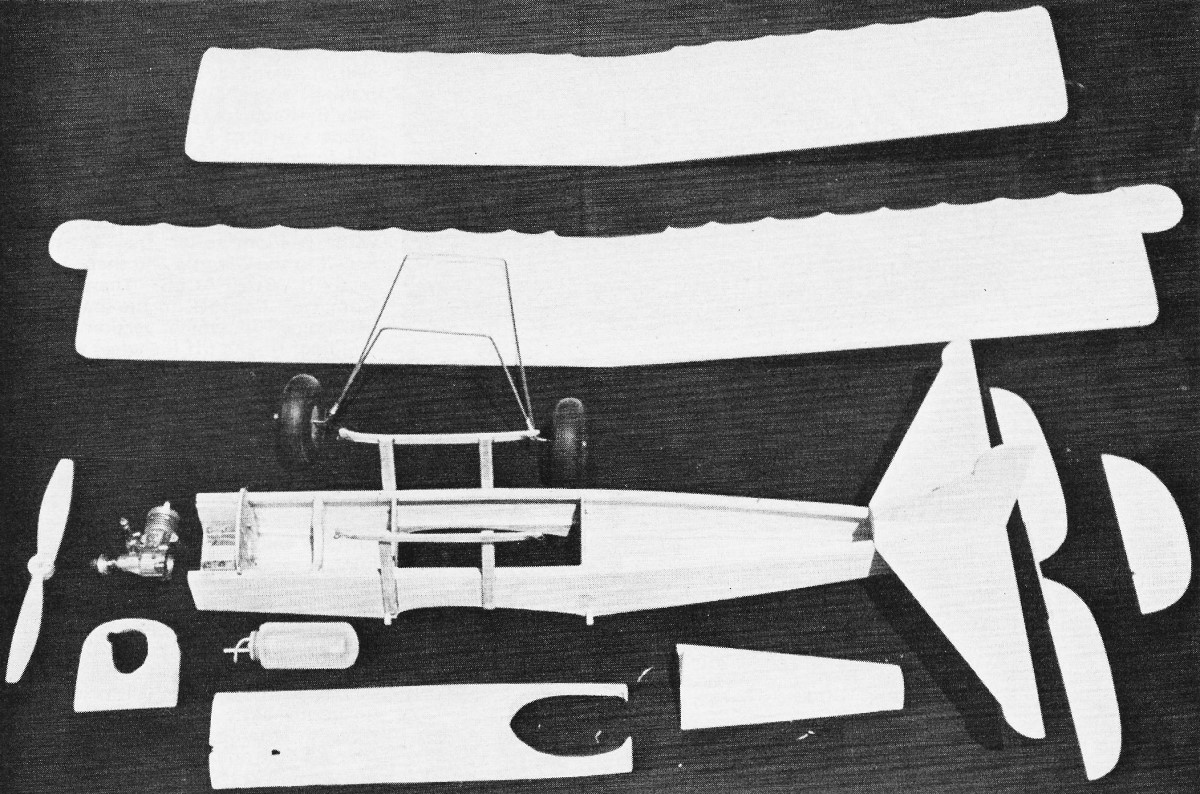
A weekend project to spawn a Sunday Fighter. A box fuse, two foam wings and you're
on the way to instant nostalgia.
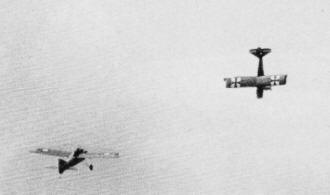
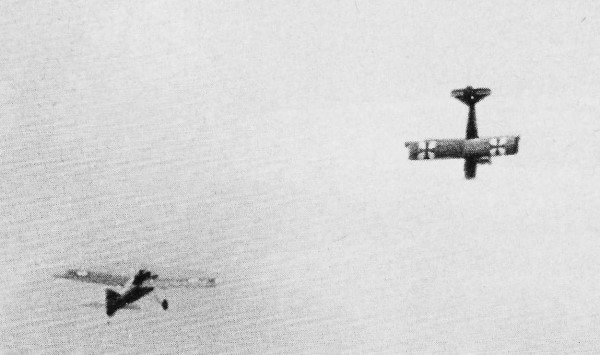
The Hun in the sun at the West Coast WWI Jamboree. Heinschmitt get the upper hand
on a Sauliner in the Combat event. (Photo by M.B. Groves)
Landing Gear: This is the usual wire bending job, a little tedious but not too hard.
Wheel alignment is easy since an axle is used. The "sub-wing" spreader bar between the wheels is shaped
from 1/8" balsa sheet and epoxied right to the axle. No need to imbed the axle - you can't notice it
from five ft. When attaching the landing gear, use individual rubber bands at each attachment point
where the 3/16" dowel protrudes. This reduces the stresses which are imposed during ground loops and
hard landings. The MonoKote "fairing" is just trim strip, cut and folded over the wire and then stuck
to itself. Looks OK from five ft., and isn't always breaking off. Good example of KISS-Keep It Simple,
Stupid.
Wheels are Williams Brothers 2 1/2-in. WWI scale type.
Interplane Struts: Here are some other examples of KISS. Make struts from coffee
stir sticks cut to length and epoxied together. The length will depend on whether you build the German
or Allied version, since the former slant inwards slightly. Placement is not critical; in fact, you
don't need them at all but they do add to the appearance. Locate them about five in. from the tip of
the top wing of the Fokker Heinschmitt and four in. from the tip of the lower wing. On the Bristol Spadport,
above five in. on both wings is OK. It isn't critical.
To hold them in place, the T-pins are first stuck into the lower wing; then the upper wing is lowered
into place on the cabane cradle and the pins stuck into the lower surface of the top wing. I did find
that, when doing violent maneuvers, it was necessary to stretch a small rubber band around the wings
at the strut line, otherwise the flexing of the wings would permit the pins to become dislodged. But
you can't see it in flight.
Equipment Installation: Shown is a simple method of installing small servos using
servo tape. It works well, but if you are one of the modelers who doesn't care for servo mounting tape,
it's easy to add a couple of cross braces for servo mounts, I happen to like mounting tape. There's
enough room for almost any of the current small size servos.
Flying: The Sunday Fighters are really nothing more than sport free flight models
with radio control added. Properly trimmed, they could be flown free flight using a good hot 049. With
three-control radio, however, they are about as much fun as you'll find.
A word of caution. I cannot honestly say that they are good models for beginners to fly, even if
they are excellent for beginners to build. They are very responsive to the controls and because they
are small, the response is relatively quick. But any sport flier who has flown an Ugly Stik or any of
the other simple trainers will have no trouble with the Sunday Fighters. Arrange the control linkages
so that you get about 20° of throw in either direction - maybe 15 if you think you are a little
slow on the uptake, and get used to the response. Then, if you want, you can increase the throw to 25
or even 30°, and watch out! You'll put on the wildest show in your life. Get a fellow modeler to
build one version, you build the other, and go up for some Sunday fighting!
Achtung! Come fight mit me! In my Fokker Heinschmitt!
I say, old chap, let's have a go! In my Bristol Spadport!
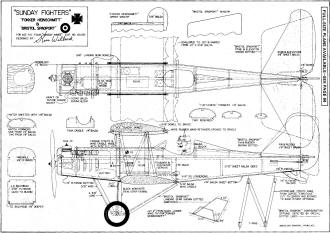
Fokker Heinschmitt and the Bristol Spadport Plans
Posted December 18, 2015
|