|
At the request of website visitor Tony L., these plans
and article for the Lil' Rebel control line racer, by Bill Cohen, were scanned from my purchased copy
of the May 1972 American Aircraft Modeler magazine (page 36). A lot of experience went into the details
of this design. Plans for this fine model were drawn by John Penhallow. All copyrights (if any) are
hereby acknowledged.
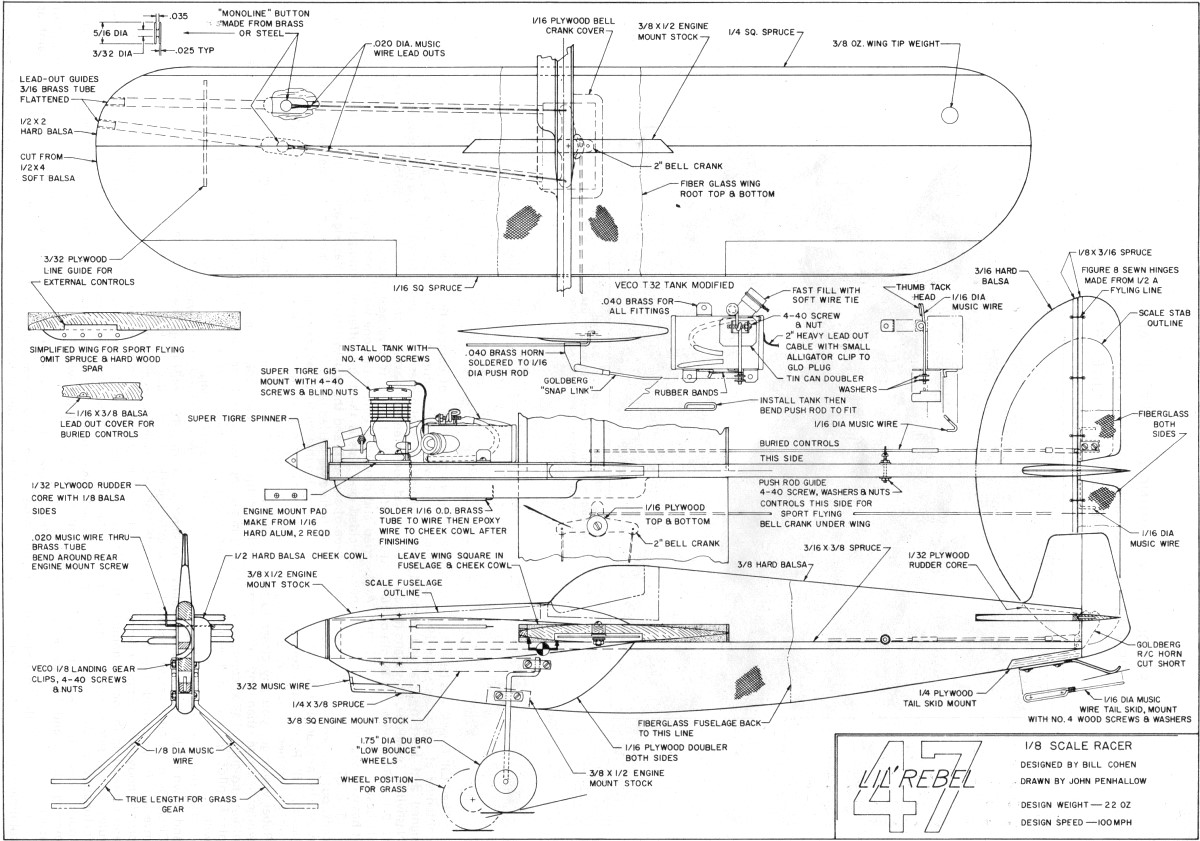
Lil' Rebel
FREQUENTLY WINNING GOODYEAR RACER USES PLENTY OF FIBERGLASS AND HARD WOODS. IT IS THE RESULT OF EXPERIENCES
WITH NINE PROTOTYPES. 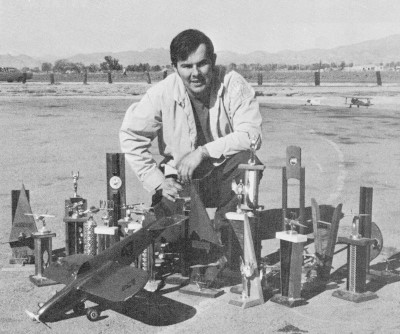 The "Lil' Rebel" has
been a frequent contender at the races since 1949. Designed and built by Garland Pack of Nashville,
Tennessee, this plane has a 17 ft. 2 in. wingspan and a length of 16 ft. Its best average speed is 191 mph.
And it has won over $10,000 in prize money. The "Lil' Rebel" has
been a frequent contender at the races since 1949. Designed and built by Garland Pack of Nashville,
Tennessee, this plane has a 17 ft. 2 in. wingspan and a length of 16 ft. Its best average speed is 191 mph.
And it has won over $10,000 in prize money.
The 1/8 full-size model hasn't won a cent, but has
brought home some hardware. In a year and a half of active racing, Lil' Rebels have collected over thirty
trophies. However, building a Rebel won't get you any closer to the winner's circle than any of a dozen
other designs. It's a combination of plane, pilot, pitman, and engine that will. The first model
of the Rebel, built and flown by John Barr, a fellow Valley Circle Burner Club member, featured an inverted
fully cowled-in engine and a profile body. My teammate Jerry Dyer and I picked up the design, going
by the rules with a side mounted engine. Unfortunately we didn't have the "magic touch" when it came
to catching fast moving models, and they started coming apart. As a result, this machine is the
culmination of nine test models. It will stand up to the rigors of competition week after week and come
back for more. Structural weaknesses have been found and corrected and again retested. Four different
fuel systems have been tried and discarded before this one was decided on. This is the third different
type of shut-off, and the fourth version tried before we settled on it. Having trouble with
bodies cracking, wing breakage, not running regular? Then this setup is for you! Goodyear, or
"Scale Racing" as it is stated in the 1971 rule book, is among the more popular control-line events
- it had one of the highest number of entrants at the 1970 Nationals.
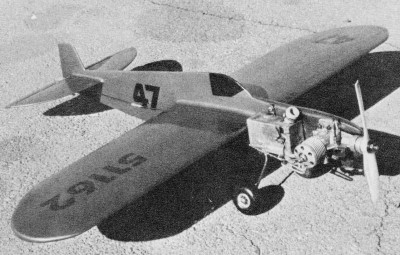 Carefully filleted
and epoxy painted to withstand high nitro fuels. Fuel system uses down-elevator shut-off=-a must for
serious competition.
Most of my information was gathered from old Air Trails magazines and Robert Hirsh, who has
the biggest collection of racing information I or "Wild Bill" Netzeband have ever seen. The stab area
is 25% of the wing area for stability. The cheek cowl has been extended back farther to cure an inherent
weak point at the wing-fuselage joint. The features which attracted me to this model were its
very small frontal area, long body for better handling in grass, non-tapered wing for ease of construction,
and because it came out to a 4-1 ratio on the aspect. A note before getting into the construction:
The rake angle of the lines has been based on a 22- to 24-ounce model. If you plan to forego the fiberglassing
and spruce and build below this figure, move the lead out tubes back 1/4 in. Construction
Head for your local hobby shop and pick up some 8-10 lb. stock 3/8 x 3 x 36" for fuselage,
8-10 lb. C-Grain 1/2 x 2 x 36" for leading part of the wing, and 4-6 lb. contest straight
grained 1/2 x 4 x 36" for the rear portion of wing. Throw in 3/16" balsa for the stab as well as the
spruce specified, motor mounts, rest of wood and hardware, and you are ready to begin. Use white
glue or Titebond for the motor mounts, ply doublers and all hardwood joints. I prefer to use polyester
resin for some building, especially on parts that have external seams. It doesn't impart any more strength,
but resin will not bleed through paint as other bonding agents will. Cut out the body halves,
glue together with the 3/16" spruce sandwiched between them (important if you want the body to stay
in one piece) and while that's drying, glue the two halves of the wing together, cutting to size, then
add the spruce leading and trailing edges. Next add the stab and elevators, adding the spruce as indicated.
On the body, glue motor mounts and hardwood inserts, adding ply doublers while they are still wet. Cut
out clearance needed for the bellcrank out of the wing spar, and insert in wing. Sandwich 1/32 ply between
two pieces of 1/8 as shown for the rudder, and you are ready for the controls. We use homemade
monoline buttons, making a loop in the airplane end of the lines to go over the buttons (details on
plan). If you can't or are unable to make them yourself, either use small clips in the wing, putting
in bigger lead-out tubes, and allowing an eyelet to go through, or run the bellcrank wires straight
out. (The speed difference is very small.) For the novice or guy who doesn't care to buy the controls,
hang them on the inboard side of the plane and install an extra control horn on the other side of the
elevator from which to run your shut-off wire. For the pros who bury the controls as shown, with
the pushrod hole on the outboard side of the plane, shut-off installation is a snap. Glue the
rudder and cheek cowl on the fuselage. Vibration is one of an engine's worst enemies, so use the hardest
piece of wood you can find. After everything is assembled and sanded and fillets are added (if
this is your preference), the fuselage from the nose to about 2" aft of the wing and about 3" on either
side of the wing are fiberglassed and resin is applied. This process will add many hours of life to
the model. The elevators are sanded and finished off the model and added when the model is completed.
Apply two coats of resin over the entire model followed by a light coat of auto primer and Hobbypoxy
paint as needed. I've found that Sig Epoxolite works the best for fillets. It will not crack at the
stress points, and paints adhere well to it. We are trying some of the "iron-on finishes," but
findings are not yet conclusive as to the durability or structural weaknesses involved. If you use dope,
be sure to apply a coat of clear Hobby-poxy over the entire model, otherwise the high nitros eat everything
up. Some teams still refuse to use a shut-off claiming unreliability. This one isn't! A shut-off
allows you to be the boss of where and when the model is going to be pitted. It also stops those end-of-tank
lean-outs that tend to blow plugs. The tank and shut-off construction are self-explanatory. The Veco
T-32 tank has a two-oz. capacity. This lets us bring the model down early in the race to refuel or correct
a bad needle setting and then run 75 or so laps until the end of the race without running out of fuel.
By pitting early, and getting a good one, you throw the other teams on the defensive and even if the
plug goes after the pit, it will usually run out the rest of the race. We use 40 to 65%
nitro, depending upon the day. Fuel formulae are useless because what is best will vary from one part
of the country to another. Find fuel (s) that will run consistently in your area and then stick with
it. As for plugs, it's a toss-up between K&B IL and Fox Heavy Duties. K&B's seem to
run and last better on cool, humid days, and the Fox's are good for dry, hot days. Here again, this
may vary from area to area. Find the combination that works best for you! So far the Supertigre
G-15 front intake is King. K&B is working on a new 15 which may change this. The G-15 as it comes
from the factory is right-on with regard to ports, timing, etc. It's the general fit between the various
parts that determines if it goes. For the filer who doesn't do any reworking, try to pick an engine
that has some end-play in the crankshaft and goes over the top of compression smoothly. Flying
Remember you, the pilot, and your pitman are a team, and it takes teamwork to win. The pilot's
job is to get the plane to the pitman quickly. And the pitman's duty is to catch, start and re-lease
the model as fast as possible. Here are a few pointers that may help you meet these goals: Insist
that the circle at a contest is marked according to the rules. This allows the pilot to have a frame
of reference and the plane will come to the pitman at the same place every time. The Lil' Rebel's
gear should be set up 15 degrees ahead of CG for pavement and 18 to 25 for short grass. In the case
of tall grass, the farther forward the better. The 1-3/4" DuBro low-bounce wheels take up the landing
shock on the pavement and will not dig into the grass and flip the plane. (If it does flip however,
the 1/32" ply in the rudder will prevent any damage.) Although these wheels have a large profile, we
have not seen any speed difference between them and the more streamlined wheels. On the hardtop,
an old Team Race trick is used. Bring the plane in full speed by cutting off above the pitman, putting
the model down about a 1/4 lap away from him and hauling full down which lifts the tail and acts as
a brake. If the plane goes over on the nose, the wire skid will take the punishment. Pilots
should keep the airplanes as low as possible except when passing. Flying high only eats up airspeed.
When overtaking and passing, try for as smooth and gentle a pass as possible, and then when over and
ahead of the other plane, dive to correct flying height. This allows you to pick up a little extra speed.
Watch the teams who are winning in your area, and then follow suit. They must be doing something
right, or they wouldn't be in the hardware!
 <click for larger version>
Notice:
The AMA Plans Service offers a
full-size version of many of the plans show here at a very reasonable cost. They
will scale the plans any size for you. It is always best to buy printed plans because
my scanner versions often have distortions that can cause parts to fit poorly. Purchasing
plans also help to support the operation of the
Academy of Model Aeronautics - the #1
advocate for model aviation throughout the world. If the AMA no longer has this
plan on file, I will be glad to send you my higher resolution version.
Try my Scale Calculator for
Model Airplane Plans.
Posted May 14, 2012
|