|
The Carousel is one
of those C/L model airplane designs that, after reading the description, you wonder how
it was able to flown to a first place finish at the Nats. It is full of oddball gadgetry
and implementation techniques, beginning with the twin boom configuration and a long
nose moment arm. The flaps are a 3-piece deal with the center section coupled directly
to the elevator bellcrank as is normal, but the outboard flap sections were controlled
independently by a weighted pendulum arrangement that was intended to adjust automatically
based on the direction the model is pointing. That, along with the pair of 90° bends
in the elevator pushrod that was prone to severe distortion under load, had to have made
control of the Carousel very difficult. The conclusion as to how the ship was flown to
first place has to be the superior piloting skill of Jim Vornholt. Imagine how good he
must have gotten once he could afford a better airplane. There is no doubt the Carousel
looks cool, but a modern day competitive stunt ship it is not.
Carousel Control Line Stunt Model
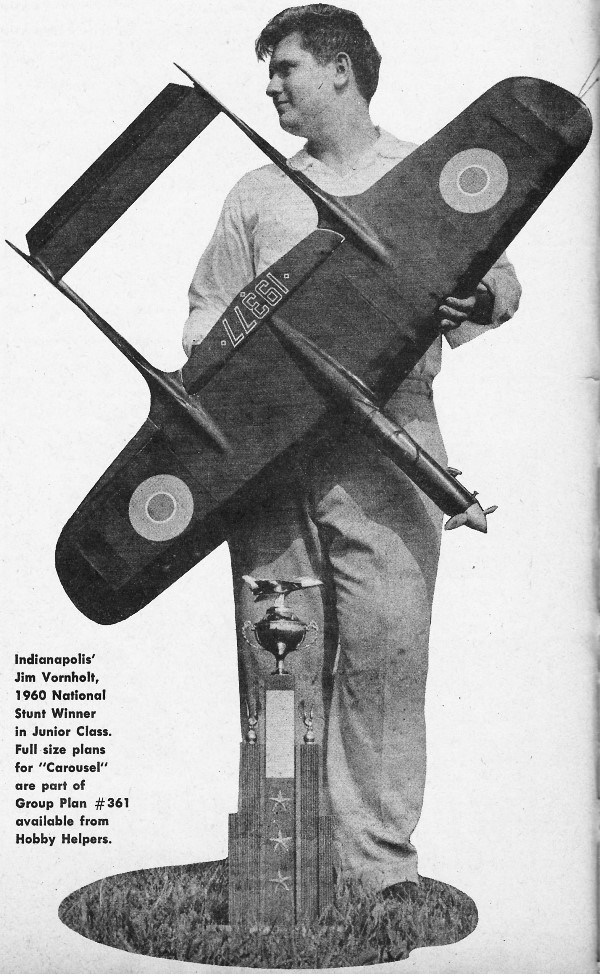
Meet the National Junior Stunt Champion and his winning aerobatic sensation ... "Carousel"
Introduction by the plane's designer, Charles A. Mackey

Indianapolis' Jim Vornholt, 1960 National Stunt Winner in Junior Class.
Full size plans for "Carousel" are part of Group Plan #361 available from Hobby Helpers.
Jim Vornholt lives within walking distance of the local flying field, so he found
it easy to become interested in modeling. We have many excellent junior fliers in the
Indianapolis area, and they all helped and inspired Jim as well as gave him some good
stiff competition. It took Jim about a week to persuade his mother to let him buy a ready-built
stunt ship from Lee Steinbrook. She gave her consent only with the understanding that
if he tore it up that was the end of it, and there would be no more model airplanes in
the house.
Jim accepted the terms, bought the airplane, and made many successful flights and
showed fast progress. Of course, the inevitable happened, he clobbered it. It's bad enough
to lose an airplane, but to think you will never be able to have another one - well,
who can blame Jim for a few tears.
Ward Rutherford and his sons, Rickey and Dennis, are friends of the family and fortunately
sympathetic model builders. They saw the crash and understood Jim's position so the repair
team swung into action by picking up all the little pieces, then headed to the Rutherford
workshop (formerly garage). A few days later the rebuilding was progressing satisfactorily,
when Mrs. Vornholt decided to visit the Rutherfords. The model was covered with balsa,
Silkspan, old rags and anything else handy while she was quickly maneuvered away from
the area.
Since then, Jim has learned to rebuild and has even designed a couple of stunt-ships.
He built a Lark in two weeks! Jim's mother now understands about stunt flying and crack-ups
and she has been a big help to him by driving him to meets when no other transportation
is available. This includes his trip to the 1960 Nationals. Mr. and Mrs. Vornholt are
proud of Jim and I don't blame them. He has gathered quite a collection of hardware,
flying his Me-109 mostly, but now he prefers his Carousel.
The twin boom designs do not fly better than the conventional designs, but they do
fly as well. The main advantage is their unusual appearance. The Carousel is mainly an
XP-design to test some new ideas.
The airfoil and nose gear were changed to improve the landings. The front landing
gear uses a torsion type set-up that improves landings on rough fields. Take-offs are
still limited by prop clearance.
The
stab and elevator were moved out of the slip stream. Theoretically, this should be an
improvement, but we don't believe it showed any advantage in performance. The biggest
problem was getting tight smooth control to the elevator. We did this by using the braces
shown on the plans, but had to pay for it in weight. If you choose to lower the stab,
mount it on wing or thrust center line and enclose control horn in hollow bottom rudder
fin on the out-side. This will lighten the design a little.
The third experiment was the weighted flap. The idea was derived from a free-flight
pendulum control in a British magazine. I never tried it because I was never troubled
by slack in my lines, and because I wasn't sure that would happen in a vertical climb.
The idea was discussed with Lee Steinbrook and he didn't think the ship would be affected
in vertical climbs, so he tried it on his ship. It worked perfectly, giving him line
tension on 70 foot lines at an exceptionally slow speed in dead calm air. When tried
on the Carousel, it worked well, but caused the wings to dip on the square maneuvers.
This was cured by cutting the flap weight down to 1/5 of an ounce.
How well any stunt ship flies depends on five things: 1) design; 2) power; 3) weight;
4) control; and 5) alignment. If a proven design with adequate power fails to fly properly,
it is due to one of the latter three mentioned above.
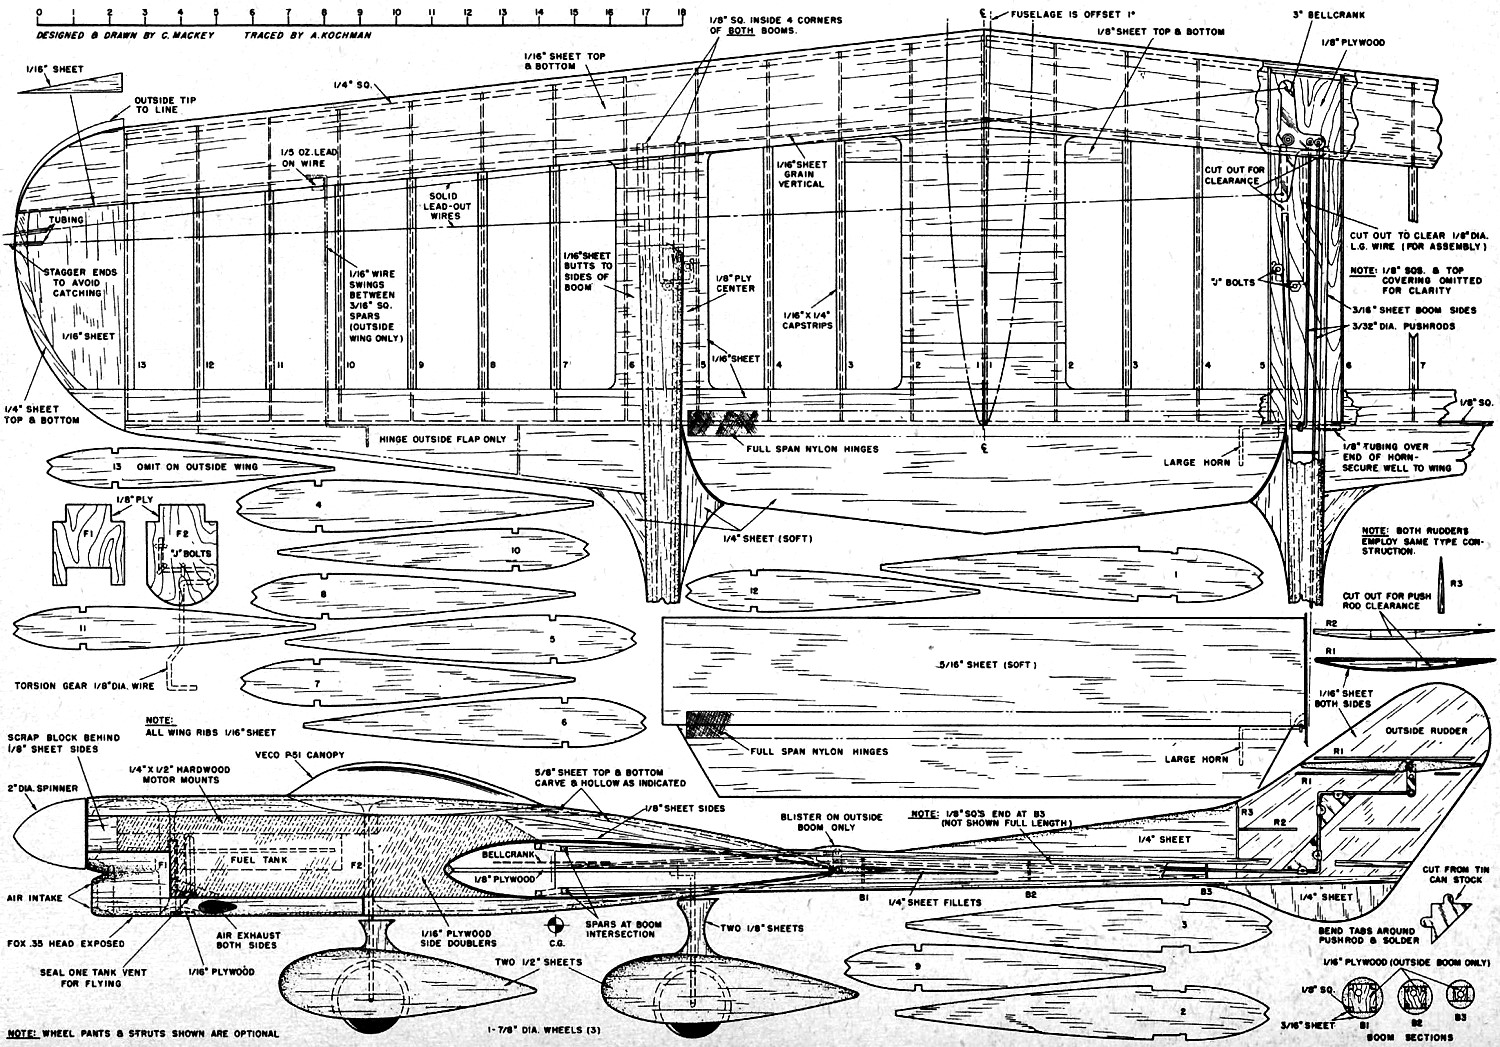
Carousel Bill of Materials
Lightweight balsa: eleven pieces 1/16" x 3" x 36"; (1) 1/4" x 3" x 36"; (3) 5/8" x
3" x 36"; (3) 3/16" x 2" x 36"; (4) 1/8" sq. x 36"; (2) 1/4" sq. x 36"; (4) 3/16" sq.
x 36"; (1) 1/8" x 3" x 36".
Three 1-7/8" dia. wheels; 7 "J" bolts; 1/16", dia., 1/8" dla., 3/32" dia. wire; two
1/4" x 1/2" hardwood motor mounts; 3" bellcrank: 2 large control horns; 2" spinner; 2
leadout wires; canopy; bicycle spoke.
Plywood, 1/16" thick and 1/8" thick; glue; plastic balsa; dope; sanding sealer; sandpaper;
covering material; nylon hinges.
The weight includes balance and wing loading. Balance plane as plans show, making
only slight changes to suit your flying style. You can build a light ship by using the
lightest wood available and still strong enough to do the job. Use just enough glue to
hold tight, and a thin finish. Almost all over-weight airplanes can be traced to heavy
or excess dope. It's not how many coats you put on, but how many you sand off that makes
a slick, thin finish.
Controls should be free, but snug. This is achieved by freeing each part of the control
system as you install it. Never wait until the ship is finished to test the controls.
If the controls are loose, tighten hinges and add braces to the pushrod where they are
necessary.
Alignment is very important! The wing should be warp free and parallel to the stabilizer.
One way to do this is by assembling the model over a flat surface. Measure l.e. and t.e.
of wing and stabilizer from the table. Block up the underside to hold proper position
and weight the top side to hold it firmly. Glue the ship and recheck alignment to make
sure the controls are working perfectly and allow to dry for about two days (if possible).
Build the Carousel wing in conventional manner. Install bell-crank, push-rods and
landing gears. Cut and glue together the sides and bottoms of the booms, leaving top
pieces off. Assemble inside rudder and the outside half of the outside rudder and glue
to booms. This leaves the inside half open to allow the elevator horn to be connected
to the pushrod.
Notch out booms for t.e. and slide between spars. To find the true position of the
booms, we measure from the table to center line of booms. Then block up. Connect elevator
horn to pushrod and secure stabilizer in place. Connect the wing flaps up and check all
controls. Make necessary adjustments and then glue booms to wings and stab to rudder.
Build the nose section and glue to wing, using the same method of alignment you used
on booms. Then finish up all the loose ends. Make the fillets from plastic balsa as plans
show. Sand to exact shape and fill all grain with sanding sealer. Sand smooth between
every coat. Use the type of covering and finish you prefer. We employ Silkspan.
The Carousel has been flown in high wind as well as dead calm air on 70 foot lines.
Sixty-five foot lines are recommended in windy weather. They seem to cut down on bouncing.
Jim doesn't like long lines on any design, so he flies his Carousel in a sixty foot radius.
Carousel Plans
Notice:
The AMA Plans Service offers a
full-size version of many of the plans show here at a very reasonable cost. They
will scale the plans any size for you. It is always best to buy printed plans because
my scanner versions often have distortions that can cause parts to fit poorly. Purchasing
plans also help to support the operation of the
Academy of Model Aeronautics - the #1
advocate for model aviation throughout the world. If the AMA no longer has this
plan on file, I will be glad to send you my higher resolution version.
Try my Scale Calculator for
Model Airplane Plans.
Posted December 3, 2016
|