Back
around 1975 or so, RC Modeler magazine ran a feature
on a design by Lee Renaud called the "Aquila." It had incredibly
graceful lines. Airtronics had not yet produced a kit for it, so I ordered plans and built one from
scratch. An unplanned landing caused its demise, but by that time a kit was available, so I purchased
and built another Aquila - it was a lot easier that way. It followed me to Robins AFB while in the USAF,
and there I eventually bought an ABS plastic fuselage to replace the beaten-up wooden one. I don't recall
what eventually happened to that one, but I think I sold it.
Video now available of 100' UpStart launch to a 15-minute, 1,232-foot
thermal flight!
A couple years ago, I bought an Aquila kit off of eBay, and then ended up re-selling it later. I
wish I hadn't done that because they are rarely seen. Plans are available now for the
Aquila; however, I really didn't want to cut out all those parts again. So, instead,
I decided to buy a Great Planes Spirit 2-meter sailplane
kit and "bash" is a bit to resemble the Aquila. The result is what you see in the photos on this page.
It's not an exact likeness, but the lines are definitely more graceful that the somewhat square Spirit.
I
have dubbed my new sailplane the Aquila Spirit, both to recognize the contributions
of both models as well as to suggest the intention to build a model in the spirit of the original Aquila.
Modifying the Spirit kit was not a lot of extra work, and the additional materials necessary are
minimal. For instance, the added curvature at the bottom of the forward fuselage was accomplished by
simply super gluing the die cut balsa back in place in that area, then cutting and sanding the new profile.
The exact shape is not critical - just get some curve in there. I also replaced the 1/8" square fuselage
edge balsa with 1/2" and 3/8" triangular stock to allow for more extensive rounding than what is possible
with the stock Spirit. The Aquila had a very rounded shape, more even so than what the Aquila Spirit
has. Photos are provided below.
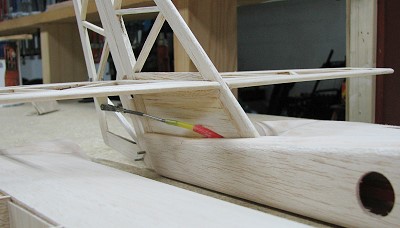
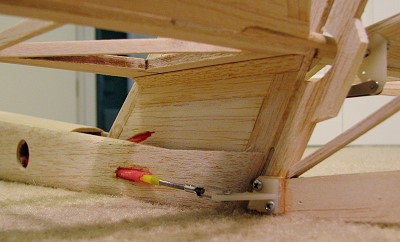
The biggest change is in the empennage area with the following changes. Photos are provided below.
Move the horizontal stabilizer/elevator up on the vertical fin rather being flush with the top of
the fuselage.
Change the rudder to sit between the elevator halves, and extend it to the bottom rear of the fuselage.
Change the elevator from the single, unbroken strip of tapered balsa to a built-up, split planform
with a dowel connecting the two halves on either side of the rudder.
Shorten the fuselage slightly to compensate for the empennage being shifted rearward.
Locating the horizontal
stabilizer on the rudder requires strengthening the vertical fin structure and attaching it firmly to
the fuselage, since it will be carrying the load of both control surfaces. These photos show what was
done. The vertical fin frame pieces extend to the bottom of the inside of the fuselage, being sandwiched
between the sides at the very rear, and by the top sheeting at the front. I used medium hard balsa for
those pieces for strength. Sullivan nylon pushrods were installed to accommodate the rather tight linkage
hookup.
I like to install the hinges prior to covering in order to avoid the hassle of trying to glue them
later without making a mess. To do so, I cut the clinched ends of the hinge pins, do the installation
and all the shaping and sanding, and verify bind-free pushrod movement. When it is time for covering,
the hinge pins are removed and control surfaces separated. Then after covering, I insert new straight
pins into the hinges and clip the excess with miniature diagonal cutters. The new clinched area will
prevent the pins from working out.
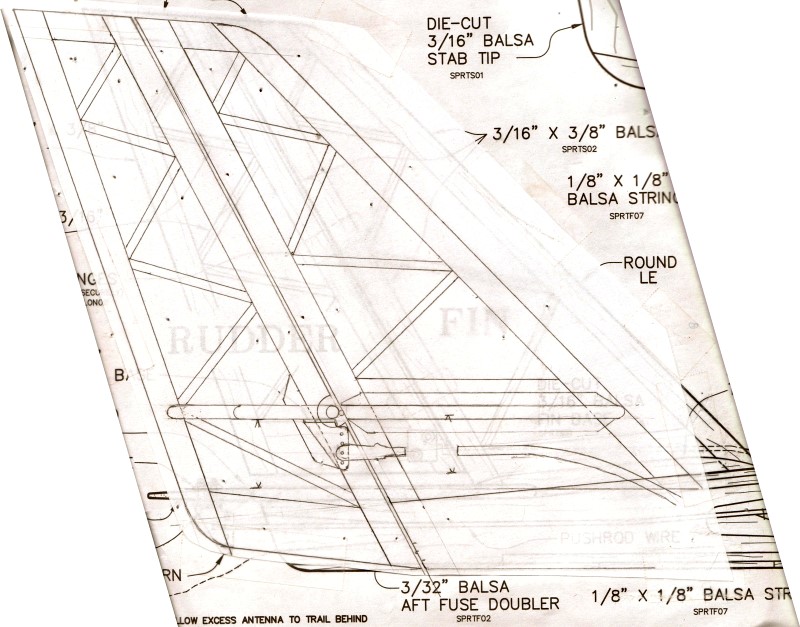
Here are the plan modifications for the empennage. The front vertical fin balsa stick extends down
to the inside bottom of the fuselage. The back stick is sandwiched between the rear fuselage sides.
Dimensions are super critical. You will find with the sizes I used that the control surface throws required
are less than with the original because more area is presented to the airstream. I deliberately allowed
the ghost of the original plans bleed through so you can compare the modifications to the original.
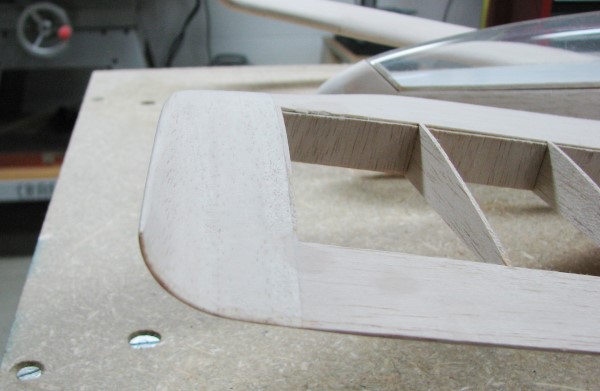
Of course, the
Aquila wouldn't be the Aquila without those nifty curved, upturned wingtips! Carving them is not all
that difficult, and since the both the inside and outside of the shape is simple (i.e., not complex,
only curved in 2 dimensions), even covering with Monokote is easy. If I recall properly, the original
Aquila used a piece of 1/16" wire along the thin edge for protection, but for the Aquila Spirit, I soaked
the finished edge with thin CA glue.
Photos of the completed airframe are given below.
Final weight, including 2.7 ounces of lead in the nose for balance, ended up at 33.7 ounces.
Great Planes says it should weight 30 ounces. The last 2-meter Spirit that I built as an unpowered glider weighed 31.5 ounces, but that was
with a one-piece wing (the plywood/aluminum joiner weighs 0.9 ounces) and it had miniatures servos.
Together, that about makes up for the difference. Any performance degradation due to the additional
weight will probably never be noticed, especially here in Erie, PA, where the usually windy conditions
benefit from a little extra ballast.
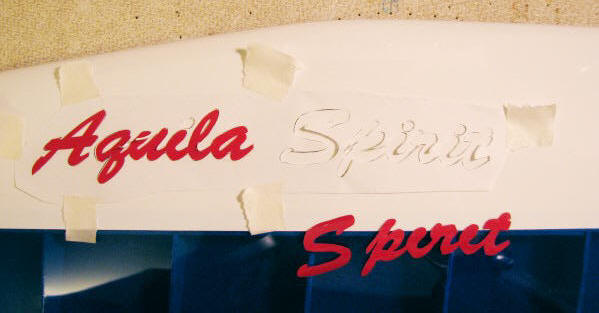
Finally, my method for making really nice lettering (and other
shapes) is shown to the left. I print out the letting on standard 20# paper and tape it to the Monokote.
Then, carefully cut through paper and Monokote to get the shapes. Take the paper stencil that results
and tape it in place where the lettering goes, then tack the letters in place. Use a low heat so as
not to make the file shrink. Finally, remove the paper and seal the letters completely to the airframe.
August 7, 2010, at the Erie
Tech Center (Summit, PA).
Thanks for reading!
About Airplanes & Rockets
Kirt Blattenberger
Carpe Diem! (Seize the Day!)
Even during the busiest times of my life I have endeavored to maintain some form
of model building activity. This site has been created to help me chronicle my journey
through a lifelong involvement in model aviation, which
all began in Mayo, MD
...
Copyright 1996 - 2026 All trademarks, copyrights, patents, and other rights of ownership to images
and text used on the Airplanes and Rockets website are hereby acknowledged.


 - Airplanes and Rockets")