|
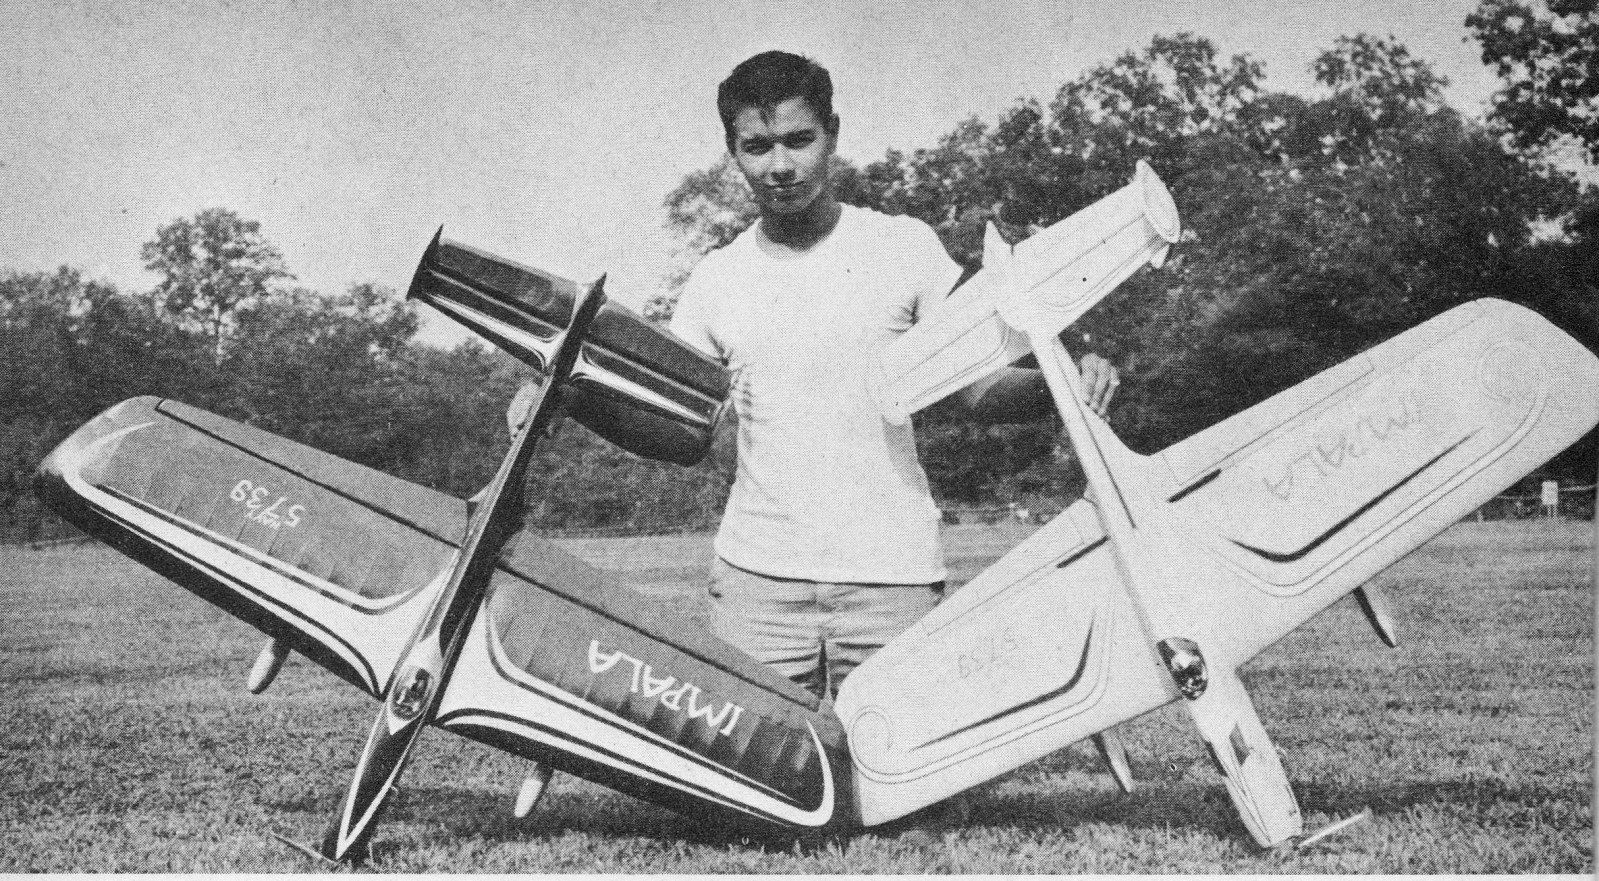
Eddie Elasick was all the rage
in Junior control line stunt circles (pun intended) in
the early 1960s. His Impala stunter design won him national fame, and the model is still
commonly built and flown in Old Time Stunt contests across the country. The 'triple-tail'
design and sleek lines that included wheel pants made it stand out amongst competitors
of its day. The Impala has a 54" wingspan and originally used a Fox .35 Stunt engine,
with a 3.5-oz. fuel tank. Flying weight was around 45 ounces.
Eddie Elasick's AMA Stunter "Impala"
Introduced by Harold L. Price
Described by Edward G. Elasick, Jr.
Former National Air Youth Champion presents outstanding control line stunt craft which
won Senior honors at '63 Westchester Flying Fair; Hobby Helpers has full size plans
Declares Harold L. Price (AMA 33129):

"The trouble with stunt today is these kids are getting too darn good. I've been talking
about this for the last three years, and seventeen year old Edward George Elasick of
Passaic, N.J., is one of the main subjects of my conversations.
""How in the world could anyone get that much experience in so few years?
"Eddie and his whole family, Mom (Evelyn), Dad (Edward, Sr.) and Bruce, are members
of the Garden State Circle Burners, one of the most active clubs in the country. The
club has its own permanent flying field, a real attraction to anyone who has been chased
out of other local fields.
"In 1960 Eddie Junior brought home his first trophy in Novice Stunt. This was a 4th
of July contest in Ridgewood, N.J., not an official AMA sanctioned meet, just a local
affair, but all of the regular contest fliers showed up for the fun. It was a big day
for Eddie since he also won Novice Combat. Two trophies in a single day is starting off
with a bang.
"Eddie advanced from Novice rapidly. He built all of the available kits on the market,
and with each one his building ability improved. Mr. Elasick cooperated most at this
stage: the kit, engine, and dope for a precision model can easily run quite a few dollars,
that's where most juniors run out of gas.
"In flying Eddie had real success in Junior events, getting in the top three at all
the meets. He took the N.Y. Mirror Meet in 1961 in Junior. Soon thereafter he won the
state Air Youth contest over good competitors.
"It was no surprise to me that he also won the National Air Youth crown for he had
developed real poise and ability. However, his regular contest job failed to win him
the Junior National Championship in the regular flying and it was then that Eddie decided
to begin designing something of his own. This was to be his first full size stunt job
and he put a lot of thought into the design. This is where his kit building days really
paid off. Although the final design follows the best established lines of today's stunt
models, that is where the similarity ends. A new airfoil, wings, and fuselage design
and the triple tails of the Constellation became the model to watch in 1962.
"The design has been proven, in the stiffest competition in years, already establishing
an outstanding record of wins. Week after week of contest practice and flying puts a
load on every part of a model, a real rough test. It seems there is never a contest where
the conditions are ideal, and an all-round capability is necessary in order to come out
on top.
"Eddie's contest attendance is after all the real reason he has done so well in the
stunt field. None of us can learn everything on our own, but how far we go on what we
learn is up to the individual.
Even if you are shown the right way time after time it is not enough if you don't
understand what you are doing wrong. The fact that Eddie corrected his mistakes when
shown a few times is both to his credit, and his teachers, who are the men he will soon
be competing against. All the little tips he picked up were sorted in his mind, the good
ones used, the others rejected, but he would always listen and think ahead.
"If you're interested in stunt, don't let yourself get in a rut; you have to see as
much as you can and then apply the knowledge to your own flying and building. Kits today
make it easy for a beginner, and believe me, there is a lot of real enjoyment in stunt
flying."
Impala description by Eddie Elasick, Jr.:
This plane was designed to do the A.M.A. stunt pattern to the book with plenty of
extra turning capabilities and perfect smoothness where it is required. The Impala can
do vertical eights and hourglasses under the 90° in a stiff wind and never loose
line tension because of its triple rudders. It does squares and triangles at the 45°
with 5 foot or less corners. When doing loops or horizontal eights it grooves like it
was being flown by an electronic brain.
The Impala has been tested in every kind of weather imaginable, from a dead calm to
a wind storm. It is an ideal contest ship as past results have shown. It catches the
eye of everyone who looks at it with its smooth streamlined look and its distinct three
rudders. In its first season the Impala took 10 firsts out of 11 contests and one close
second. These days with all the close competition, it's an honor to place within the
top three and there's very little difference in trophies. I don't think I have to tell
you anything else about the Impala because the results can speak for themselves. But
maybe you'd like to know it won the Senior event at the recent big Westchester, N.Y.
Flying Fair.
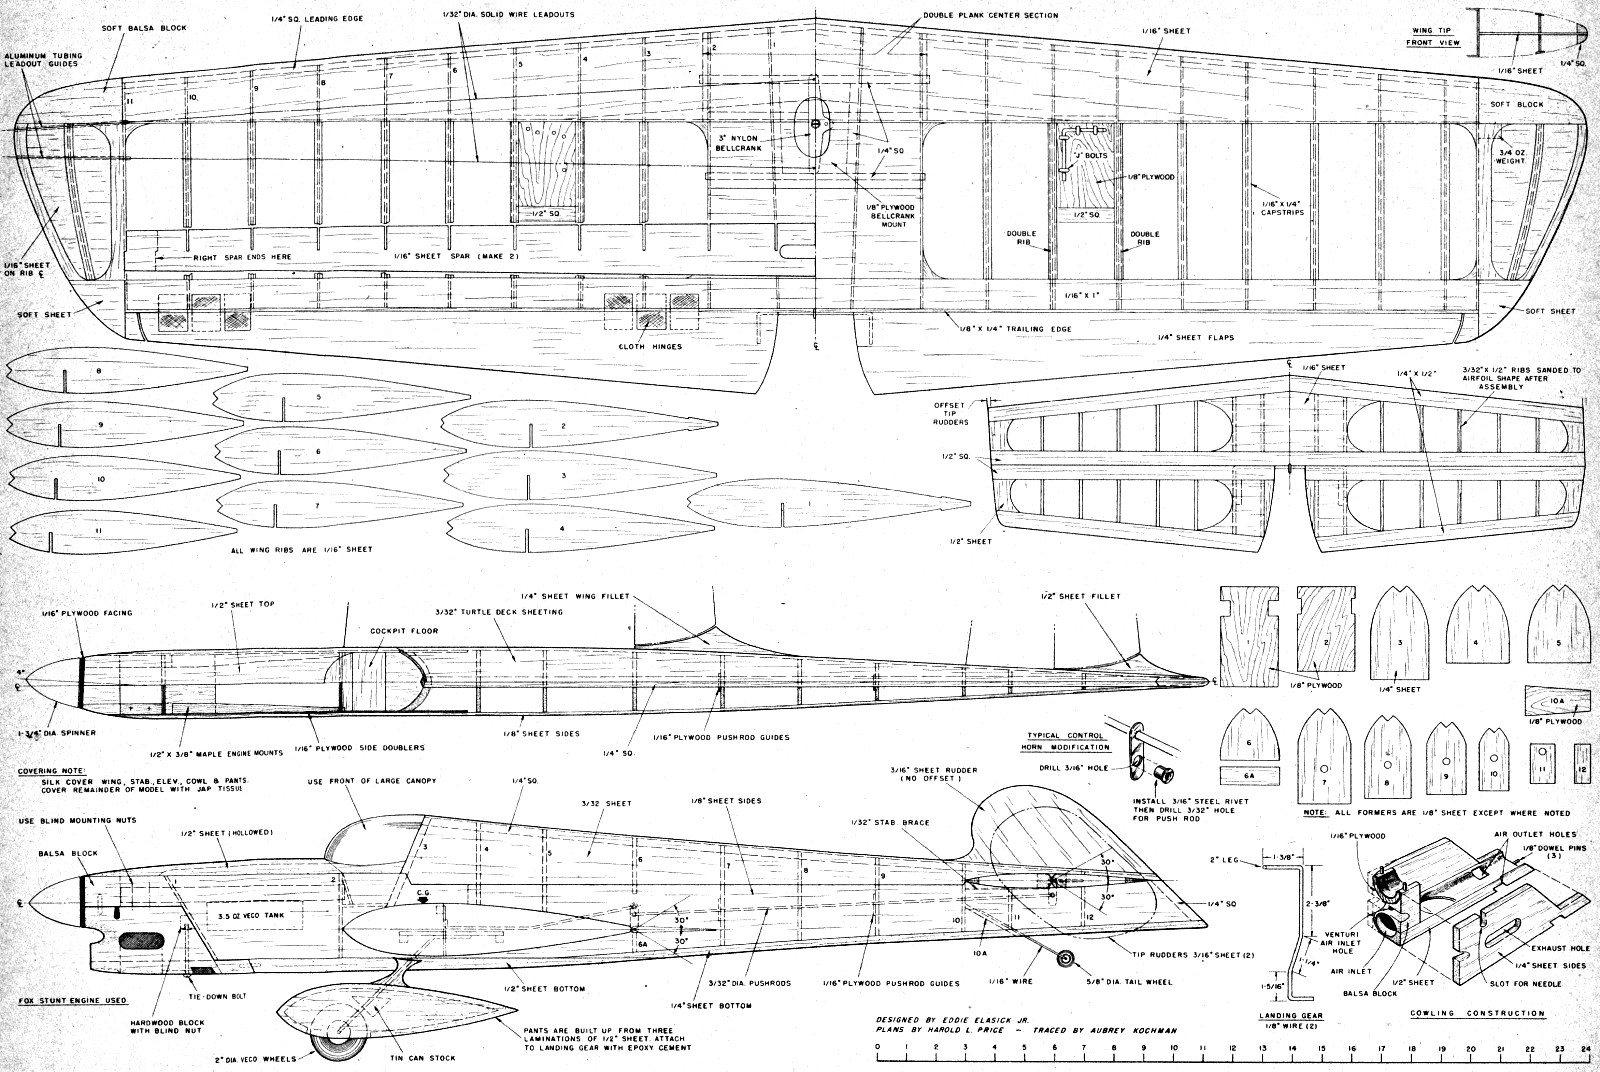
Construction ... Start with the lightest wood you can find. The weight
of the models that I fly are between 44 and 48 ounces but will fly well over 50 ounces.
Glue both halves of D-Tube spar together. Slide ribs on spar. Pin lower trailing edge
to flat board. Slide 1/4" sq. balsa bellcrank mount supports and center section wing
stiffeners into place. Glue all ribs to lower trailing edge and add 1/4" sq. leading
edge spars. Then glue upper trailing edge on to ribs. Pin securely and allow .to dry.
Glue 1/8" ply bellcrank mount into place. Install large Pylon brand nylon bellcrank,
lead-out wires and pushrod, Sheet first layer of 1/16" balsa sheet center section of
wing including wing ribs 1 and 2. Then sheet entire leading edge. Check for warps! Align
wing perfectly on board. Pin and glue D-Tube spar. Allow to dry overnight.
Sheet second layer of 1/16" sheet balsa section of wing adding rib caps, fillets and
the 1/16" vertical trailing edge stiffeners to increase strength and make trailing edge
warp resistant. Add wing tips, lead-out guides, and 3/4 ounce weight to outside wingtip.
Install flaps and controls assembly shown. For control that will last rivet control horns
on as on plans. Leave landing gear until later.
Block up with scrap the 1/2" x 1/4" edges of the elevator and stab. Drop 3/32" x 1/2"
strips into rib places. Sand to shape. Sheet center section of stab and inside ends of
elevators. Use light sheet for outside tips. Install control horn.
Cut out 2 fuselage sides and glue 1/16" ply doublers to them. Install motor mounts
and 3 1/2 ounce modified Veco tank. Install all formers and 1/4" sq. former spar. Glue
on nose block and tack glue bottom sheet and carve to shape. Untack bottom sheet and
hollow out and slide wing into body; install control hook up from flaps to elevator and
align wing and stab correctly with body. Pin and glue. Allow to dry several hours.
Install tail wheel gear and glue on bottom sheeting and turtle deck sheeting. Add
landing gear to the wing. Add center rudder and two tip rudders. Center rudder is at
zero degrees. Add all fillets and sand smooth.
Use 1/4" cowl sides and 1/2" cowl top block. Carve to shape. Make cutouts for exhaust,
air scoop for main part of engine and small hole to venturi. Add air vent holes and needle
valve hole and a hole for the head. Best method for holding on cowl that I have found
is three dowels and a tie-down bolt as on plans.
Use three pieces of 1/2" sheet laminated together and carve to shape. Add fairings
and attach to landing gear with epoxy cement.
The finish: Add pilot, cockpit detail and canopy. Cover canopy with
masking tape. Cover wings, elevator and stab with silk. Silk· cover cowl and wheel-pants.
Jap tissue the rest of the plane. Brush on 4 coats of clear mixed 50-50 with thinners.
Spray on a coat of colored filler: (1 part talcum powder, 1 part thinner, 1 part the
color of the finish and about 1/2 part of clear dope). Wet sand, apply a second coat,
wet sand carefully to remove every bit of excess and then apply a thin coat of clear
dope followed by the finish color, trim and clear top coat.
This finish will weigh from 3 to 4 ounces and will shine next to any finish anywhere.
Impala Plans
Notice:
The AMA Plans Service offers a
full-size version of many of the plans show here at a very reasonable cost. They
will scale the plans any size for you. It is always best to buy printed plans because
my scanner versions often have distortions that can cause parts to fit poorly. Purchasing
plans also help to support the operation of the
Academy of Model Aeronautics - the #1
advocate for model aviation throughout the world. If the AMA no longer has this
plan on file, I will be glad to send you my higher resolution version.
Try my Scale Calculator for
Model Airplane Plans.
Posted February 28, 2015
|